Apple Slab
Would a pie by any other name taste as sweet? Absolutely.

Date
September 6, 2010

Apple Slab.
Fairly rolls off the tongue, doesn't it?
CLUNK.
I doubt anything I've ever baked has a less compelling name. But truth be told, it wasn't the name that attracted me. It was an email from a reader wanting to re-create something his grandmother had made decades ago. And since I'm a complete sucker for old-time recipes, I took the bait.
This reader - I remember his name was Frank, though unfortunately I've long since lost his email – recalled “an apple pie baked in a rectangular pan, with a thinner than normal layer of apples and a white glaze on top.”
Hmmm, shouldn't be hard to figure out. Still, I wanted to find an “authentic” old-time recipe, something from, I'd guess, the first half of the last century.
Which I did fairly easily, simply by Googling “apple pie rectangular glazed.” Up popped Apple Slab, and I was off to the races.
Kind of.
So many recipes, so little time... Apple Slab had to wait its turn. Along with Persian Buns (deep-fried, glazed cinnamon rolls); Gooey Cake; yeast bread made from fresh-ground wheat; and Tarte Tropezienne, a specialty of Marseilles: a large, flat brioche split lengthwise and filled with pastry cream, glazed with a crackly vanilla syrup and topped with toasted almonds. Kind of a Bienenstich, but lighter.
Hmmm, speaking of Bienenstich – there's another one waiting in the wings.
Even when you work in the King Arthur test kitchen, there's STILL not time to bake everything on your “sounds good” list. But what fun we have trying!
Back to Apple Slab – which finally made its way to the top of the pile. The recipes I read were all incredibly basic; spartan, you might call them, as so many old-time recipes are. “Make a crust. Line with crushed cornflakes. Slice apples over. Sprinkle with sugar and cinnamon. Add top crust, bake till done. Glaze with white icing."
Yup, that was it. Bakers could easily follow a recipe like that 70 years ago. Now – not so much.
So I took those basic thoughts, and gave them a face lift, turning them into a 21st century-style recipe we can all follow, complete with ingredient amounts and baking times.
The result? An apple pie that transports easily in its 9” x 13” pan; readily divides itself into 2 dozen easy-to-plate servings (try THAT with a round pie); and is ridiculously tasty.
Frank, wherever you are – this one's for you. Enjoy!
Make your favorite double pie crust recipe, one that uses 2 1/2 to 3 cups of flour. I'm using my favorite here, our Classic Double Pie Crust.
Do you have pie crust phobia? Follow the step-by-step photos in our pie crust blog.
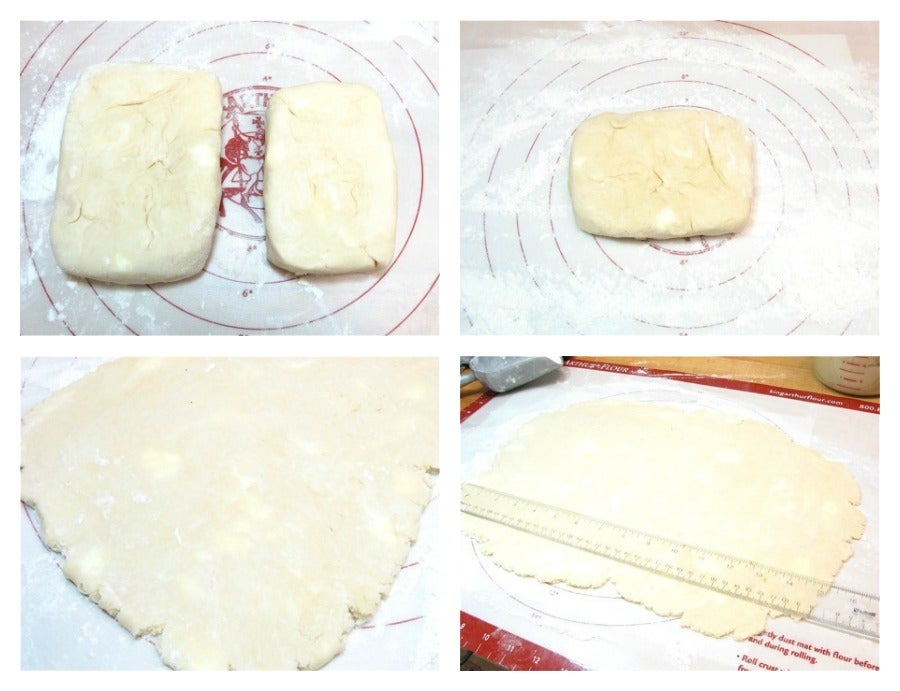
Divide the crust into two parts: one should be 3/5 (60%) of the dough, the other 2/5 (40%). This is easy if you have a scale. If you don't, eyeball it. Shape each piece of crust into a rectangle; you're going to be rolling them into rectangles, so might as well give yourself a head start.
Cover with plastic wrap, and refrigerate for 30 to 60 minutes, till thoroughly chilled.
Take the larger piece of pastry out of the fridge, and put it on a floured work surface.
Start to roll it into an 11” x 15” rectangle. See those light patches? That's butter. Those big “smears” of butter help keep your crust tender.
OK, that looks about right. Don't worry about the ragged edges; they'll disappear under the top crust.
Now we're going to move the crust to an ungreased 9” x 13”" pan.
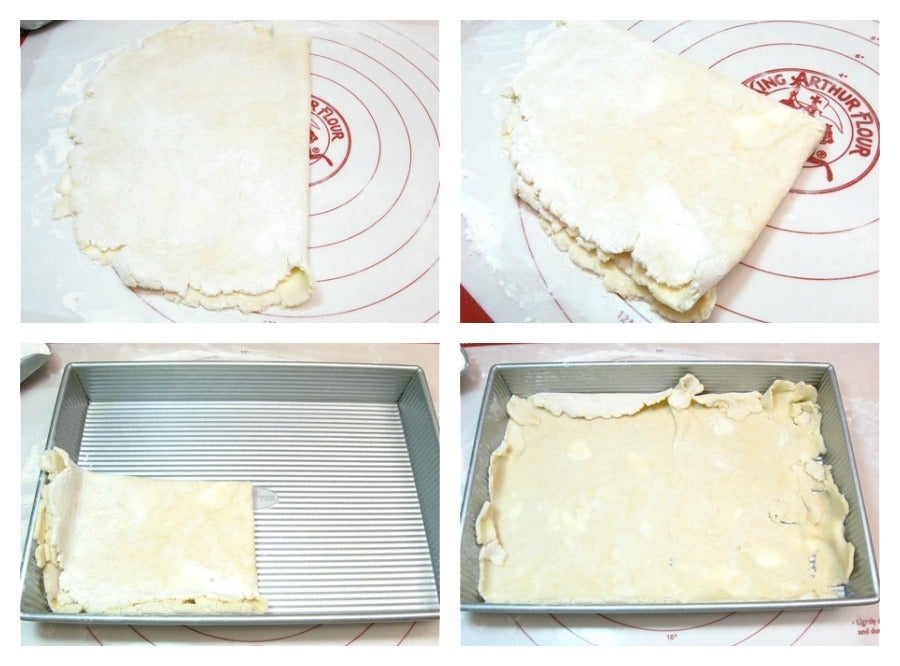
Fold in half, then in half again. Move to the pan, with the folded corner right in the center of the pan. Unfold.
Messy, huh? That's OK. Patch up the holes by pushing the pastry together with your fingers, or adding a pinch from the excess on the sides. Push the pastry up the sides of the pan a bit, to make a shallow pastry container for the apples.
Put the crust in the fridge while you get the apples ready. And start preheating your oven to 350°F.

Next, we're going to peel, core, and slice about 5 large or 6 to 7 medium baking apples. I've chosen Granny Smiths here, as our fresh local apples weren't in yet when I was testing this recipe.
An apple peeler/corer/slicer makes this task fast and EASY.

Once the peeper/corer/slicer has done its work, I simply slice the apple in half with a knife and separate the slices. I can peel, core, and slice an apple in just about 10 seconds.

Here's the chilled crust, ready for its apples.
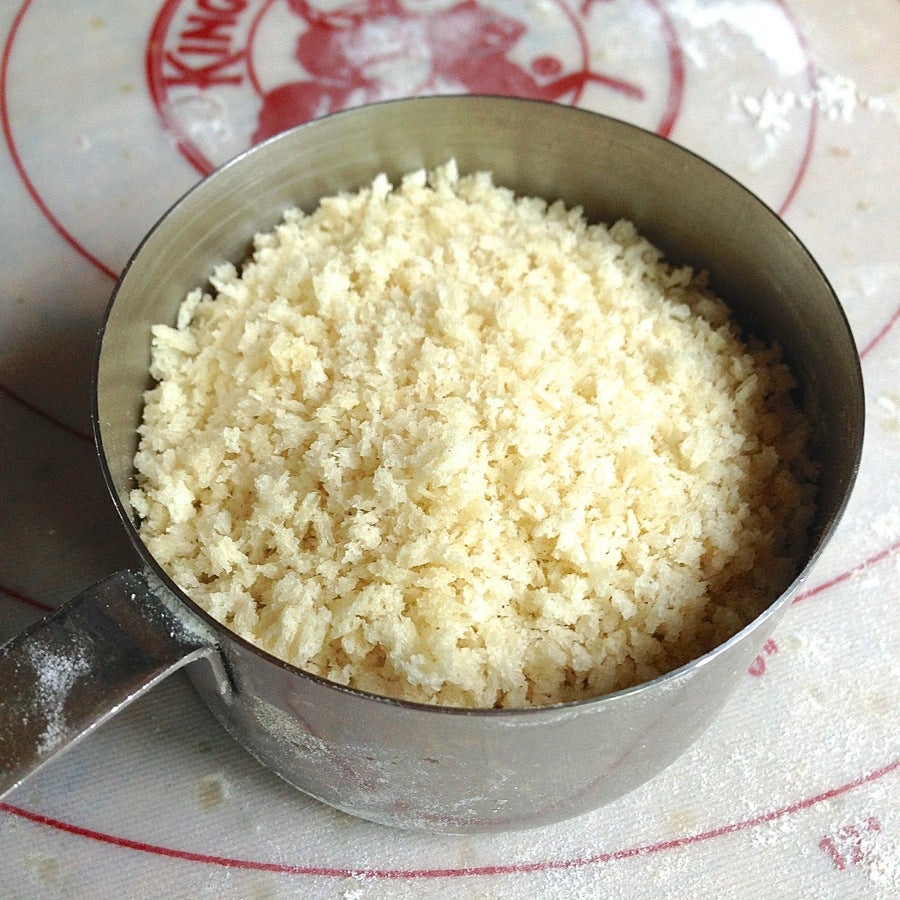
But first - a layer of coarse, dry bread crumbs, to help absorb the apples’ juice and keep the crust from becoming soggy. I used 1 cup (50g) of Panko - coarse Japanese-style bread crumbs.
The original recipes I found called for crushed cornflakes, which would also be a good option.
Spread the crumbs evenly over the crust.

Top with the apples.

Next, sprinkle with 2/3 cup (131g) cinnamon sugar. I like Cinnamon-Sugar Plus - superfine sugar mixed with Vietnamese cinnamon. Super-tasty. But you can make your own cinnamon sugar by combining 2/3 cup sugar with 1 teaspoon cinnamon.

Ready for its top crust.

Roll the remaining piece of pastry into a 9” x 13” rectangle.
Again, don't worry too much about ragged edges; as my grandma-in-law used to say, “It'll all come out in the wet wash.”

Flop the top crust over the apples. Yes, apples will poke through. Seal the edges of the two crusts as well as you can. There'll be places where they don't quite meet. That's OK.
If the whole thing has become warm and sticky and hard to work with, pop it in the fridge for 15 minutes to firm it up.
Just before baking, slash it 6 or 8 times to allow steam to escape.
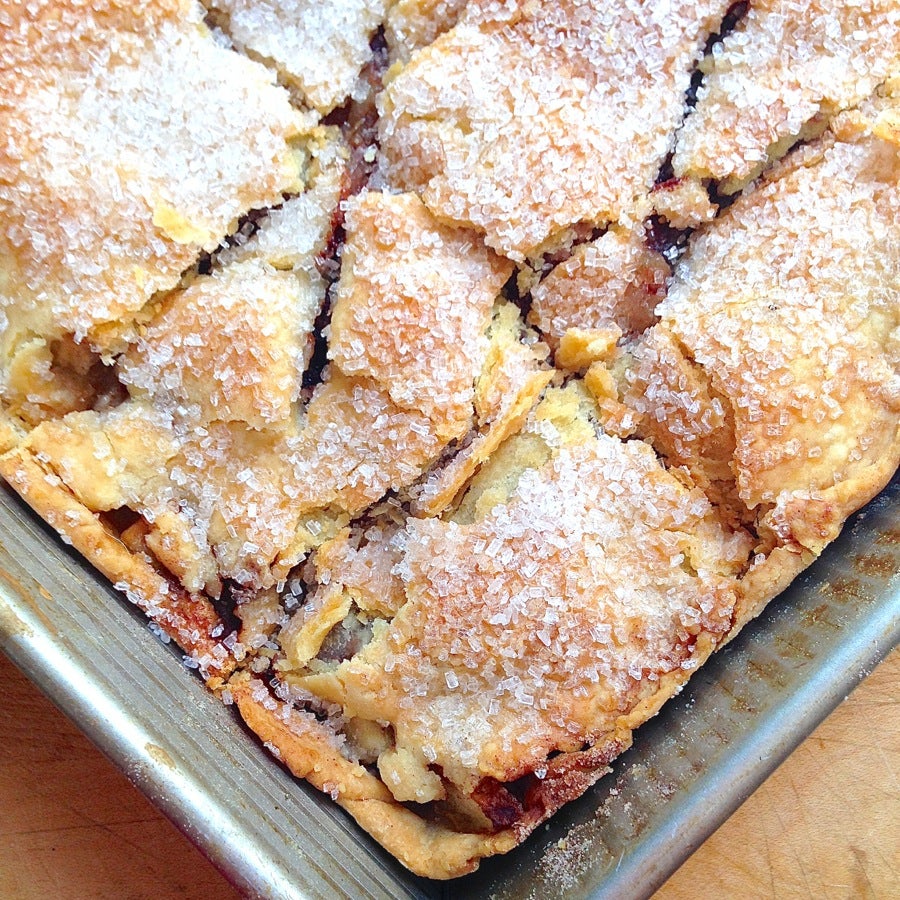
If desired, brush the slab with milk, and sprinkle it with coarse white sparkling sugar or cinnamon-sugar.

Put the slab in the preheated 350°F oven, and bake it for an hour.

Remove it from the oven; it'll be golden brown.
No beauty queen, but icing will help its looks.
Cool the slab completely before glazing.

Here's a wonderfully tasty glaze: Combine 1 1/2 cups confectioners' sugar, 1/3 cup boiled cider, 1/2 teaspoon cinnamon, a small pinch of salt, and enough milk or cream to make the mixture “drizzle-able.”
Don't have boiled cider? Use plain milk or cream, maple syrup, honey, or thawed apple juice concentrate. Start with 1/4 cup of any of these; if you've made this kind of icing before, you know it's easier to add more liquid, than to try to take it away. Add enough liquid to make the glaze pourable.

See how thick this is? Maybe a little TOO thick for drizzling.

A teaspoon of cream should take care of that.

Drizzle the glaze artfully atop the slab.

It kind of all runs together anyway, but it's fun to try to make patterns.
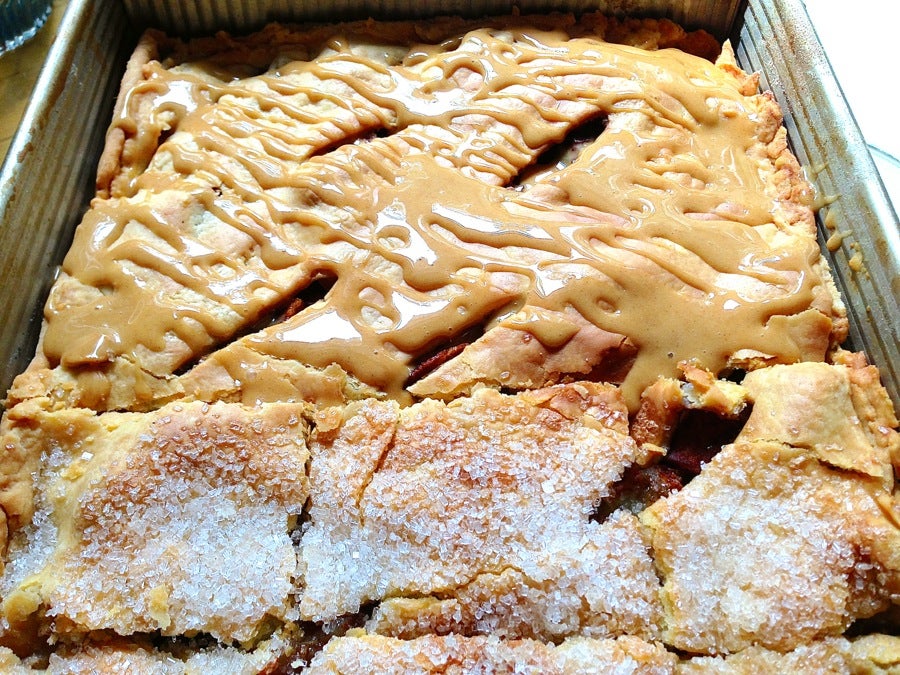
I experimented with a slab that was half glazed, half topped with cinnamon sugar and sparkling sugar. Baker's choice.
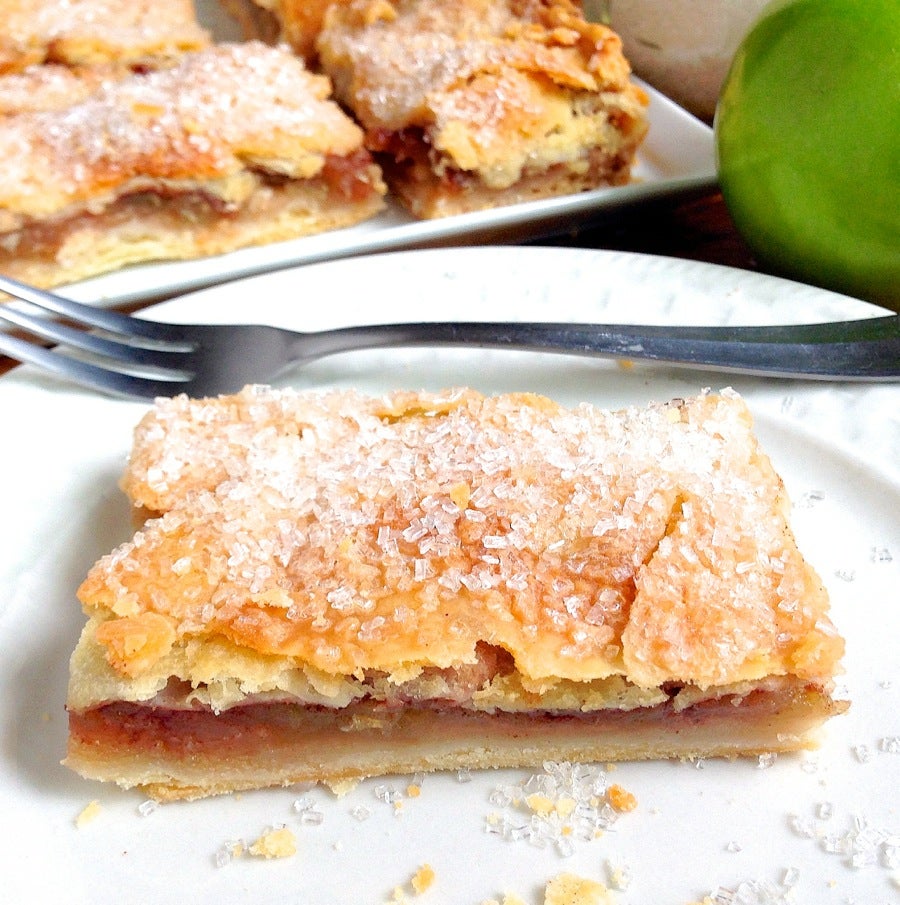
Cut. Serve. Enjoy.

And look how easy it is to serve in small pieces, compared to pie. You can get 2 dozen servings from this pan of Slab – try doing THAT with a pie!
Read, rate, and review (please) our recipe for Old-Fashioned Apple Slab.