For crispy, crackly crusts, put a lid on it
Great steam makes great bread.

Date
February 27, 2024

I get tagged in lots of bread pictures online. Bakers of all levels often reach out for guidance on how to improve their bread, sharing images for me to diagnose the problem. And when I see a loaf that’s matte with no ears, a common occurrence, the first thing I recommend for improvement is steam.
Why? For the best hearth loaves possible, bread needs a steamy baking environment. During the early stages of baking, as the loaf springs and quickly heats, it’s important that the crust remains supple (moist) for as long as possible. Moist conditions allow the loaf to expand more fully — the crust will stretch rather than dry out and set. This extended period of expansion, made possible by the steam, produces a loaf with the best volume, most open interior structure, and crispiest crust, with deep, burnished color.
In bakeries, we use masonry ovens that have steam injection. But how do you create those conditions without an expensive oven the size of a car? For most loaves there’s a simple answer: Put a lid on it.
For making a steamy environment, a covered baker is hard to beat. While adding water to a preheated cast iron pan or cake pan full of lava rocks can be effective, most ovens, especially gas ovens, vent out most of the steam during baking, making it much less impactful. But if you’re using a closed vessel, trapped moisture (from the loaf itself) remains in place, settling on the crust and preventing it from setting too soon.
A covered baker can take many forms: From the Challenger bread pan to Dutch ovens to large pots, I’ve baked bread in many things. The key is that the vessel has a tight-fitting lid, which makes it excel at holding in moisture. For best results, be sure to preheat the vessel fully. A hot pot makes the bread jump (what we call “oven spring”) well and the dough’s rapid rise in temperature means a quicker release of moisture. In this sense, each covered baker is like a miniature masonry oven pumping out gorgeous, bakery-quality loaves.
To demonstrate the power of a covered baker, here’s a test: two loaves, same batch, one baked on a baking steel without steam added to the oven, and the second loaf baked in a covered baker. The results speak for themselves.
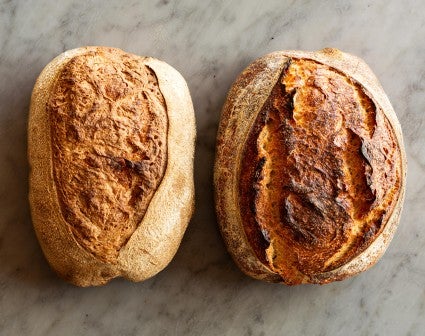
The loaf baked in the covered baker (right) is shiny with better volume. On the left, a delicious loaf, but with much less volume, a tighter interior structure, no ear, and a dusty visual.
And here are the interiors of those same loaves above, clearly showing the differences in volume as a direct result of steam.

But with covered bakers, there is one common complaint: They are a literal workout to use. Ranging from several pounds up to what feels like a cement block, they are heavy. And because they need to be preheated in the oven before you add your loaf to bake, they’re also hot. If you’ve ever reached into the depth of your oven, past a large hot oven door, to retrieve a hot covered baker (wearing something akin to welding gloves), you know that they can be unwieldy, at best.
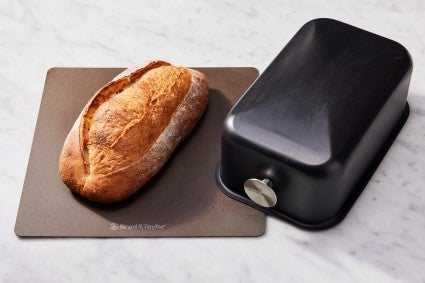
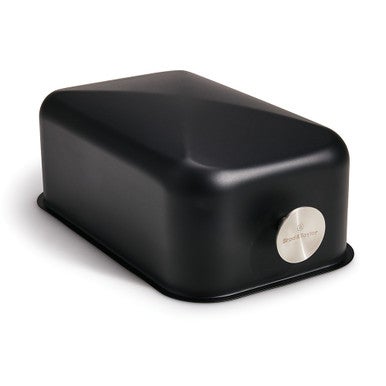
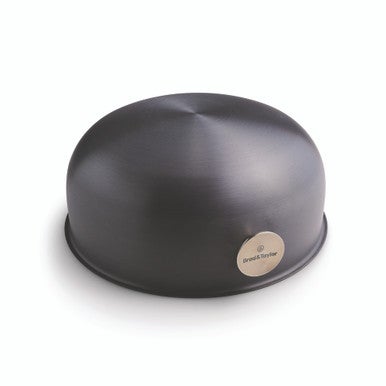
But here's an option that “puts a lid on it” with all the benefits and none of the heft. The Baking Shell, an oven-proof baking cloche constructed of lightweight material designed to fit over a loaf as it bakes on a baking stone or steel. Similar to a covered baker, the seal between the shell and the baking surface holds moisture inside during baking, promoting maximum expansion and beautiful browning.
The lightweight shell, weighing just a little over a pound, comes in two shapes for loaves of various sizes: The rectangular shell, which measures about 8" x 13" by 5.5", is perfectly sized to cover a large oval loaf, also known as a bâtard. The round shell, meanwhile, is ideal for circular boules.
To use, place the shell in the oven along with the baking stone or steel as the oven preheats. We want everything close to the loaf to be hot to support maximum expansion. (For best results, I avoid putting the shell on the actual spot on the stone where I will place my loaf to bake — just place it to one side of the stone or place it on a rack above. I don’t want anything blocking or preventing the baking surface from fully heating.) Once preheated (about 45 to 60 minutes), I slide my loaf onto the stone and carefully place the shell over the top, centering the loaf within the shell. (The loaf will bake better if it’s not touching the shell.)
As with all covered baking methods, I remove the shell about halfway through the bake for the reveal (the best part!), releasing moisture and allowing the loaf to finish baking. As important as the moist period of baking, the drying period is key for crust firmness and full color (and flavor).
An additional benefit of the shell is its ease of storage. It might sound like a small thing, but the lightweight and smaller profile (compared to other covered baking devices) means that I can tuck it into a cupboard or even put it on a high shelf in the pantry with ease.
And how is the bake? Well, how does this look?
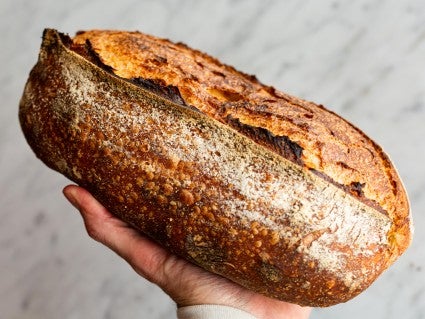
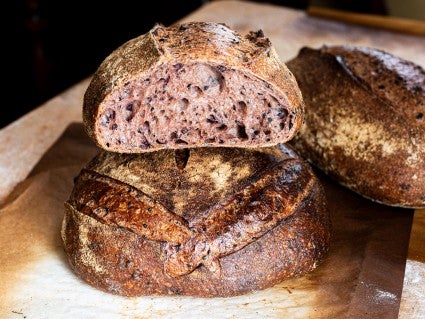
This is our Pain de Campagne, shaped as an oval loaf. Note the beautiful color, expansion of the ear, and what I promise is a tooth-tugging crust. If this is what you’ve been looking for, try using the Baking Shell then tag me online (@breadwright) — we’ll do a virtual high five.
And if you’re looking for more tips for great(er) baking:
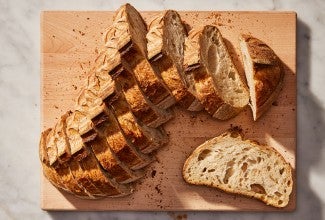
Cover photo and styling by Martin Philip.