


How to downsize your pies
Mini pies for a scaled-back Thanksgiving

Date
November 4, 2020

What’s the one food you most look forward to at Thanksgiving?
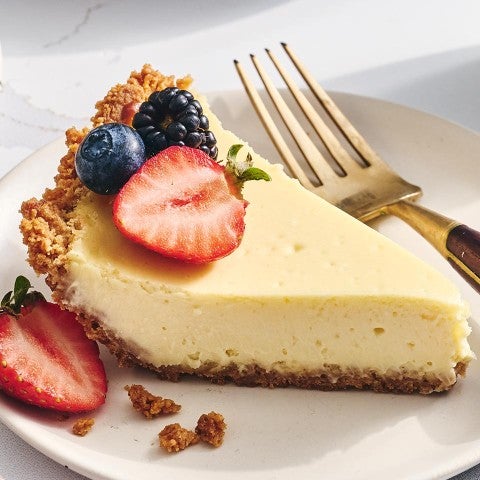
For some it’s the turkey. For others it’s the array of sides. But for many of us bakers, let’s admit it — our thoughts skip right over the apps and main meal and go straight to dessert: pie. Apple pie. Pumpkin pie. Pecan pie and chocolate cream and sweet potato and strawberry pie. OK, someone brought a coconut cake, and there are always cookies, but pie is the main attraction of any Thanksgiving dessert spread.
The problem is that for smaller gatherings (as many of us expect to have this year) the need for multiple pies diminishes. Still, how can you bear to choose between apple and pumpkin, or strawberry and pecan?
What if you could enjoy all your favorite Thanksgiving pies — without a ton of too-tempting leftovers?
Enter the mini pie, a great way to showcase an array of pies and have them all disappear by the end of the day.
Here’s what might be a typical scenario this year. You’re serving six close family members (including yourself) at Thanksgiving dinner; you want to offer pumpkin, apple, and pecan pie. So you pull out your regular (not mini) 12-cup muffin pan and use it to make mini pies: six of each flavor. Everyone can enjoy one mini pie immediately, one later, and squirrel one away for the next day. And no one (including you) over-indulges!
Wait, isn’t this pretty complicated? Especially with the frenetic rush of food prep in the days before Turkey Day, making 18 pies sounds like a daunting task.
Thankfully, you can make these pies well ahead of Thanksgiving; they can be prepared, baked, and then frozen for up to a few weeks before serving. Once cool, wrap each pie individually in plastic, then bag them all airtight and freeze. When you’re ready to serve, unwrap, thaw, and reheat briefly: 5 to 10 minutes in a 350°F oven or about 20 seconds (per pie) in a microwave will bring them back to life.
But let’s not jump too far ahead. First we need to make the mini pies, starting with the most important part: the crust.
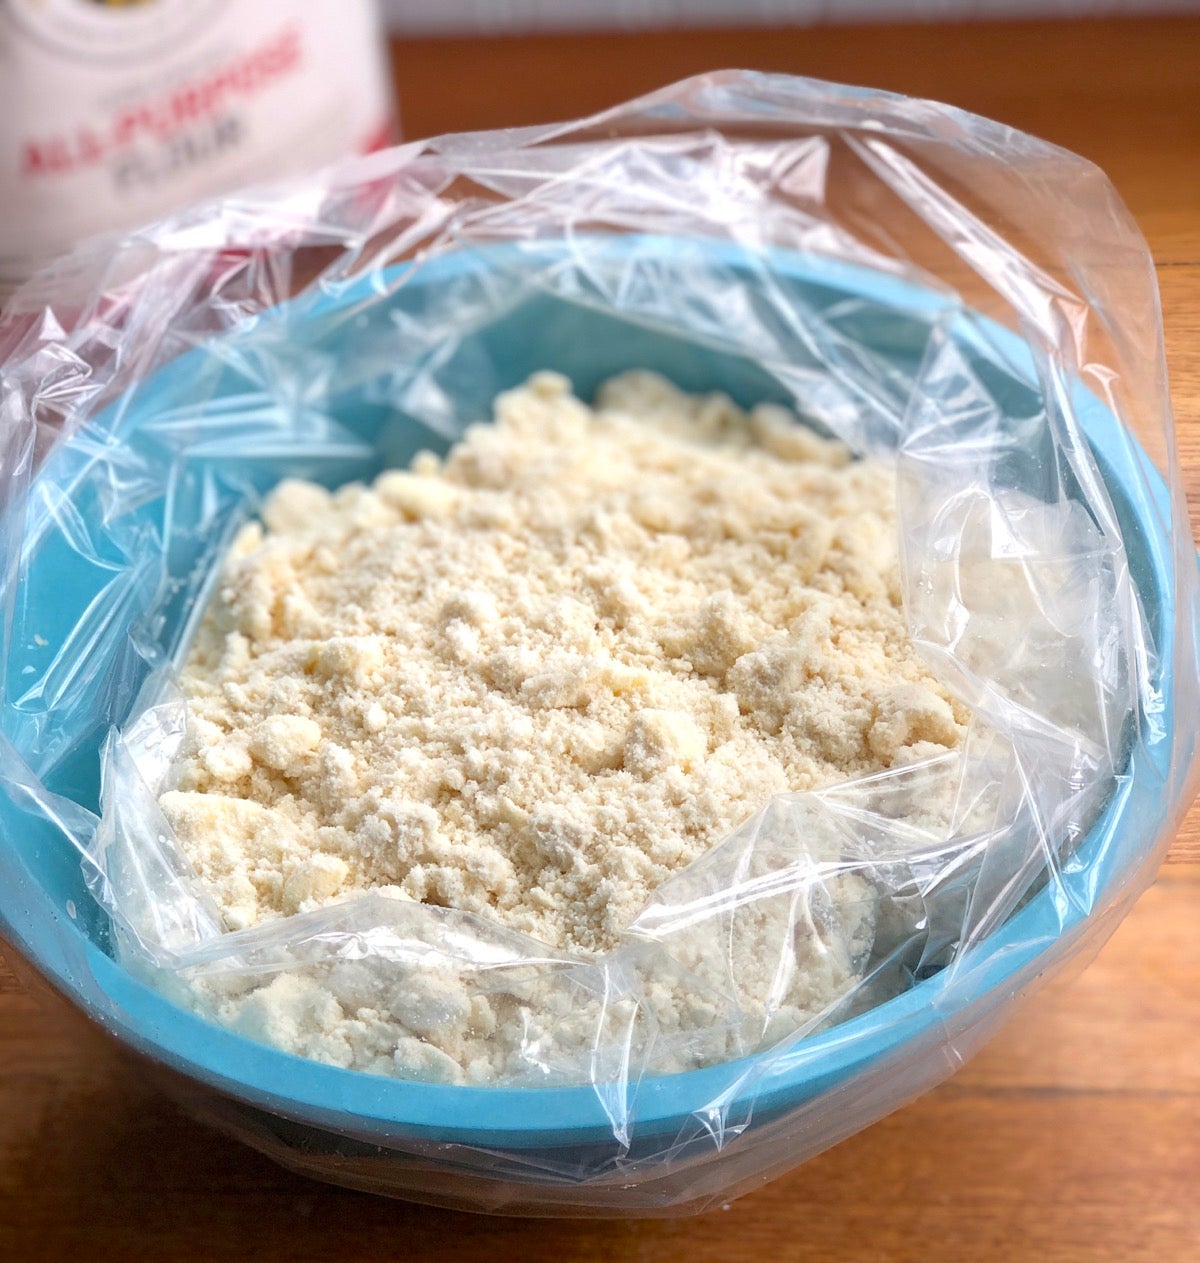
The best pies rely on a great crust, but pie pastry can be fairly labor-intensive. Enter pie crumbs, an easy-prep mixture of flour, salt, and fat that can be made weeks ahead of time and stashed in the freezer. I keep a bag of pie crumbs in my freezer pretty much year-round — and if you’re a devoted pie baker, you should too. Want to make pie crumbs? See how it’s done.
When you’re ready to make the pastry for your mini pies, simply remove the bag of crumbs from the freezer, portion out what you need, and add enough liquid to make a cohesive pastry.
Here’s your second time- and effort-savior: Leave your rolling pin right there on the shelf; you won’t need it for these easy press-in mini crusts. (Feel the weight lifting from your chest?)
Once you’ve pressed individual crusts into the wells of a muffin pan, downsize your fillings as directed and fill and bake the pies. At last! “Easy as pie” lives up to reality.
Ready to give mini pies a try? Here are a few facts to absorb:
Let's start with the pastry. To make six each apple, pumpkin, and pecan mini pies, you’ll need 18 crusts: 40g x 18 = 720g pie crumbs. If you’re making standard pastry rather than starting with pie crumbs, make a triple batch of your favorite single-crust pastry recipe.
Put the pie crumbs in a mixing bowl and let them rest for 15 to 30 minutes, just long enough for the fat in the crumbs to soften a bit.
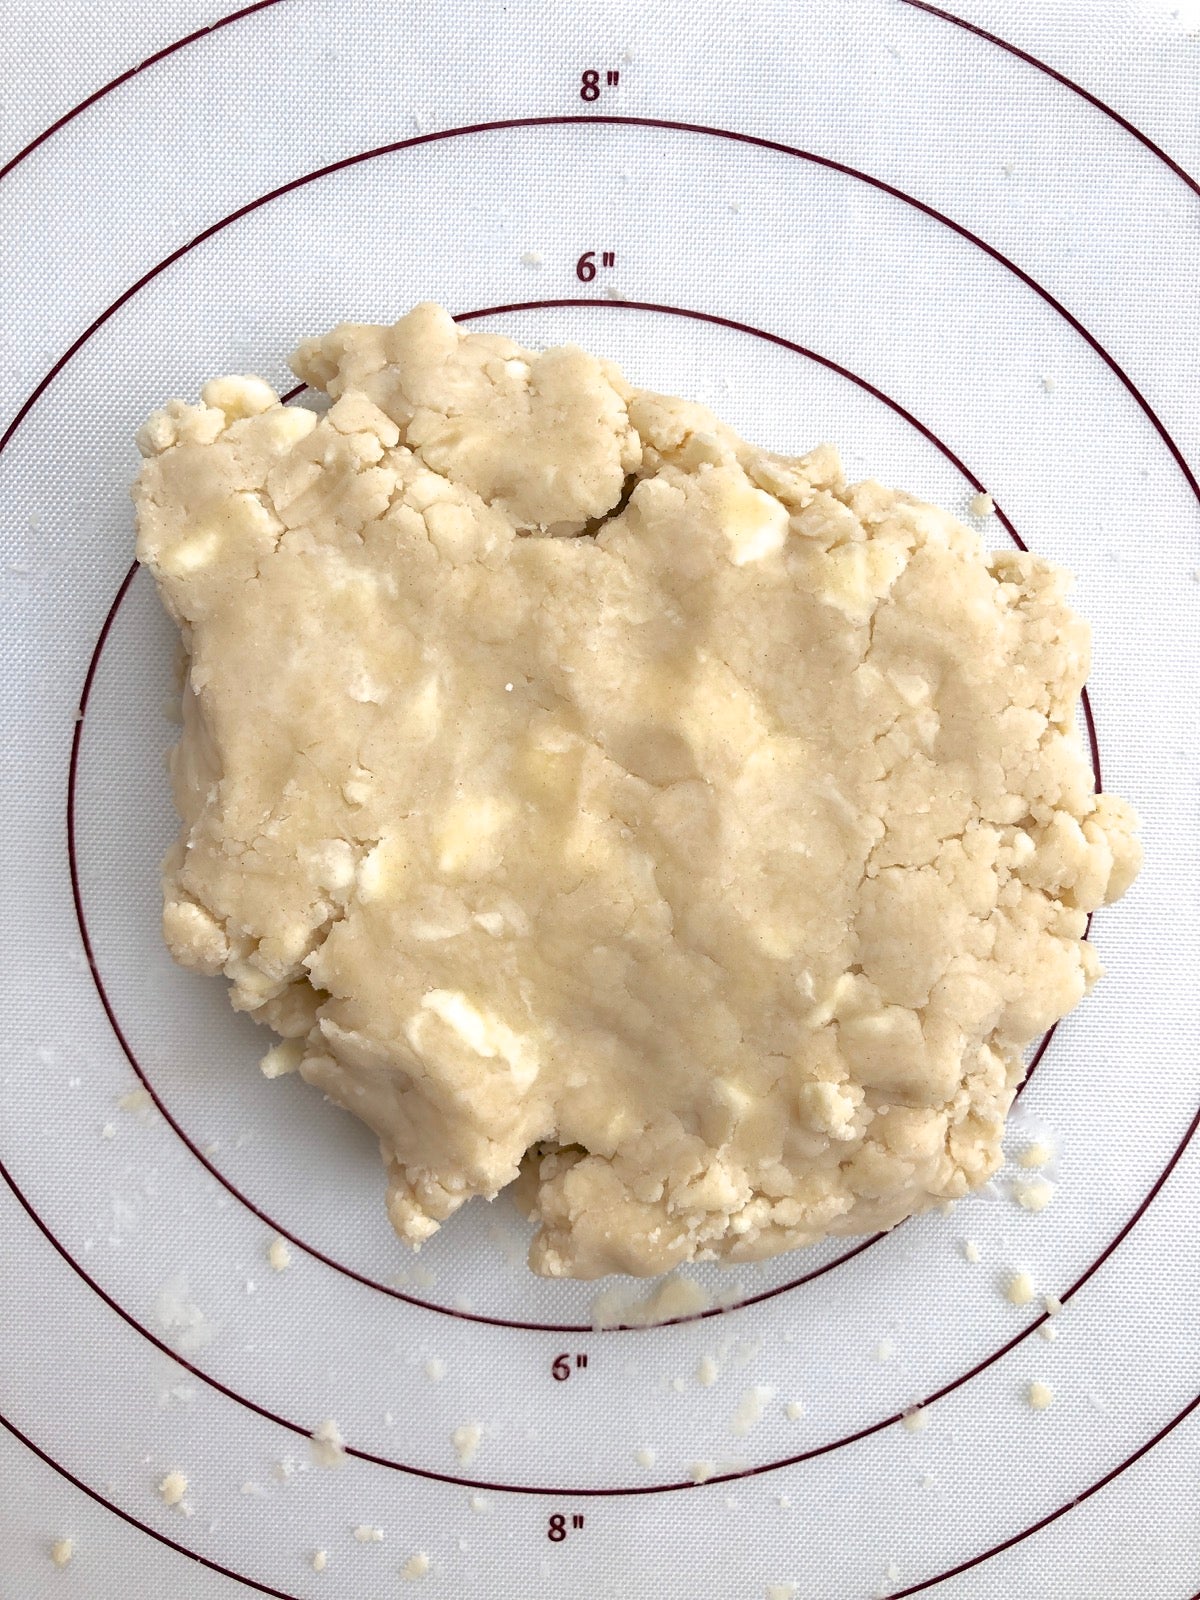
Next, add enough liquid (ice water or cold vodka) to bring everything together into a rough but cohesive ball. For this amount of crumbs I use about 9 to 10 tablespoons (113g to 142g) liquid. I like to use vodka for these mini crusts, since it makes a lovely, soft, pliable pastry that’s very easy to work with.
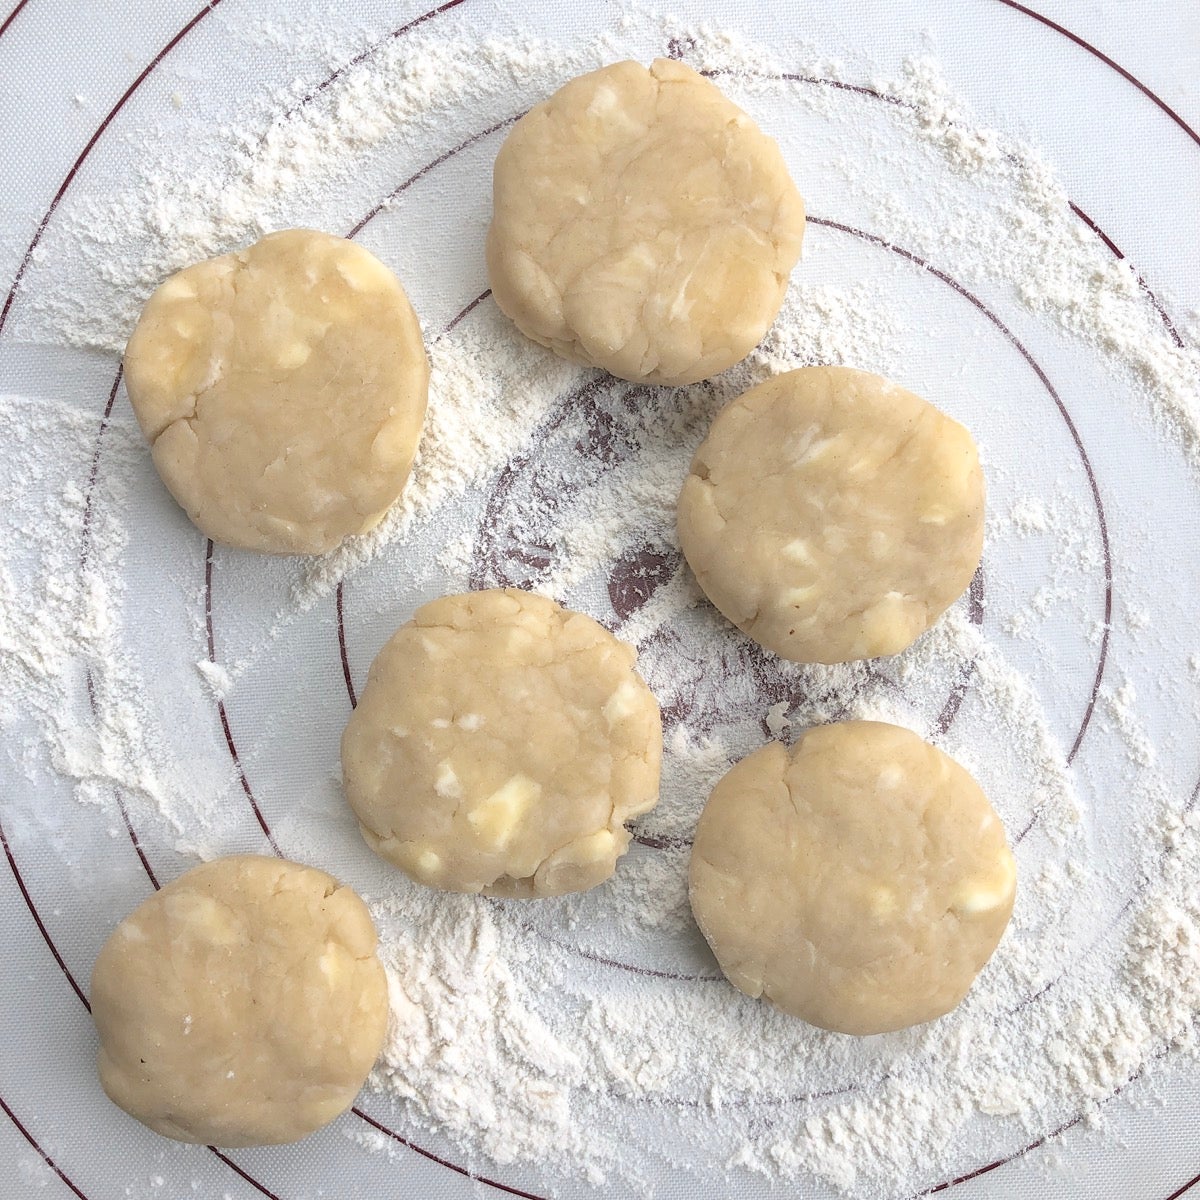
It's easiest to make each batch of six mini pies at a time, rather than try to do all 18 at once. So divide the pastry into thirds, one for each pie variety: pumpkin, pecan, and apple. Transfer one piece to a lightly floured work surface, and refrigerate the remaining pieces until you're ready to use them.
Divide the pastry into six 40g pieces. Shape each piece into a ball, then flatten with your palm into a 2” disc.
Now here’s the best part: no rolling! Simply place each disc into one of the wells of an ungreased muffin pan.
A quick word on muffin pans: make sure yours is full-sized, i.e., 2” across the bottom, 2 3/4” across the top, and 1 1/4” deep. If you use a pan with wells significantly larger or smaller than this, the crust and filling amounts I outline here won’t fit.
Find a sturdy flat-bottom drinking glass, small can, or bottle or jar that’s about 2” across the bottom. Spice jars are often a good fit.
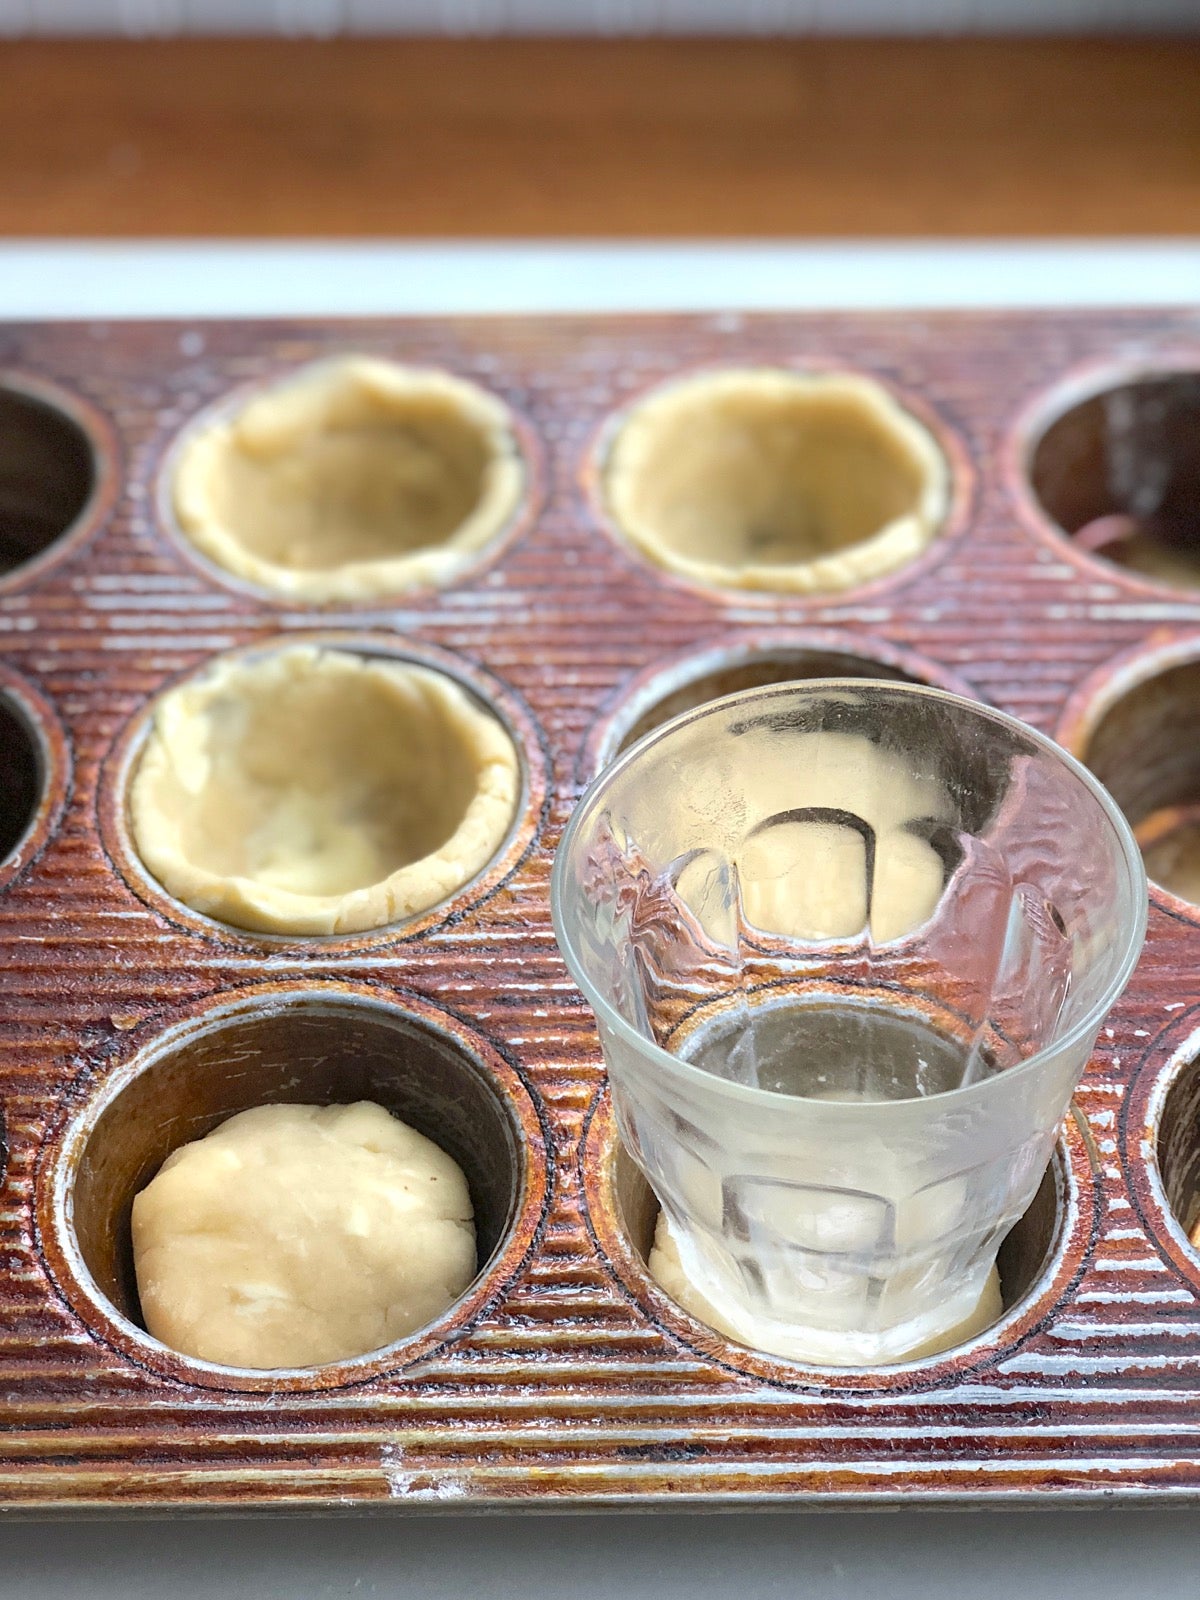
Center the glass or jar over the disc and press down. (If you’re at all worried about the strength of your drinking glass, put a potholder or folded kitchen towel between your hand and the glass.) Press firmly, twisting the glass a bit, to bring some of the crust up the sides of the well. Remove the glass and use your fingers to press the crust the rest of the way to the top of the well. The pastry is soft but not sticky and easy to mold. Remember Play-Doh? Very similar.
Repeat with the remaining five crusts. Put the pan in the refrigerator to keep the crusts cool while you make your filling.
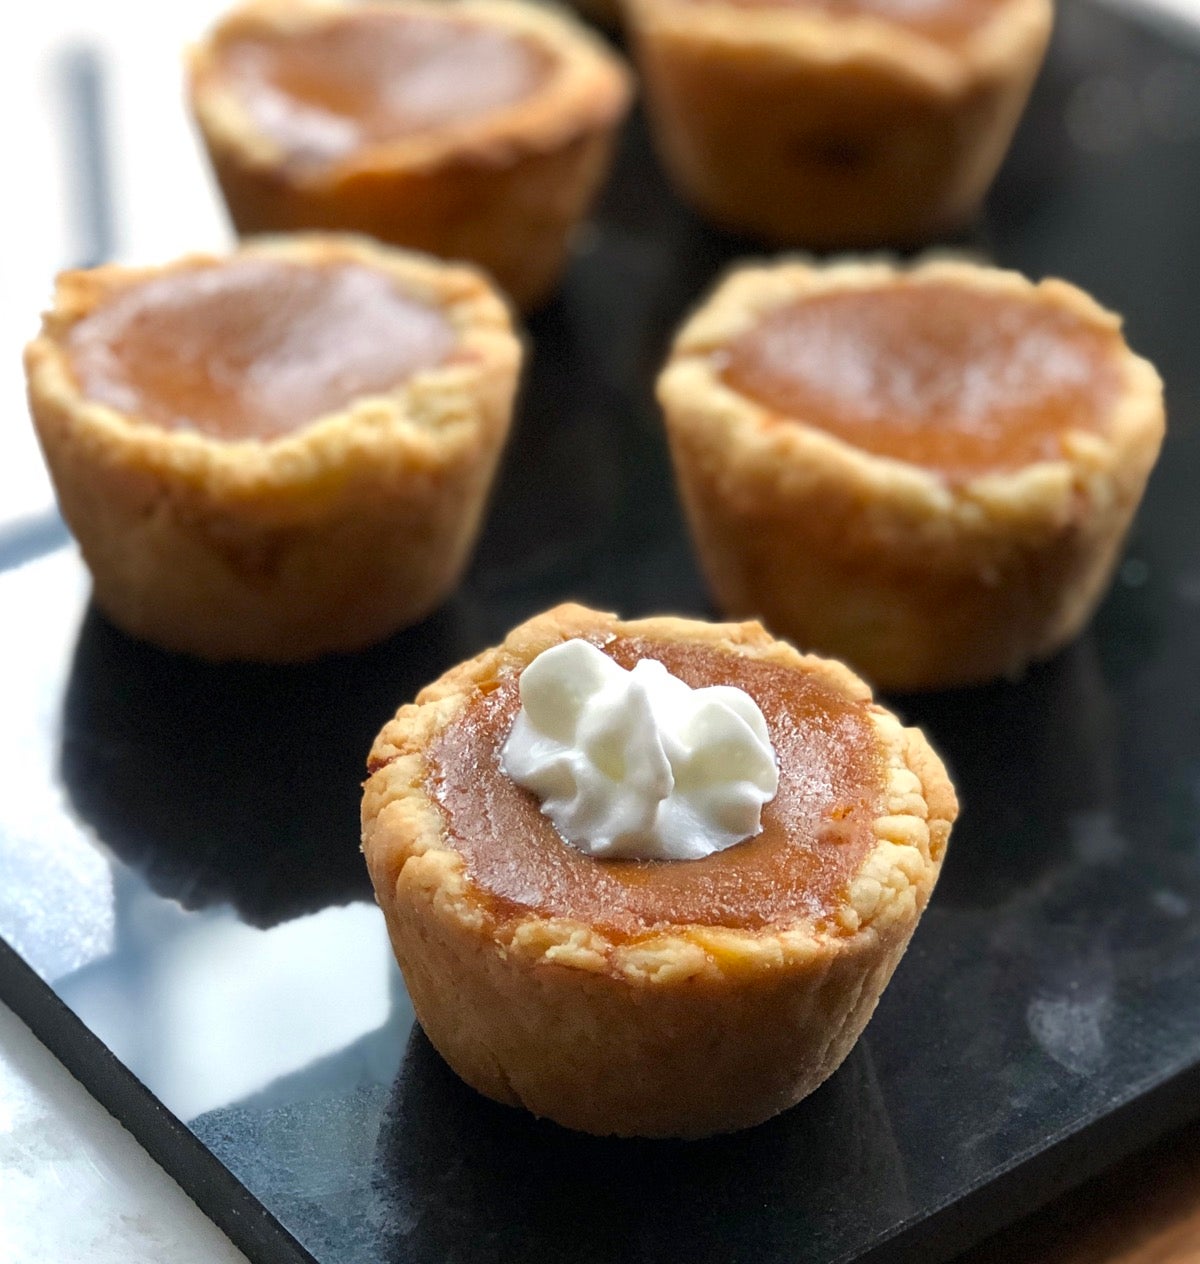
I’m going to start with pumpkin pie, because even though these days it may be considered rather old-fashioned and an acquired taste, I can’t make it through Thanksgiving without pumpkin pie.
First, preheat your oven to 425°F. You can do this while you make the filling.
I've made things easy for you by downsizing my favorite filling recipe, listing ingredients in gram weights (which is the easiest way to tweak amounts). I’ve also included approximate volume measurements for those of you who don't use a scale. Here’s what you’ll need for six pumpkin mini-pies:
In a medium-sized bowl, mix the sugar, flour, and spices together thoroughly. Mix the egg, pumpkin, and milk in a separate bowl, then stir into the dry ingredients.
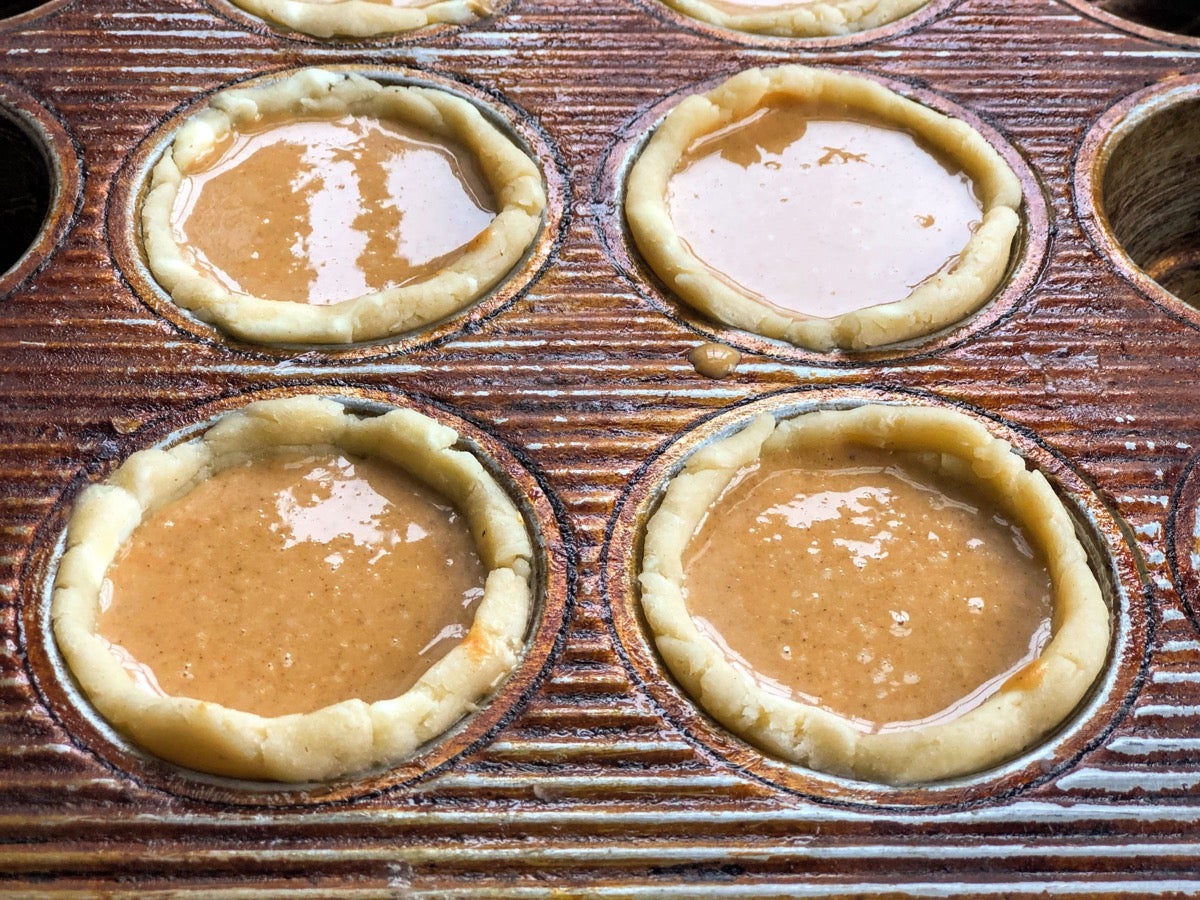
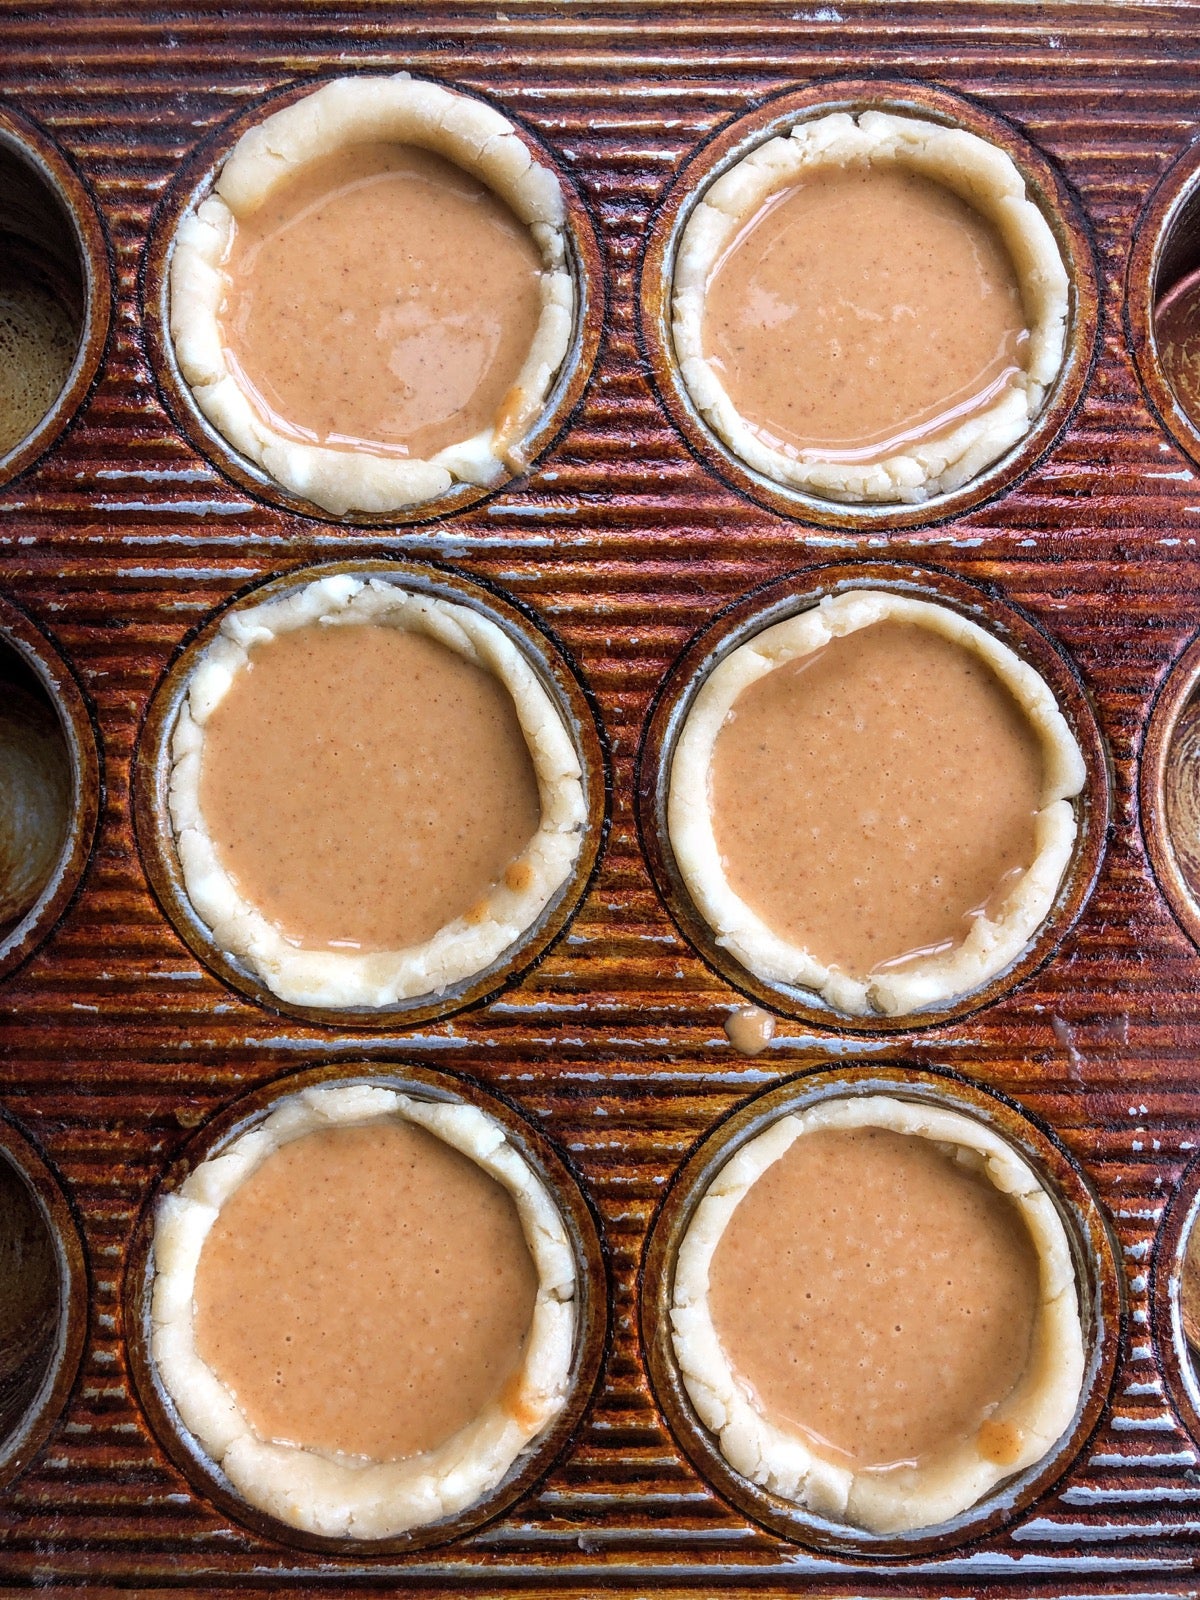
Remove the crusts from the refrigerator, and divide the filling equally among them, using about 85g filling for each crust. Bake the mini pies for 25 to 30 minutes, until the center of the filling registers at least 160°F on a digital thermometer.
Remove the pies from the oven. Use a heatproof spatula or table knife to loosen them around the edges. After 10 minutes, carefully lift the pies out of the pan and place them on a rack to cool.
Tip: If you’re fairly agile, slowly tilt the pan until it’s nearly upright, then tip it just a bit more. The pies should slip out of the pan; it’s your job to catch them before they hit the counter.
Note: Prefer sweet potato pie to pumpkin pie? Use the techniques and baking method above, filling the crusts with about one-third of your favorite sweet potato pie filling.
Some people simply can’t celebrate Thanksgiving without pecan pie. My favorite recipe is sweetened with brown sugar rather than corn syrup; it makes a somewhat sturdier (and to my taste, less gluey) filling.
First, divide, shape, and refrigerate your crusts.
Next, preheat your oven to 375°F. You can do this while you make the filling.
Here’s what you’ll need for six pecan mini pies:
In a medium-sized bowl, mix together the flour, sugar, and salt. In a separate bowl, mix the milk, egg, vinegar, vanilla, and melted butter, whisking until smooth. Add the liquid ingredients to the dry ingredients, stirring to combine.
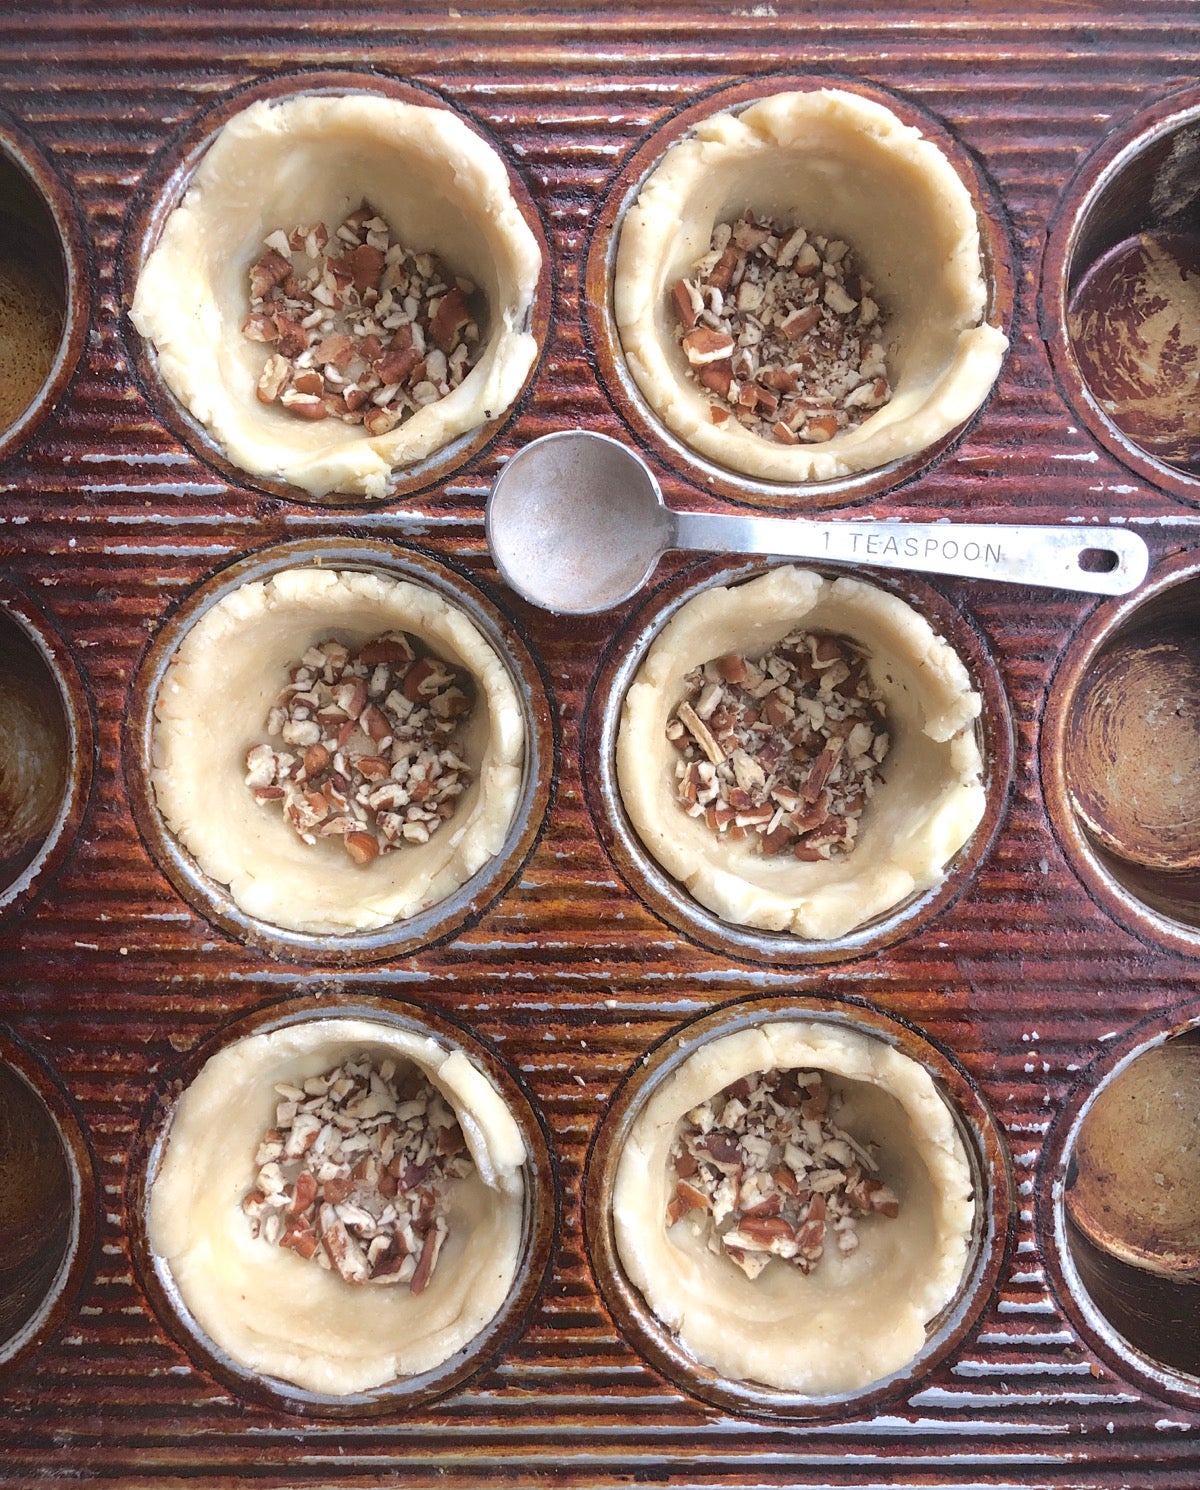
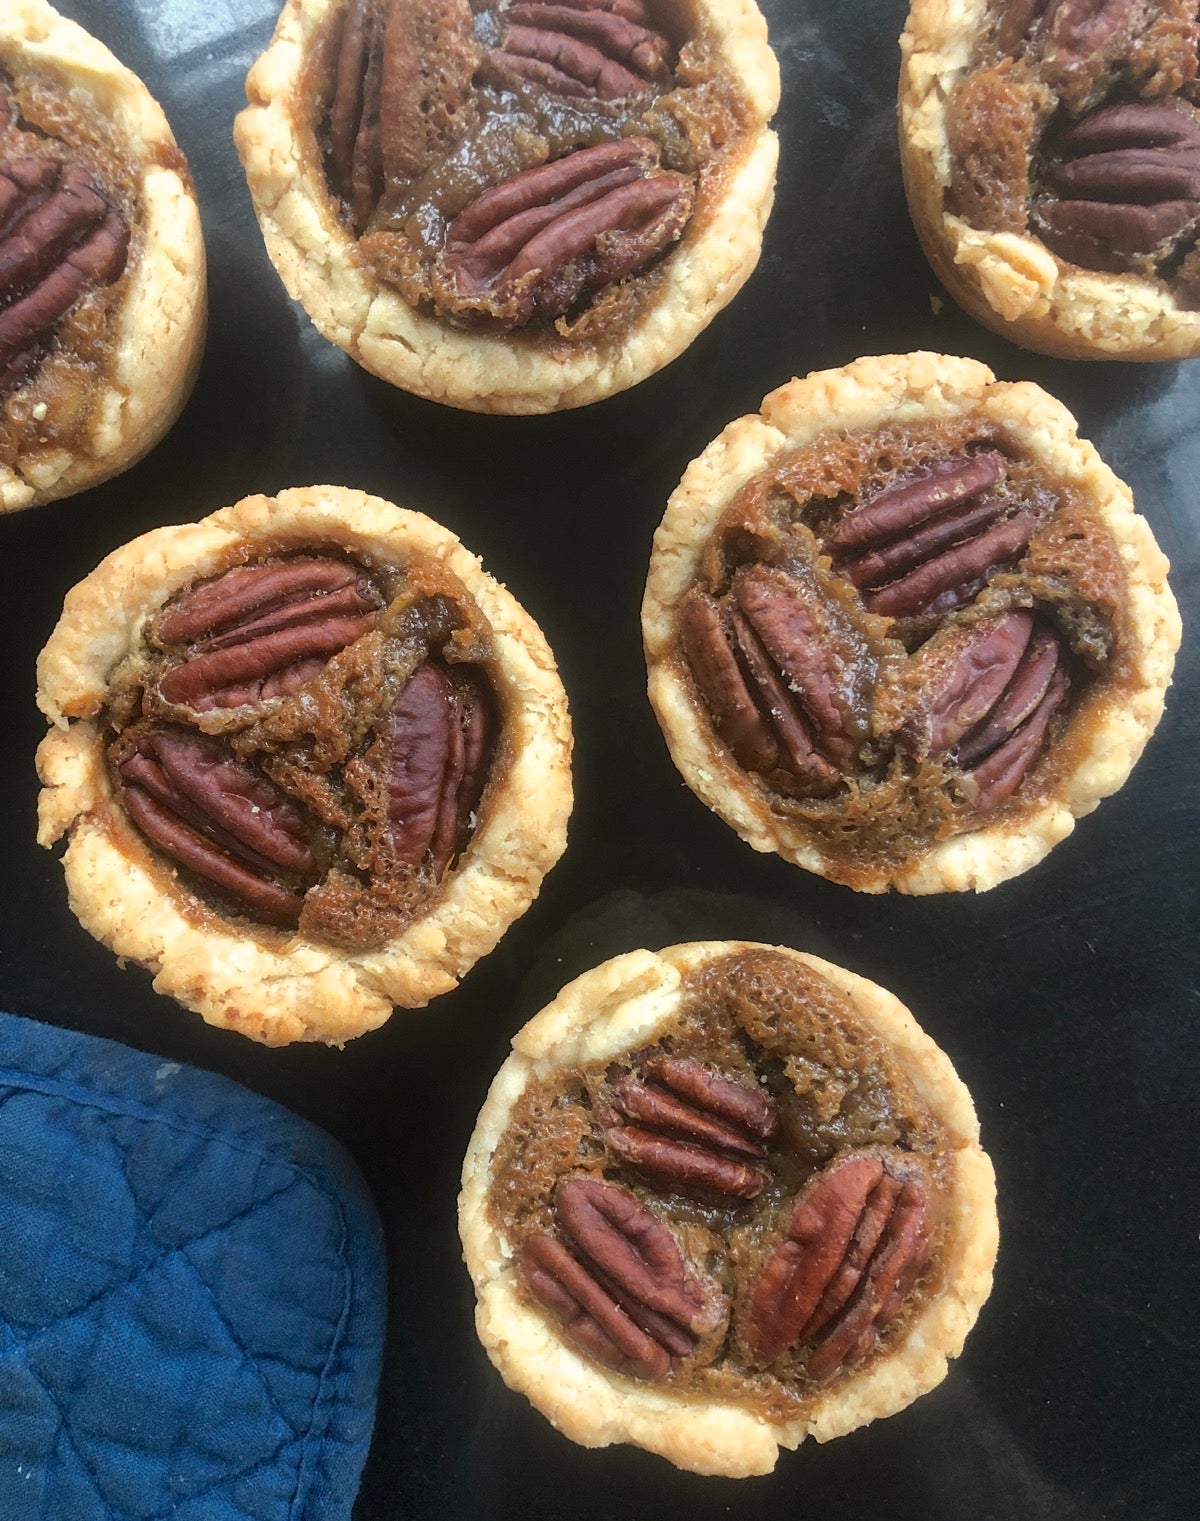
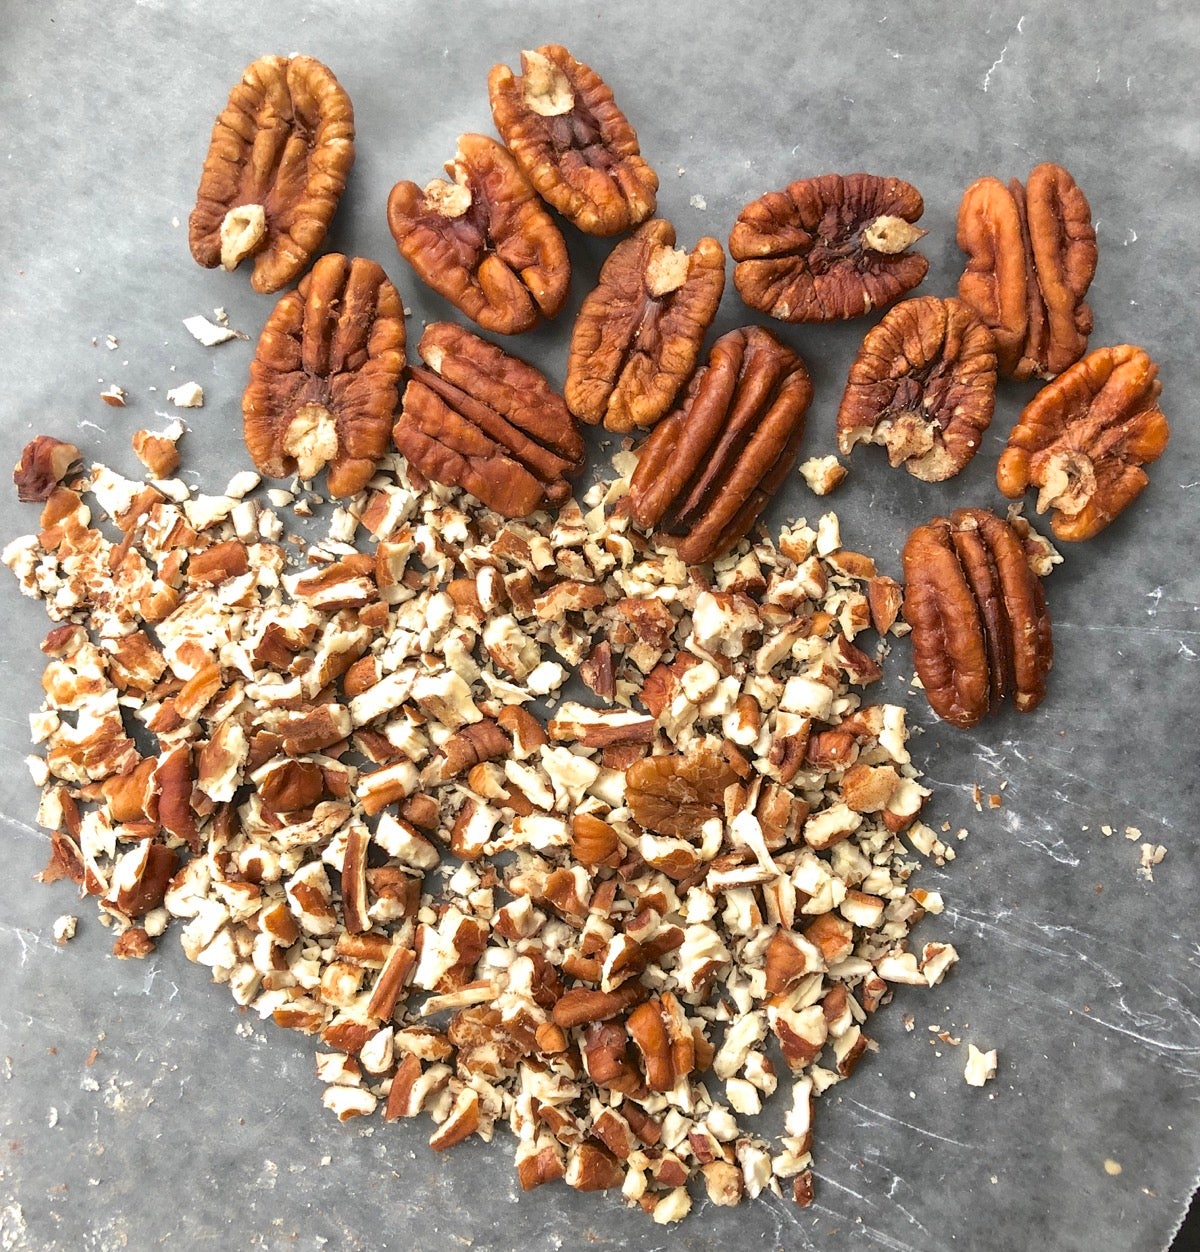
Remove the crusts from the refrigerator, and sprinkle 1 1/2 teaspoons of the diced pecans into each crust. Divide the filling evenly among the crusts; you’ll use about 45g filling for each. Arrange 3 pecan halves atop each mini pie.
Bake the mini pies for 32 to 35 minutes, until the edges of the crusts are browning and the center of the filling registers about 185°F on a digital thermometer. The filling, volcano-like, will have puffed way up; don’t worry, it’ll flatten back down as the pies cool.
Remove the pies from the oven and carefully loosen their edges. After 10 minutes, remove them from the pan and transfer them to a rack to finish cooling.
I’ve saved perhaps the most beloved pie for last: apple. Though pumpkin may be more traditional, apple pie seems to have a much larger following (if Thanksgiving night leftovers are any indication).
These apple pies are a bit more involved than the pumpkin or pecan pies. You need to precook the filling, and you have to choose how to top them. That said, they’re totally worth the effort.
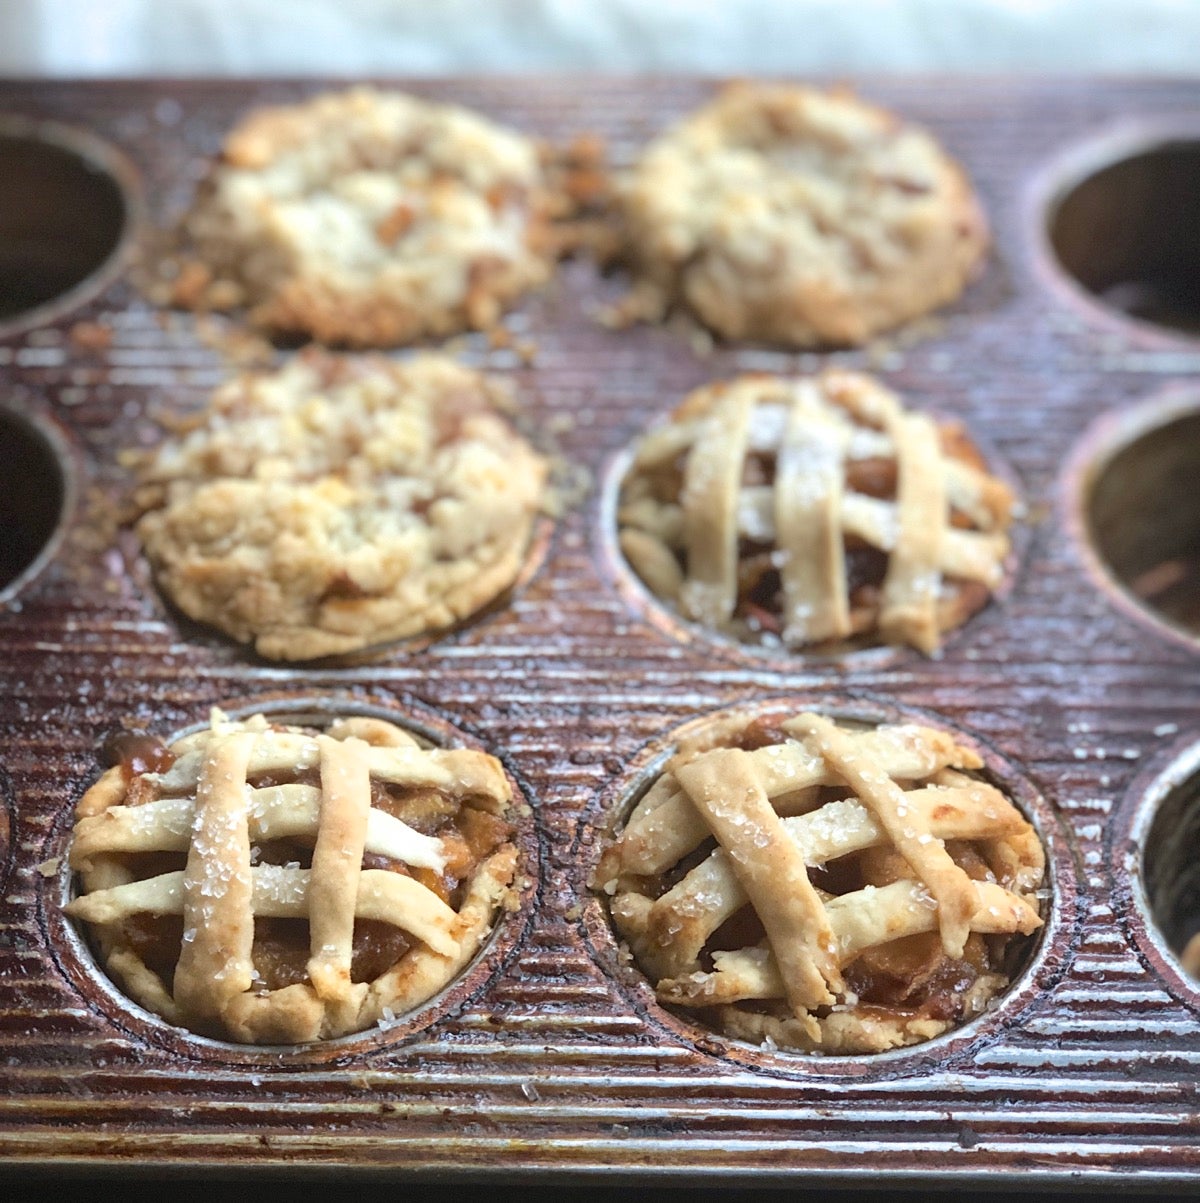
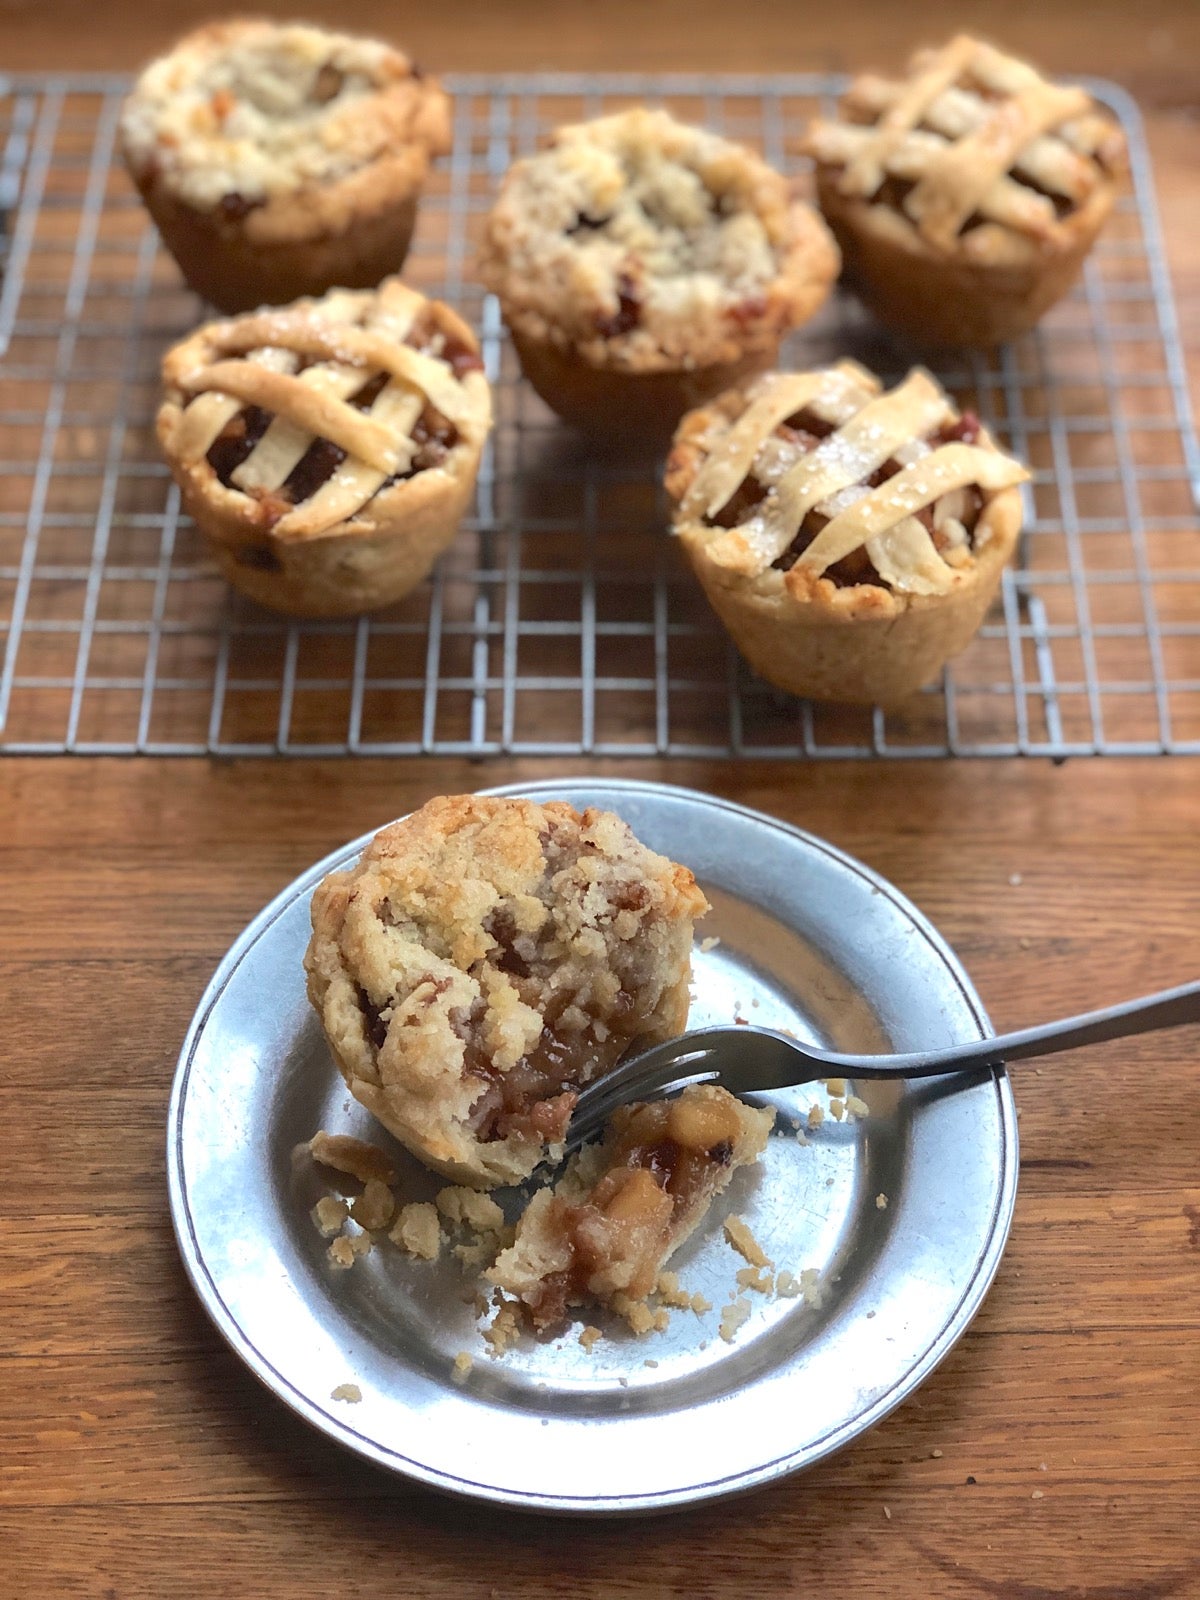
Unlike pumpkin or pecan pies, apple pie generally calls for a top crust. You can choose a full top crust, a lattice crust, or a crumb crust. If you want a top or lattice crust, after dividing the dough into six pieces pinch off about 1/4 of each piece and set them aside; these will be your top crusts.
Shape the remaining dough pieces into 2” discs. Grease six wells of a standard muffin pan, including the flat area of the pan around their tops; greasing the pan will help prevent sticking if any of the filling juices leak out. Shape your crusts, and refrigerate
Next, preheat your oven to 425°F. You can do this while you make the filling.
Here’s what you’ll need for six apple mini pies:
Since we won’t be baking these mini pies as long as a typical apple pie bakes, we’re going to pre-cook the filling. This will also shrink the apples by about half, making it easier to spoon the filling into the crusts without any spillover.
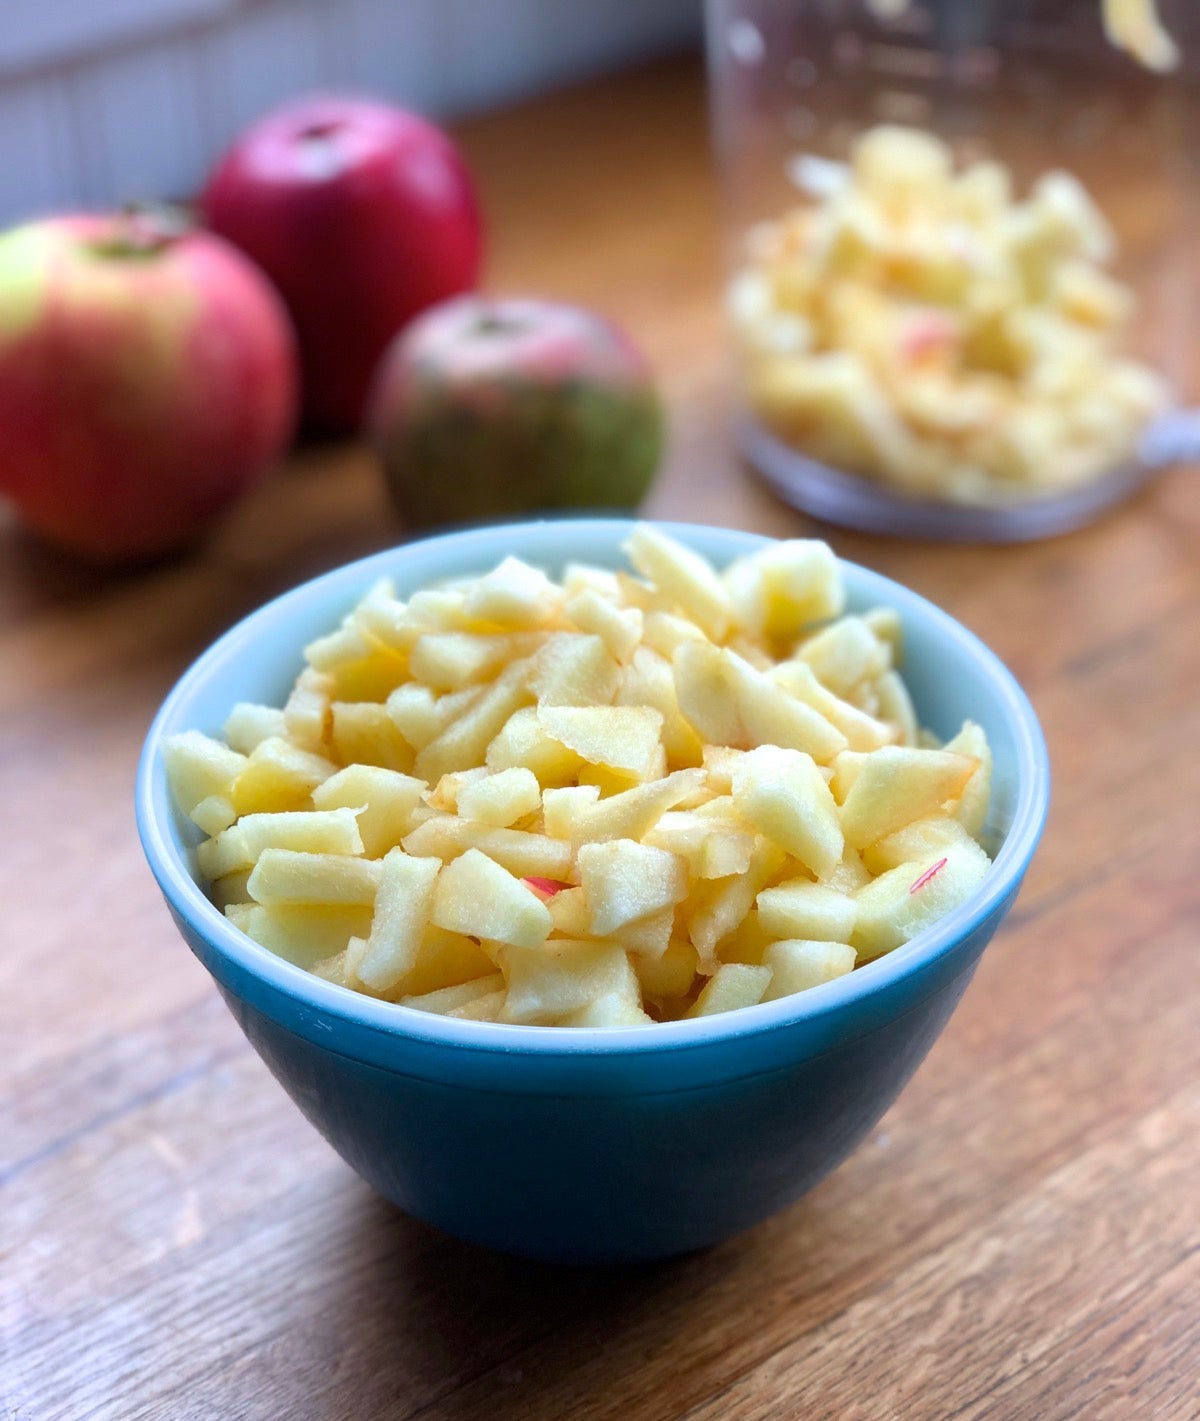
Melt the butter in a large frying pan, then add the apples. Cook over medium heat, stirring frequently, for a couple of minutes, until the apples are thoroughly coated with the butter and have begun to exude some juice.
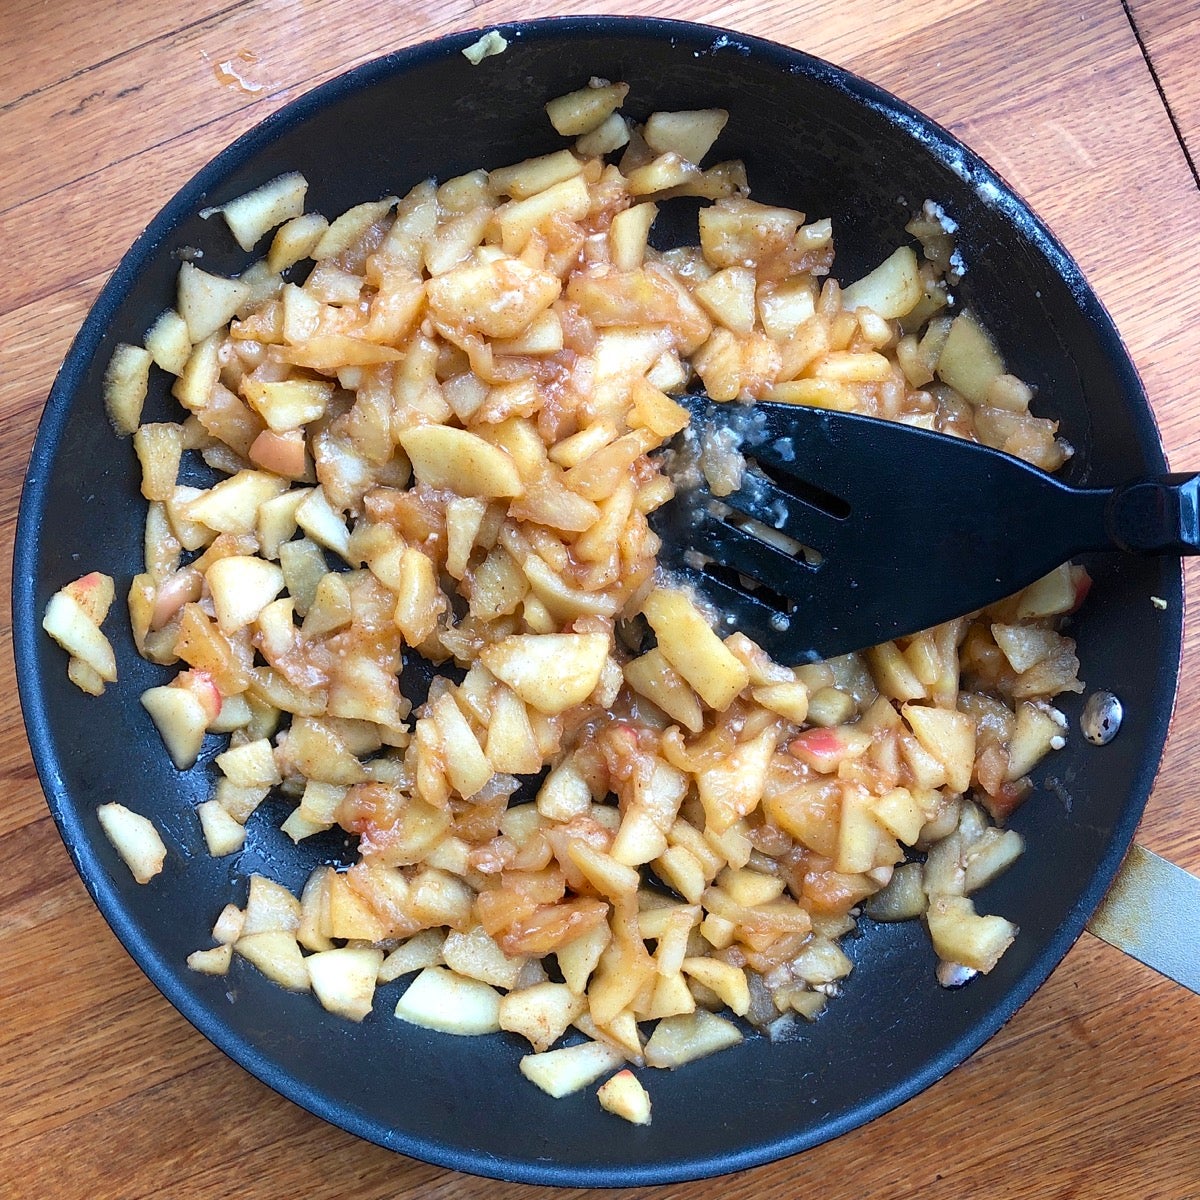
Add the sugar, salt, spices, and boiled cider and cook for a couple of minutes more, until syrupy. Add the flour and cornstarch, stirring until the mixture begins to thicken. Stir in the vanilla and lemon juice. Remove the apples from the heat and spoon them into a bowl to cool a bit before using.
Scoop the apples into the prepared crusts, heaping it up a bit; you'll use about 73g for each but it's perfectly fine just to eyeball them, too; you don't have to be exact.
To make a solid top crust, roll the reserved pieces of dough into rounds and place them over the filled crusts, tucking them in around the edge as best you can. Slice a steam vent in the top of each.
To make a lattice crust, roll the reserved pieces of dough into rectangles and cut five strips. Place three strips across each mini pie, then top with two more at right angles; there’s no need to weave this into a traditional lattice unless you really enjoy fine handwork (or self-torture). Sprinkle with coarse white sparkling sugar, if desired.
Word to the wise: If you’re like me and have an aversion to “fussy” baking, skip the pastry crusts and go with the crumb topping; it’s a million times simpler, and most people seem to prefer the taste.
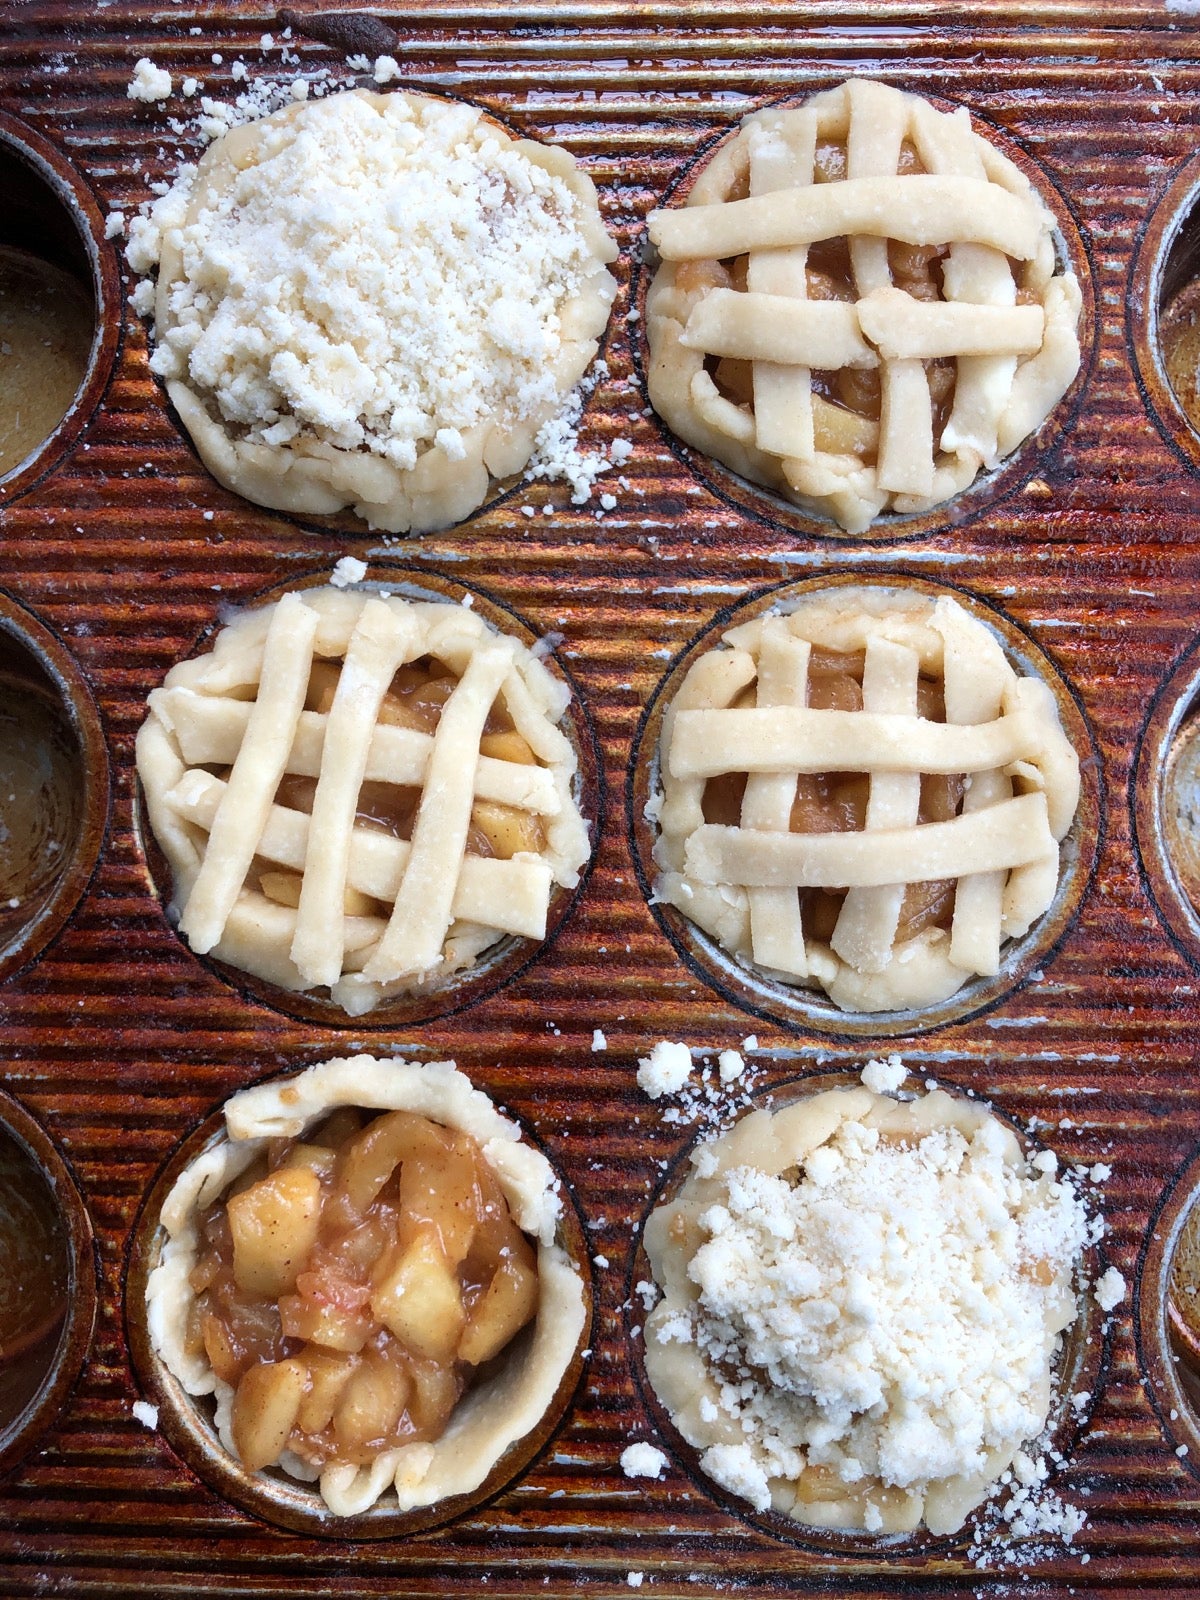
To make a crumb crust, place 30g (1/4 cup) King Arthur Unbleached All-Purpose Flour, 43g (3 tablespoons) cold butter, and 37g (3 tablespoons) sugar in a small bowl, or the bowl of a small food processor. Work everything together (or process) until well combined; be sure to stop before the mixture starts to become cohesive, as you want it to remain crumbly. Divide the crumb topping evenly among the pies, using about 17g (a generous tablespoon) for each.
Bake the mini pies for about 35 to 40 minutes, until the edges of the crusts are light brown and the filling is bubbly. Remove the pies from the oven and carefully loosen their edges. After 15 minutes, remove the pies from the pan and place them on a rack to finish cooling.
Note: Prefer strawberry or blueberry pie to apple pie? Use the techniques and baking method above, filling the crusts with about one-third of your favorite berry pie’s filling.
I started writing this blog post questioning whether making mini pies would be more trouble than they're worth. But having made several dozen, I can safely say that not only are the techniques involved very approachable — mix, pat, fill, bake — the resulting pies are both delicious and just plain fun. Have you ever wanted a whole Thanksgiving pie just for yourself? You can have it — in miniature. Happy baking!
Do you say you won't dare bake pie because you're unsure of your skills with a rolling pin? Check out these other easy no-roll crusts: No-Roll Pie Crust and Graham Cracker Crust.
