For easiest rolling and minimal cleanup, try this rolling mat
Silicone is the simple solution.


 In baking, the tools of the trade can sometimes make all the difference. We've asked bakers and employee-owners across King Arthur to point us toward their favorite baking tools, and in today's Problem Solvers, blogger PJ is sharing one of the nifty items these bakers can't live without.
* * *
What’s the one part of baking you really don’t enjoy? Rolling pie crust? Kneading yeast dough? How about piping “Happy Birthday” onto a cake, in the process showing off your — um, less than perfect — handwriting?
For me it’s none of the above. No, my chief challenge is cleanup.
I have no problem with washing mixing bowls and spoons; I love the instant gratification. But laboriously scraping bits of dried sourdough off a wooden tabletop? Wiping away the flour that settled all over the counter while you were rolling out cookie dough, your cleaning sponge getting gooier and gummier by the second? Ick.
Enter your new best friend in the kitchen: the mighty silicone rolling mat, my favorite tool for heading off onerous cleanup chores. I use my mat for everything from rolling out pie crust dough to prepping cinnamon buns, shaping dinner rolls and bagels, and so much more (e.g., cutting rollout cookies — if I ever made them!).
In my experience, there’s nothing quite as slick as a great non-stick sauté pan (hello, Calphalon).
But while this rolling mat isn’t as impossibly stick-free as that, it’s definitely less stick-prone than your wooden table or granite countertop — probably on a par with a sleek (and way more expensive) marble pastry slab, but oh-so-much easier to handle and move around. For best results, you’ll still want to either lightly flour or minimally grease the mat before using it.
What about silicone compared to parchment? Again, similar stick resistance. But the silicone mat’s advantage is its stability: It stays firmly in place as you roll, unlike parchment (even parchment that’s been wet on the back), plastic wrap, or waxed paper, all of which can slide around as you work.
To me, the number one selling point for our silicone rolling mat is the fact that once you’re done rolling out pastry dough, shaping rolls, or cutting cookies — with all the inherent dough scraps, butter smears, and piles of flour those processes entail — you simply pick up the mat, turn its contents into a wastebasket or compost bucket, and rinse it off in the sink (or deposit it in the dishwasher). No counter to scrape and wipe; no gummy sponge to clean. Genius.
Another reason I love this silicone mat is its portability. “So what?” you’re wondering. “It’s not like I’m going to roll pie crust in the bedroom or out at the picnic table.”
But what if every work surface is covered with other projects, as often happens at Thanksgiving and other food-centered holidays? Or even more important — what if the only rolling surface you have is so high (or low) that it’s uncomfortable?
Yes, uncomfortable, as in awkward, as in putting strain on your shoulders and arms. The optimum height for working with dough (or any kind of food prep) is hip height; so if you’re around 5’ 6”, your typical 36”-tall countertop is probably good. But what if you’re 5’ 1”, or 6’ 2”? Or if you simply like rolling on a lower surface, so you can really put your back and shoulders into the job? Find a desk or table at the right height, lay your silicone mat on top, and get rollin’!
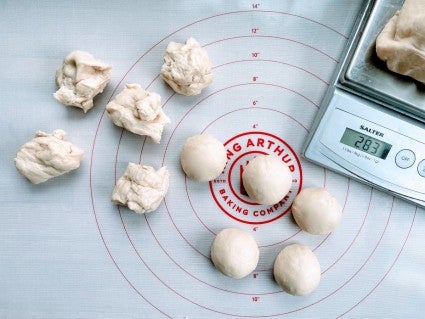
Do you know how to shape rough portions of dough into perfectly round, smooth balls? This is a key process in making dinner rolls, bagels, and many other buns. It’s actually quite simple so long as you’re working on the right surface … and a silicone rolling mat is that surface.
Surface tension is the key to shaping dough seamlessly. If your rolling surface is too slick or too rough the dough will either slide around or stick, never forming a smooth ball. But silicone, with its smooth but very faintly stippled surface, is great for shaping rounds. I find that a rough portion of dough rolls effortlessly on silicone, shaping itself into a smooth ball with just a few quick turns: no flour or cooking spray required.
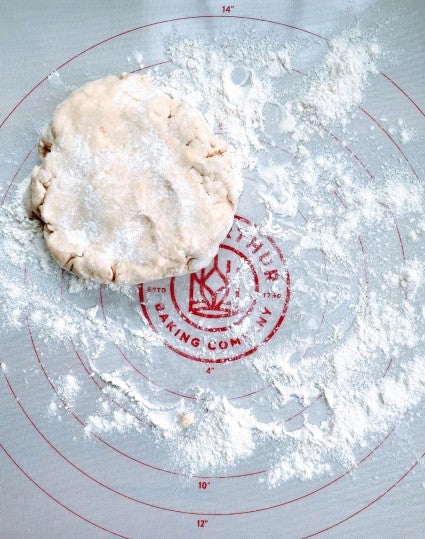
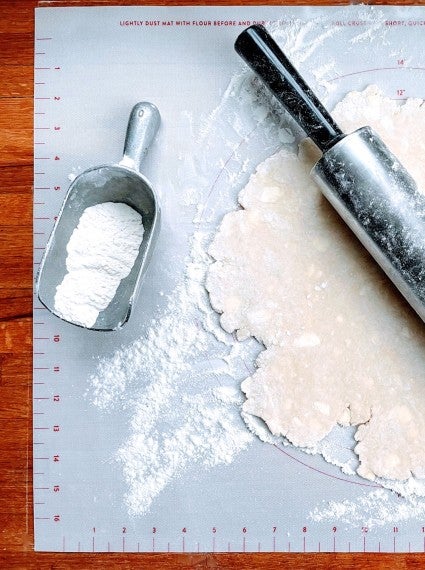
How often do your recipe directions say to roll pastry into a 13” circle for pie, or shape yeast dough into a 10” x 12” rectangle for cinnamon buns? You can find a long ruler or yardstick, lay it on your counter, and roll pastry or dough to the required measurements. But the ruler moves around. And you inadvertently sprinkle flour on it. And it’s just generally a pain in the you-know-what.
So how much easier is it when the ruler is built right into your rolling surface? Every time I roll out pie dough, I simply center the pastry in the rolling mat’s marked circle and roll outward from the center until the crust reaches the 13” mark. And as for those cinnamon buns: With markings for squares or rectangles up to 16” x 22”, a mere 10” x 12” rectangle is — well, a piece of cake.

Once you’re done with your mat, you can fold it up and throw it in the cupboard; roll it into a tube and stick it back in its original box; or do as I do: just clip it onto a hook near your work area, where it’s readily available. Because trust me — once you start using this mat, you’ll want it always close at hand.
Interested not just in this rolling mat, but in a silicone baking mat? Try our nonstick cookie mat, with markings for perfectly spaced cookies. But don’t limit yourself to cookies: this mat’s sized for a half-sheet pan, so you can use it for all kinds of rolls, breads, and pastry creations.
Cover photo by Kristin Teig.
