Weeknight Detroit Pizza
Martin reveals the secrets to an authentic Motor City pie with his recipe for Weeknight Detroit Pizza, straight from The Book of Pizza. It includes all the iconic aspects: the tall, puffy interior; the crispy frico edge; and a cheese blend that mimics the traditional (but hard to find) Wisconsin brick. A parbake ensures the pizza stays crispy (never soggy), and a finishing of ricotta and pesto (optional, but recommended) takes each slice over the top.
Hey there. Hey y'all, Martin here, and I've got a great recipe for you today from "The Book of Pizza." This is for our weeknight Detroit pie. Detroit-style pizza, pillowy dough, crispy cheese wall around the outside. I've got some beautiful garnishes today. Let's make this recipe.
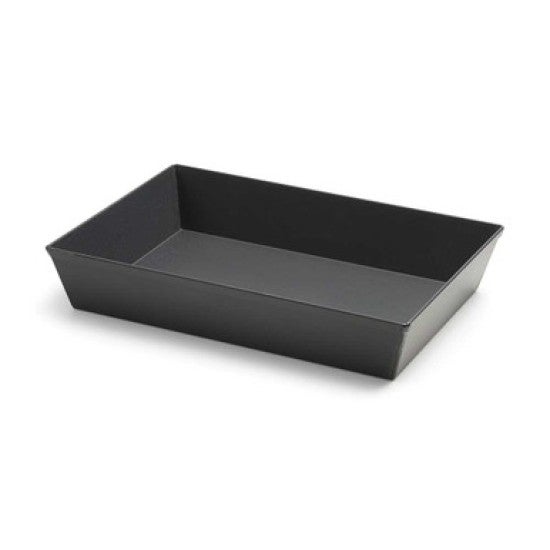
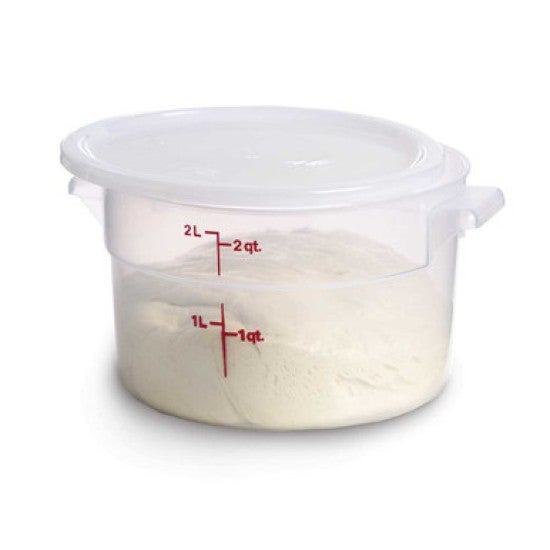
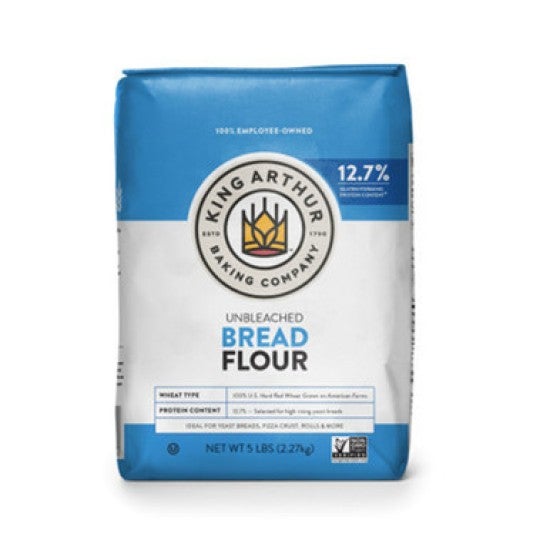
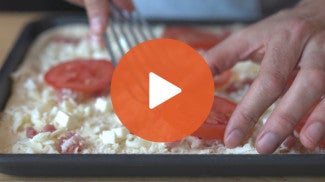
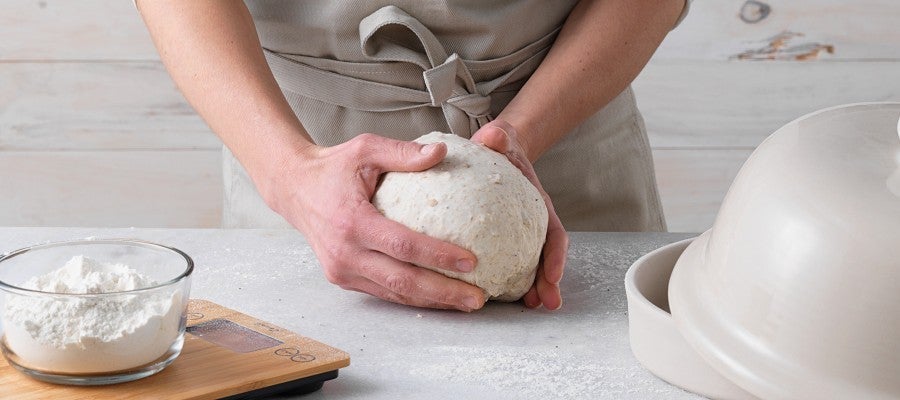
All right, so let's get this mix going. Put my nice big bowl on the scale and I'm gonna put 360 grams, about three cups of bread flour into the bowl. Bread flour, I mean, y'all have heard me say this a thousand times. We're using it for strength, it gives a nice high rise and that supports the quality of this dough, which I really like. Or one of the qualities of this dough that I really like, which is that it has this sort of like thin, crisp crust and slightly open interior. And then I've got a teaspoon and a half of salt, about nine grams. And next step is our yeast. This is one teaspoon or three grams into the bowl. Boop. And I always give these a little bit of a stir, just a little bit of a stir to make sure that they're well-combined. It's not a ton of yeast, so you wanna make sure that it's sort of distributed within your dry ingredients. And then we'll get our water in there. It's 270 grams and it's lukewarm. You know I always say this, it's kind of cool. We run the studio kind of cool so the water is slightly warm. If it's the middle of summer and your house is 85 degrees, you might wanna cool that water down a little bit. Straight in. And then we need 15 grams of olive oil. And I'm just gonna pour that right on top. And now we'll give it a little stir. This is a medium consistency dough. It's not super wet and it's also not super firm. We want it to be sort of firm enough to have some strength, but at the same time, we want it to be soft enough to have some nice sort of variable crumb structure is what I would say. Early in the mix here, I'm just gonna use the handle end of my wooden spoon and I'm gonna use that sort of clean the sides of the bowl. And then I'll use this sort of pressing and folding motion with my flexible scraper just to make sure that all the flour is fully incorporated. Looking for any dry spots and just continuing until I don't see those. And you know, lately I've seen some doughs that weren't really that incorporated, and so I've been a little bit extra diligent around my sort of mixing process. And so I'm gonna go in with a wet hand and just sort of press and fold sort of knead in the bowl for a second just to make sure that every bit of flour and olive oil, salt and yeast, everything is incorporated. Alright, so the dough is mixed, it's not smooth yet. Remember, we're gonna fold it a couple times in the coming hour or so, and that will help it to sort of smooth out and evenly strengthen. During that period of time, I'm gonna leave it in my two quart container here. You could leave it in the bowl if you wanted. Just make sure you get a good cover on there. So little squiggle of olive oil. Grab this dough, put it in here and turn it once if you want. You don't have to. That looks good to me. Okay, so the dough is mixed, it looks okay, it's ready to go. We're gonna come back in 15 minutes for the first fold. All right, it's been 15 minutes or so. I say this all the time, if it's been longer, that's okay. Don't let the dough sort of be in charge of you. All we're doing is just sort of coming back and checking on it. Does it feel like it's starting to move a little bit? And we're giving it a little bit of structure through a bowl fold. So wet hand, into the bowl, grabbing on the outside, stretching upwards, pressing to the middle. And I'm just working my way around. And as I do that, I can actually see the structure change from almost, like I said before, like that cottage cheese consistency to something that's sort of organizing itself. It looks stretchy and smooth as I sort of manipulate it. It just gets prettier. So just make your way around the container, pressing to the middle and then you can invert it, get the lid back on there and put it in a comfortable spot to rise for another 15 minutes. Alright, I should fold this dough, should put away this beautiful book. Have you seen this, "The Book of Pizza?" Tons of great recipes, including some pan-styles like this Detroit. It's been about 15 minutes somewhere in there. And the dough actually looks really good. It's even risen a little bit, you know? It hasn't been that long. But again, this is Weeknight Detroit, right? It shouldn't be some super protracted timeline that you have to wait around for. It should happen noticeably in a reasonable timeframe. We're 30 minutes into basically rising after that initial mix and it'll already windowpane. Alright, so let's give it a fold. Stretching from the outside, pressing to the middle, just moving around. And boy, this dough is happy, it's stretchy, it's smooth, it feels active. Beautiful, beautiful dough. So given my fold, I'm gonna invert it in the bowl. I'm gonna put my lid back on there and we're gonna wait an hour to an hour and a half for it to rise. And then we'll come back and get it into the pan. If it's your preference, you could also chill the dough at this point and then proceed with the recipe on day two or whatever it is. That's another option to sort of like accommodate a different timeframe. For us though, we're gonna come back in an hour to an hour and a half. We're gonna get it into the pan and then we'll be getting closer to dinner time, which I like, even though it's not dinner time. I'm gonna go look at this beautiful book for a minute. Okay, so let's make this sauce. I got my pan warming up, I've got some olive oil that's about 25 grams. I'm gonna get that in there. I've got four cloves of garlic. Man, that smells good. And I'm just letting sort of fry in the olive oil until it's super fragrant. I'm not looking for much browning or anything like that. So once that's nice and fragrant, I'm gonna go ahead and add in my 28 ounces of crushed tomatoes and four teaspoons of sugar, about 17 grams, and then one teaspoon of salt. And we're just gonna give it a little stir and then we're gonna reduce it for about 20 minutes. The thing I'll say though is that you don't want a real soupy sauce to put on top of your Detroit. You want a reduced sauce, what I would call a cooked sauce. Okay, so we've got a beautiful dough. High rising, we gave it the full 90 minutes. So I've got my Lloyd pan here, I guess I should talk about that for a second. I love these pans. I don't think anybody makes a pan like this. It's dark anodized. You can put it in higher heat situations. So I have some of these that are a little bit smaller and I even use 'em in my tabletop ovens outside as well. It's one of the versatility aspects of this. So the dark color, this dark anodized color supports browning. So it's a really nice thing to have for some of your favorite pizzas that go into pans. So Lloyd Pan, love these. I'm gonna put a little bit of oil in before I dump the dough. About a tablespoon. You can measure with your heart again if you want to, or I'm following the recipe here. So I'm gonna measure at one tablespoon. When I'm at home, that's not something I would measure. Just so you know. But I understand the value of, you know, clear instructions that produce repeatable, delicious bakes. So I'm on team accuracy here. And then I'm gonna get the dough in there and like I said, it's super beautiful. It's high rising, it's fluffy. We know that we've got good flavor in there. So let's get it into the pan. Beautiful, big, puffy mass of dough. I'm gonna flip it once so that I can dimple it without it sticking to my hands and so that I have olive oil on both sides. And I can just start this dimpling and sort of stretching process. Oftentimes because we're going from a round container to a rectangle, sometimes what I'll do is I'll reach up in there and I'll just stretch it so that it's a little bit more sort of square-cornered. Go around to the other side, sort of pick it up by its ears and just give a little bit of a stretch. And then I'm just pressing out into the corners. I'm sort of dimpling. This dough is stretching pretty easily, partly as a result of the fact that we let that bulk go the full 90 minutes so the dough is well risen and sort of extended in such a way that allows it to stretch more easily at this point. If the dough were a little bit younger, I might say, eh, I'm gonna go ahead and put it in the pan, but then I'm gonna come back in 30 minutes and just see if it'll stretch all the way into the corners. And this one looks real good. Maybe I give it one more stretch on these ears just a little bit to say, hey, I really want dough that's evenly distributed within the pan. And that looks pretty good. I'm gonna let it recover from my sort of manhandling. For 45 to 60 minutes, put it in a nice comfortable spot. Okay, so the dough has risen for 60 minutes in a nice, comfortable condition. Let's see what it looks like. Beautiful. It's well risen, it's definitely ready to go. I see some bubbles here and there. It looks like it's puffed up a little bit. So my oven is preheated 500 degrees. I've got a baking stone or steel in the lower third of the oven. And this bake has two parts. And this may be something that's new to you. The first part is like a parbake. I'm gonna put it in for about 10 minutes. The dough is going to puff and just barely begin to sort of set and darken in spots. And then I'm gonna take it out and then I will top it. And the reason for that is that often with Detroit-style, we're putting a fair amount of toppings on top. Using the parbake allows that crust to rise and for the interior to sort of open and lighten before I put heavy toppings on it, which would compromise the structural aspect of it. So it's a two part bake. Let's get it in there for the first part, 10 to 12 minutes, 500 degrees on a stone or steel in the lower third of the oven. Let's go do it. Okay, so first phase done. This looks really good. You know, the dough will retract a little bit from the sides and that's okay and it's already starting to get a little bit golden on the bottom. So I've got two kinds of cheese here. We're trying to approximate Wisconsin brick, which is the classic cheese used for this pizza. We've got a blend of low-moisture mozzarella and cheddar cheese. And I'm gonna sort of like alternate between my two bowls to get this cheese in here. And I'm making this cheese wall first. That's what I'm doing first is making this little cheese wall, okay? So I'm filling in and I'm kind of pressing it against the side. I'm not touching the pan, but I'm kind of pressing it against the side a little bit to produce this classic aspect, which is called a frico, which is like the sort of crusty cheese edge. And so now I'll go back and I'll just get my full cheese coverage. Is that a lot of cheese? Yes, it is a lot of cheese. But listen, you're not gonna eat half of this pizza, you know? You're really not. You might actually, you might. But a reasonable portion is not a ton of this. It eats pretty heavy, you know? So I'm just making sure that I've got good coverage and also that I have some cheese that's against the side walls of the pan. Like I said before, the pan's hot, just watch yourself. And I didn't mention it, but when the pizza comes out, if you'll look here, you can see that I've got some beautiful little brown spots in places. But by and large, it's still on the white side. It's not fully baked yet. And so that's why we're gonna top it and then we'll return it to the oven for the remainder of the bake. Okay, beautiful jammy sauce. It's nicely reduced. And so now I'm gonna go ahead and add some. And you know, depending on who you are, some people prefer that the sauce even go on after baking the pie and you can do that as well. There's more than one way to sort of slice it. Someone's gonna tell me that I did it wrong because people are passionate about pizza and I love that. Everybody's got their own method. I'm gonna just put this on in stripes. So we're gonna get our pizza back in 12 to 14 minutes. What are we looking for? We're looking for a really beautifully, fully baked sort of cheese wall on the outside. We're looking for this sauce to even further reduce a little bit. We're looking for the cheese to melt. It should just look gorgeous. So another 12 to 14 minutes and then we'll pull it out. Hot, hot. Looks really good. Man. I'm gonna go ahead and get it out of the pan while it's still hot. You know, you can let it hang for a second and set up. But also, you don't wanna let it sit in here for too long because if you just let it cool in the pan, it will sort of sog out because of all the steam that's still coming off of it. So take something like a good thin spatula like this or an offset or something like that and just go around the pan and make sure that you're not stuck. Taking that step right now will mean that when I go to actually depan it, it'll come out in one fell swoop, which is what I want. This should have a beautiful, dark sort of crown around it, which is what I want. That's not burnt, it's just really fully toasted. Looks really pretty. Beautiful, crunchy, crunchy edge. Like to the person you love most in the world, give a corner a piece of this and it's sort of like you'll seal the deal for the remainder of your life because to get a corner piece of a Detroit-style is truly like the greatest act of love and pizza, I think. So we're gonna come back in like two or three minutes, I'll cut it and then we'll proceed to the last and final step, which is to garnish and then enjoy a bite of this beautiful Detroit-style pizza. So I'm gonna cut it into eights and I think that's probably pretty good. I think that's generous, but appropriate. So what I want to do now is garnish this. And this is something that I did actually when we were shooting this book. I had made the plain basic pie and we had some pesto or something kicking around and we were trying to get people to take home all of the food that we had made. And one of the ones that I did that I still think about was one that I just threw some pesto on after the bake and it was so, so good. So I'm gonna do that here. So I've got a little bit of pesto and I'm just gonna give each slice just a dollop right in the middle. And then I've got some ricotta, just a little bit of ricotta in a bag. You can spoon this on, you don't have to pipe it. I'm just gonna pipe it, though just 'cause it's a little bit easier. I'm gonna do a little bit of red pepper flake, and then a little bit of Pecorino Romano just to sort of gild the lily here. So a beautiful Weeknight Detroit-style pizza. It's a celebration of a crisp, crisp, crisp, cheesy edge with a beautiful pillowy dough inside. It comes together in the space of an afternoon. It's the basic with just cheese and sauce. I added a little bit of pesto, a little bit of ricotta cheese, Romano. The truth is that it's not that complicated and honestly, it's not hard to make some of the best pizza of your life. We did this in the space of an afternoon. Comes together in no time at all. That can be yours. So this is our Weeknight Detroit. This is Martin and Tucker, and also Kat, one of my co-authors here in the studio today saying, thanks for joining us. Look for "The Pizza Book" wherever your favorite books are sold. It's there. And let us know how you like it. I'm gonna sit here and eat the rest of this pizza.

Video Credits
Shop this video


Related Videos


Your bread fell flat. Your cookies crumbled. Who do you turn to?