What is proofing bread? And how do I get it right?
Mastering your dough’s rise is one crucial step to great bread.

Date
August 31, 2023

Starting your journey as a bread baker? It can be daunting — so many confusing terms! — but once you understand what everything means, the process becomes much clearer. Here, we’re diving into one of the most crucial steps to making homemade bread: proofing.

Everyone knows that bread dough rises, right? Well, that’s basically what proofing means! It’s when bread dough is left to ferment — the yeast (commercial yeast or sourdough culture) consumes the sugars and starches in the dough and expels carbon dioxide — which causes the dough to expand as it traps the carbon dioxide within its strong and stretchy gluten network. As bread proofs, it typically doubles (or nearly doubles) in size, becoming puffy and pillowy.
Professional bakers often use terms that are different from the ones used by home bakers. In this case, there are several different terms that are used interchangeably to describe this step. Other words and terms that refer to proofing include rise and fermentation.
Read our beginner’s guide to gluten.
Which leads to the next point: Bread dough is usually left to rise two different times in the baking process, and proofing technically refers to just the second of these rises but is often used to describe both.
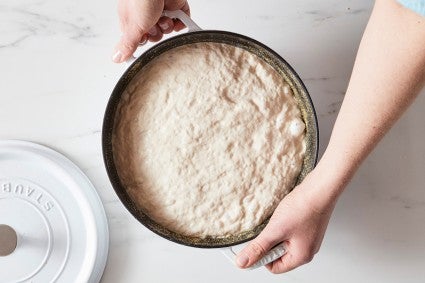
In a standard bread recipe — take Classic Sandwich Bread for instance — the bread dough is mixed and kneaded, then left in a covered bowl to rise (usually, but not always, doubling in size). This step is often called first rise, first proof, bulk fermentation, or bulk proof. It typically takes around 1 to 2 hours, depending on the dough and the environment in which it’s left to rise.
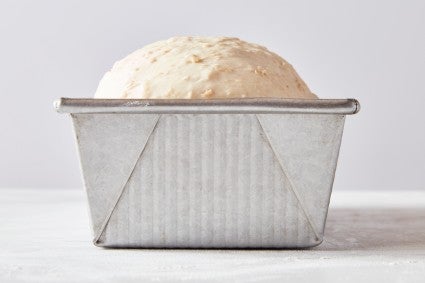
Once the dough has undergone bulk fermentation, it is shaped. In this example, it’s shaped into a sandwich loaf and placed in a bread pan, but this also applies if you’re shaping a boule, a bâtard, or even rolls. Once shaped, the dough is left to proof a second time — this is the step that “proofing” technically refers to. Much of the air was knocked out of the dough while shaping, so this is a chance for the dough to expand again before baking. This step is sometimes called second rise or second proof.
One of the biggest keys to successfully proofing bread dough is temperature. Yeast thrives best in a warm environment, and the warmer the conditions, the quicker your dough will proof. “Breads do well in the low to mid-70s, between 72°F to 78°F,” says Baking Ambassador Martin Philip. “That’s just the right range to encourage yeast activity without having your dough move so fast that it overproofs or fails to develop flavor.”
Martin prefers an electric folding bread proofer, which allows him to control the temperature and environment in which his bread proofs. But you can also be intentional about where in your kitchen or home you place your bread to proof to ensure you have the best environment — and temperature — for yeast to thrive.
Ideally, you want to find the warmest spot in your house, where cozy temperatures will encourage yeast activity. Options include:
If you’re baking bread in the summer or your house is naturally warm, you may not need to go with any of these options — your kitchen counter may be warm enough. A digital thermometer is a helpful way to gauge the temperature of your bread throughout proofing: If it stays around 72°F, it’s fine where it is. If it drops in temperature, consider moving to a warmer spot.
While many cookbooks recommend using a tea towel to cover rising dough, we don’t agree. “Draping your dough with a kitchen towel is not a sufficient cover — your dough will dry out, forming a skin,” says Martin. “Use an airtight lid, bowl cover, or plastic wrap instead.” If you’re doing a lot of bread baking, consider a lidded dough-rising bucket.
It depends! (Not a very satisfying answer, we know.) Recipes typically include time ranges (“Let rise for 1 to 1 1/2 hours”), but these should be considered guidelines, not hard and fast rules. Instead, use visual clues to determine if your dough is well-proofed — more on that next.
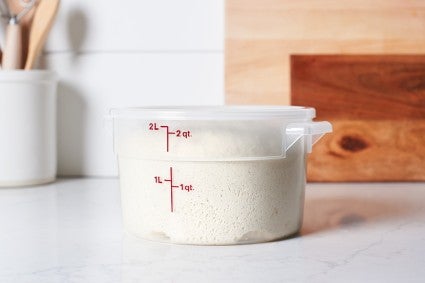
If the dough is supposed to double in size during bulk fermentation, place it in a straight-sided container with markings on the side so you can easily and accurately tell when it has doubled in volume.
If you’re proofing shaped sandwich bread dough in a loaf pan, look for the dough to rise 1" over the lip of the pan. (Don’t guess, use a ruler to measure!)
For freeform loaves, use the poke test to determine proofing: Lightly flour your finger and poke the dough down about 1". If the indent stays, it’s ready to bake. If it pops back out, give it a bit more time. See more guidelines here: How do I know if my bread dough has risen enough?
And remember: As a general rule, if your dough is proofing in a cool environment, it will take longer. If it’s proofing in a warm environment, it will be quicker.
“Proofing is every bit as important as the other foundational aspects of bread making, from mixing to baking,” says Martin. “It’s key to bread’s structure, oven spring, and the beauty of the final loaf.”
While proofing may be the most passive step in bread baking — you literally sit back and wait — it’s also one of the most crucial. Being mindful of how you cover your dough, where you place it, and when you bake it will set you up for baking success and better bread.
Practice proofing with Martin's small-batch focaccia:
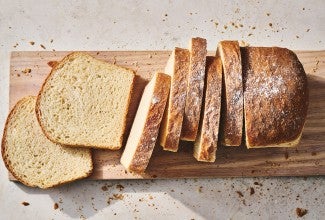
Cover photo by Mark Weinberg; food styling by Liz Neily.