


How to make your own wedding cake
With advice from bakers who lived to tell the tale.

Date
May 14, 2026

Telling people you’re making your own wedding cake elicits responses that range from “Are you insane?” to “How are you actually going to pull that off?” It’s true, it’s not for the weak, but it’s a unique challenge some bakers (including me!) are willing to take on.
Making my own wedding cake was a rare opportunity to bake something for all my loved ones, and sharing something homemade with everyone was important to me. Recipe Editor Kye Ameden also opted for a homemade wedding cake and says, “It added another personal touch to our event, it was an easy way to make sure it was just what we wanted, and we saved money, too. Plus, it was fun!” Outside of King Arthur, others have attempted it too: Just look at Justine Doiron’s impressive lineup of four (!) different cakes or Zoe Barrie’s extra-long almond sheet cake.
Admittedly, it’s not for everyone (that’s why bakeries exist). Professional baker Bronwen Wyatt, who previously ran a cake business in New Orleans (and also made the cake for her own micro-wedding) emphasizes, “I think a wedding is going to already feel like a very emotional time, even if everything goes perfectly. If there’s any chance making your own cake is going to stress you out or take you out of just enjoying yourself and savoring these really special, one-in-a-lifetime moments, consider outsourcing the job! I was pretty surprised that even my own tiny wedding made me feel so nervous.”
If you do decide to go on this DIY-route, it’s imperative you know what to expect and have a game plan. Here’s a good place to start.
Will you make a smaller 8" cutting cake plus sheet cakes for serving? Or a three-tiered cake that can feed all 150 guests? Whatever combination you choose, just be sure that you have the tools and freezer/fridge space to pull it off. (More on that below.) When calculating how much cake you’ll need, remember that wedding cake slices are much smaller than a traditional triangle wedge cut from a round cake.
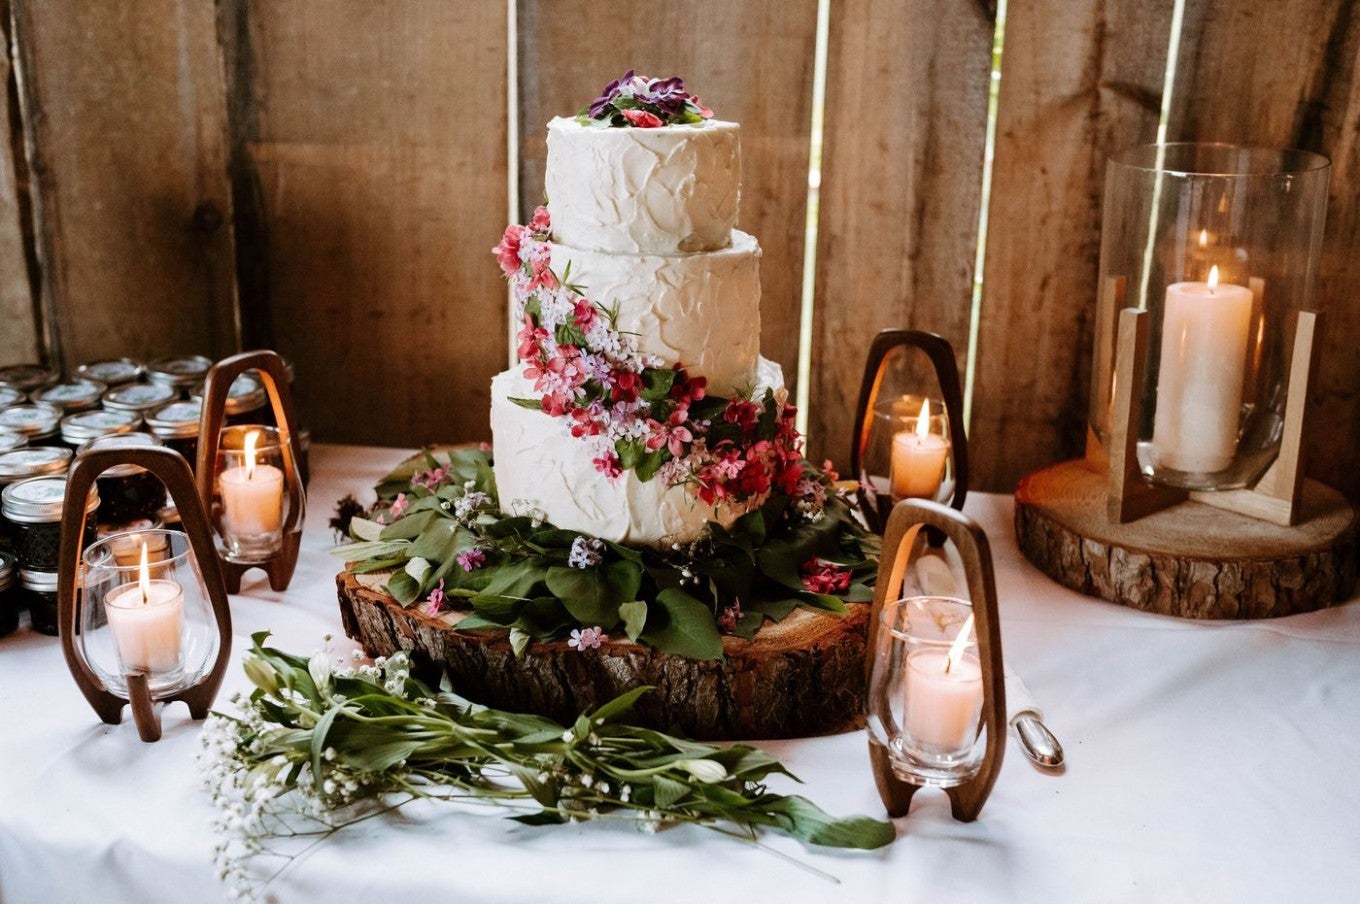
For my own wedding of 100 guests, I made a decorated two-tiered cake (6" and 8") to display, plus two 9" x 13" sheet cakes (assuming each sheet cake served 48 guests). For me, two tiers felt manageable in terms of assembly, storage, and transportation. Plus, because the sheet cakes were just for serving and wouldn’t be displayed, I didn’t have to decorate them.
“Choose recipes that can be made ahead and store well, since the freezer will be your best friend in this process,” recommends Kye. “And test those recipes well ahead of time too, to make sure you like the flavors and textures, and also see how they hold up so you know how far in advance you can start prepping.” If your wedding is in the summer, it’s even more imperative to choose a stable frosting. I used Swiss Buttercream for that reason, and Kye opted for a cream cheese-based buttercream for added stability. (This guide to troubleshooting Swiss meringue buttercream may come in handy.) Ermine Frosting, French Buttercream, and Italian Buttercream are also great options for stable frostings.
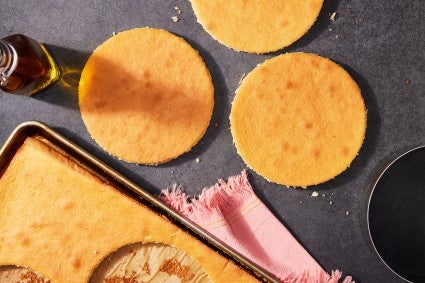
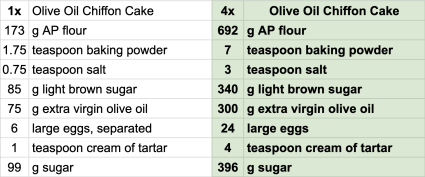
I had a goal to make a layer cake every month leading up to my wedding to test drive different flavor combinations and practice decoration techniques. After making different iterations of the cake and fillings, I landed on different flavors for each tier and serving sheet cake: Black Sesame Chiffon Cake from Natasha Pickowicz’s More Than Cake with passionfruit curd and black sesame Swiss meringue buttercream; and Hannah Ziskin’s Olive Oil Chiffon Cake with Thai tea Swiss meringue buttercream.
These resources are helpful to figure out how much you’ll need to scale your recipes: How much frosting do I need for a cake? and Why the size of your baking pan matters so much
Keep a running Excel doc with all of the recipe links, ingredient lists, and all of the tools and equipment you’ll need, noting what you already have and what you still need to purchase or borrow.
I highly recommend measuring your ingredients using a scale, which makes scaling recipes up so much easier. To scale your ingredient list, note the initial ingredient amounts in grams, and either manually multiply or use Excel to easily do the math for you.
As you practice baking and assembling cakes, make note of what tools or equipment you’re missing or may want to have multiple on hand.
The essentials:
Nice-to-haves:
To make sure you're not baking the week of your wedding, turn to your freezer. You can freeze cake layers, fillings, and/or frostings in airtight containers or cling wrap; you can even freeze the whole filled and frosted cake for up to a month!
I froze two fully frosted tiers. To do so, I first froze the cakes uncovered until the frosting solidified. Then, I wrapped each one tightly in plastic wrap. Since I needed to still assemble the cake on my wedding day, I let it thaw in the fridge the night before. (Do not attempt to assemble fully frozen cake tiers, since the layers and frosting may crack!)
Kye meanwhile froze her fully assembled three-tiered cake. “I wanted to avoid wrapping it in plastic so that there weren’t marks left on the frosting. I ended up using a large plastic storage bin turned on its short side so that it was tall enough to contain the cake. A friend with an extra fridge and freezer was willing to store the cake — and he transported it to the event, too!” she shares.
Now that you’ve done all the organization and mental prep, it’s time to bake! For me, the sweet spot was two weeks before the wedding, and I’d recommend starting no more than one month in advance so that everything still stays fresh in the freezer. Chart out a timeline of what needs to get done, and how much time you’ll need depending on the quantity and complexity of your recipes. I set aside an entire weekend and started by making all of my fillings, soaks, and chiffon cakes on one day, then the frostings, cake assembly, and final coats of frosting for the next.
After that, the hardest part is over — take a moment to be proud of your work and get excited for the big day!
In most scenarios, the only thing left to do on wedding day is to stack the tiers (use cake dowels to avoid the upper tiers from sinking into the lower tiers) if you haven’t already, and add the final flourishes, whether that’s piping, flowers, or other decorations.
Kye and I took similar approaches, using flowers for the main décor element. “They’re beautiful and didn’t require hours of endless piping on my part,” she notes. “They did require day-of-attention to place them on the cake, but I was able to delegate the majority of this task to a few trusted friends after I showed them how to do it and what my vision was.”
Most importantly, she adds, “Do not plan on doing anything involving the cake on the actual day of the event, if possible. There’s so much happening and you want to be able to appreciate the people around you and be present, not be worried about piping bags and final garnishes.” Bronwen shares a similar sentiment: “I promise you’d rather be hanging with your guests than fiddling with a cake!”
Bring a small offset spatula and a little container of leftover frosting to the venue for touch-ups, and once again, delegate that responsibility to a trusted guest.
Now, the only thing left to do is celebrate and astound your guests with a beautiful cake you made with your very own hands. Good luck!
Cover photo by Danielle Sykes, food styling by Liz Neily.
