-
To make the dough: In a large bowl, stir together the water, sugar, 2 cups (240g) of the flour, the yeast, salt, and butter. Mix until fairly evenly blended.
-
Add the remaining flour and the cocoa, and stir until the dough pulls away from the sides of the bowl. Turn the dough out onto a clean work surface and knead it until it just starts to smooth out. You don't want to knead too much at this point, since the dough will continue to develop during its long rise.
-
Place the dough in a lightly greased bowl, cover, and let rise for about an hour, until puffy.
-
After an hour at room temperature, refrigerate the dough (in its covered bowl) for 8 to 16 hours; overnight is your best bet.
-
To prepare the butter: Just before the dough is ready to come out of the fridge, prepare the butter. Cut each of the three sticks in half lengthwise and place all six pieces on a floured piece of waxed paper or plastic wrap. Sprinkle flour on top of the butter, cover with another piece of paper or plastic, and gently pound with a rolling pin until the butter becomes malleable. Then roll it into a rough 8" x 8" square.
-
To assemble the Danish: Remove the dough from the refrigerator, place it on a lightly floured surface, and roll it into a 12" square. Place the butter in the center of the dough at a 45° angle; it'll look like a diamond inside the square. Fold the four flaps of dough into the center to enclose the butter, pinching them together as best you can.
-
Roll the dough into a 10" x 20" rectangle. Fold one third into the center, then the opposite third over the first, like you were folding a business letter; this is called a letter fold.
-
Turn the dough 90° and roll it into a 10" x 20" rectangle again.
-
Fold each of the shorter edges toward the center until they meet without overlapping. Fold the dough in half along the center where the edges meet, as if closing a book; this is called a book fold.
-
Wrap the dough in lightly floured plastic wrap and refrigerate it for at least 8 hours (or up to 24 hours, until you're ready to use it).
-
To finish the Danish: Remove the dough from the refrigerator. Cut it in half crosswise, right through the folds, to make two 5" squares. Return one half to the refrigerator to save for another use (see "tips," below) or freeze for longer storage. Line two baking sheets with parchment.
-
Roll the dough into an 8” x 24” rectangle, trimming the sides so they’re straight and neat. Cut the dough into 12 squares (4” x 4”).
-
Start by rotating one of the squares so that it looks like a diamond; one of the corners is pointing toward you and another is pointing away. (Imagining the corners as north, east, south, and west, like the points on a compass, can be helpful here.) The video below shows the next five shaping steps.
-
Fold the right-hand (east) corner across to the left-hand (west) corner to make a triangle. Starting 1/2" below the left-hand (west) corner, use a bench knife or a chef's knife to make a cut parallel to the edge (through both layers of dough) all the way to the bottom (south) corner.
-
Make a similar cut starting about 1/2" above the left-hand (west) corner and moving all the way up to the top (north) corner. Make sure your cuts don't intersect at the left (west) corner.
-
Gently unfold the triangle, bringing the top piece of dough on the left (west) over to the right (east). You should now be looking at a diamond shape with a border.
-
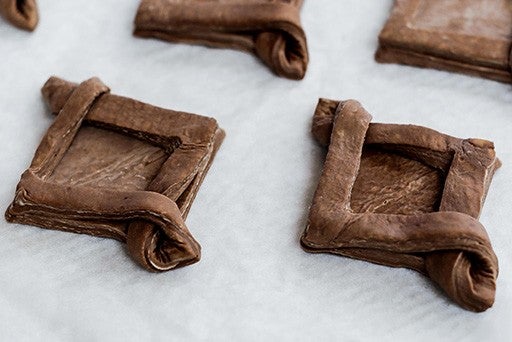
To create the final basket shape, lift up the top (north) corner and fold the border down to the bottom (south) corner so it aligns with the inside of your cut.
-
Then pick up the bottom (south) corner and fold it up to meet the top (north) corner. You should now have a two-layer border that twists at the right (west) and left (east) corners. This shaping process is much easier than it sounds!
-
Space the shaped pastries on the prepared baking sheets, leaving at least 3" between them.
-
Use a piping bag to fill the center of each pastry with 1 to 2 tablespoons of pastry cream. Garnish each pastry with a scant tablespoon of cherry pie filling, scooping it on top of the filling.
-
Cover and let rise in a warm spot (not over 80°F) for 1 to 2 hours, until puffy.
-
To bake the Danish: Toward the end of the rising time, preheat the oven to 425°F.
-
Bake the Danish for 18 to 20 minutes, until their edges are set and the cocoa is fragrant. Remove them from the oven and allow them to cool a bit before serving; their structure needs a chance to set.
-
Storage information: Store any leftover pastries, well wrapped, in the refrigerator for a day or so; freeze unfilled pastries for longer storage.