Make your best cookies with these 10 tips
Cream correctly, scoop seamlessly, and whatever you do, weigh your flour.

Date
September 27, 2023

Cookies are often the first thing we learn to bake: They’re simple, fun, and comforting. But just because they’re straightforward, that doesn’t mean they always turn out right. Are you plagued by cakey cookies, thin cookies, hard cookies, or more vexing variations? Here are our tips to ensure you make your best cookies, every time.
A little too much flour can be the difference between a dry, cakey cookie and a fudgy, chewy one. And if you’re weighing your flour by volume (i.e., with measuring cups), then it’s very likely you’re adding too much flour.
That’s because measuring flour by volume is wildly inconsistent: It all depends on how densely the flour is packed into the cup. If the flour is more condensed, a cup can hold up to 160g of flour. If you fluff and scoop, as we recommend, a cup will hold around 120g.
Don’t have a scale? Buy one now! In the meantime, here’s how to measure flour correctly by volume.
But if you weigh your flour with a scale? You’ll always get exactly 120g of flour per cup, precisely as our Test Kitchen (or whoever developed your recipe) intends. Which translates to cookies with the perfect texture, whether that’s chewy chocolate chip cookies or crumbly, buttery shortbread.
Here’s a common ingredient line in cookie recipes: 8 tablespoons (113g) unsalted butter, at room temperature.
Don’t ignore those last three words! Butter needs to be the correct temperature to cream with sugar (more on that below), which means it should be right in the Goldilocks zone — not too hot and soft, and not too cold and hard.
But what exactly does room temperature mean? You should be able to press an indent into the butter with one finger, as if you were pressing it into clay. The butter should not be so warm that it’s greasy; it should still be slightly cool, with a bit of resistance when you press it.
The best way to get your butter to room temperature is to leave it out on the counter for a few hours. But if you need to get butter to room temperature quickly? We tested tons of different methods to determine the best one.
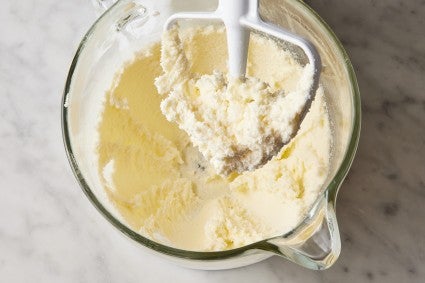
Typically, one of the first steps when making cookie dough is to cream butter and sugar together. This process aerates the mixture — the hard sugar crystals cut through the room-temperature butter, creating tiny pockets of air that help leaven the cookie when it bakes.
If you don’t cream butter and sugar long enough, it will still be gritty and dense, which may result in grainy cookies that don’t puff or spread. Meanwhile, if you cream butter and sugar for too long, it will introduce too much air, causing your cookies to potentially puff excessively and become cakey while baking.
Cookies don’t always require creaming. One of our favorite tricks for fudgier cookies is to ditch the creaming and use melted butter instead!
Properly creaming should take about four minutes on medium speed in a stand mixer, until the mixture is pale and fluffy. Watch how it’s done:
Sugar is sugar, right? Nope! Brown sugar is white granulated sugar with molasses added back in — up to 10% molasses, by weight. This translates to several key differences in your cookie baking.
Besides adding caramelized flavor and golden color to cookies, brown sugar is acidic and lowers pH — which is important to activate baking soda, a leavener typically called for in recipes that use brown sugar. (Low pH brown sugar + high pH baking soda = the reaction of leavening.) Using granulated sugar instead would require tinkering with acid levels and leaveners to achieve the same reaction. What’s more, if you use white sugar in place of brown, your cookies may spread less (or more, depending on the other ingredients in the recipe).
The good news: If you don’t have brown sugar, you can make your own. Here’s how.
Chilling cookie dough can be annoying — do you really want to wait longer for freshly baked cookies? But as tempted as you may be to skip this step, don’t. It’s crucial for many reasons: Chilling cookie dough controls spread, concentrates flavor, and creates cookies with chewy/crisp (rather than soft/doughy) texture. Skipping or shortening that chill may result in thin cookies with less browning and blander flavor. So wait the extra 30 minutes — it’s worth it.
Learn more in our previous post: Chilling cookie dough: Does it make a difference?
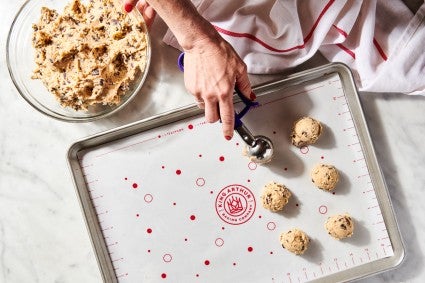
For a uniform appearance and an even, circular shape in all your cookies, use a cookie scoop to portion out the dough. You can choose your preferred size — small, medium, or large — then scoop and drop in half the time it takes to do so with a spoon.
And a bonus tip: If your cookies still turn out a little wonky, you can use a drinking glass to transform them into perfect circles. When the baked cookies are just out of the oven and still hot, take a wide-mouthed drinking glass and turn it over to cover the cookie. Move the glass in a circle, rounding the cookie’s edges as you do so to smooth it into an even shape.
It matters how you line your pan, and we’ve done the baking to prove it. In an experiment testing five different pan lining methods against each other, cookbook author Jesse Szewczyk found that cookie spread varied wildly depending on how the pan was lined. A greased baking sheet caused unsightly dark bottoms and burned edges, while an ungreased, unlined baking sheet put cookies at the risk of sticking. Baking on aluminum foil caused the cookies to spread extensively and become thin and crispy.
When lining your pan to bake cookies, we recommend two methods. A good, safe bet is to use parchment paper. The cookies spread just enough while maintaining a nicely domed center. For even more consistent results, baking on a nonstick mat resulted in perfectly shaped cookies that spread just the right amount.
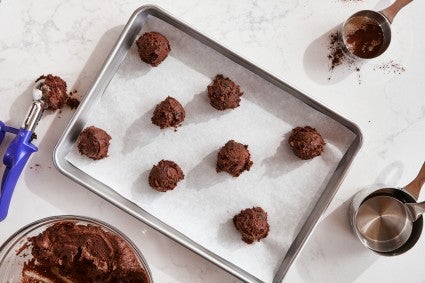
Cookies tend to spread more than you think they will. So as much as you may want to knock out an entire batch of dough at once, resist the urge to crowd them on the baking sheet. Instead, leave several inches in between each ball of dough. Otherwise, the cookies can spread and run into each other, transforming them into messy shapes and ruining the contrast between crispy edges and chewy centers.
And for extra insurance, follow the next tip, then space cookies based on what you learn there …
Before placing all your dough in the oven and hoping for the best, bake one or two test cookies before scooping and baking the entire batch. That way you can do a complete initial assessment of:
Adjust accordingly before baking the full batch to guarantee your best bake.

It’s always best to err on the side of underbaking a cookie, instead of overbaking. Typically, cookies should still look a little underdone when you pull them from the oven — that’s because they’ll continue to bake on the hot baking sheet, and they’ll settle and firm up as they cool.
You want to remove your cookies from the oven once they’re just set in the middle, with golden brown edges. If you’re unsure what “set” looks like, keep an eye on their shine. If the dough is shiny as it bakes (thanks to the butter or other fat in it), that shine will significantly reduce or go away once the cookies are set. As soon as they reach that stage, remove them from the oven. Even if they don’t feel firm yet, they’ll continue to set and harden as they cool.
Ready to bake your best cookies yet? Find your next recipe with our collection of Classic Cookies.
Cover photo (Sourdough Chocolate Chip Cookies) and food styling by Liz Neily.