How to pipe and decorate a celebratory basket-weave cake
One piping technique makes a stunning cake for everything from a birthday party to Pride brunch.

At King Arthur, we’re inviting everyone to our table to share the joy of baking, and Camilla Wynne, a proud queer baker and cookbook author, is here to show us how she’s celebrating Pride and what this month means to her. For more, see her post on Why queer visibility in baking matters.
* * *
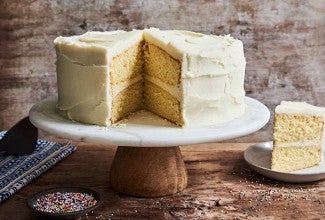
This year for Pride I’ll be up all night — but not to party. My partner and I are expecting a baby in early summer, which means we’ll be sleep-deprived by the time the celebrations get started. So we'll have to get our celebrating done early, at our gay baby shower, for which I'm making a joyful basket-weave layer cake topped with a flurry of something colorful, like edible fresh flowers or a rainbow array of marzipan fruits (my personal childhood favorite).
While this cake looks impressive and could wow at any summer function, from birthday to garden party to Pride brunch, it’s mostly comprised of one piping technique that’s pretty simple once you get the hang of it. Here’s how to do it.

You can decorate any cake this way, but Golden Vanilla Cake is a great choice, especially with rainbow sprinkles folded into the batter. Depending on what size piping tip you use, you’ll need about 6 to 8 cups of frosting to complete the design on an 8” or 9” cake — I suggest a double batch of German Buttercream, one of the most delicious frostings known to humankind (and any leftovers can be frozen for future projects or frosting emergencies).
If you have one, it’s easiest to decorate on a cake turntable. Level your cake layers using a serrated knife if they’re at all domed. Use a dab of frosting to affix the bottom layer to a serving plate or cake board. Top with about 1/2 cup jam and use a small offset spatula to spread it into a thin layer within 1/2" of the sides, followed by an even 1/2" layer of frosting edge to edge.
Repeat with remaining layers, placing the final layer upside down to create a perfectly flat top with sharp edges. Use a palette knife, sturdy spreader, or offset spatula to cover the entire cake in a thin layer of frosting — this is the crumb coat. (See more details on these steps in How to crumb coat a cake and How to assemble and frost a layer cake.)
Place the cake in the refrigerator for 10 to 15 minutes to firm up.

While the cake is chilling, fit a pastry bag with a basket-weave tip and fill with frosting. This flat tip has one straight edge and one ridged edge, which will provide the textured effect of the basket. These tips come in a range of sizes — which you use is up to you. The smaller the tip, the longer decorating will take but the more elaborate and detailed the pattern will be. That said, a large tip, such as the jumbo Cake Icer tip, can create a fun, almost pop-art effect that will come together quickly.
(Heads up: At King Arthur, we only recommend the products that we, as bakers, truly love. When you buy through external links on our site, we may earn an affiliate commission.)
Return the cake to the turntable. Holding the piping tip at about a 45° angle to the top edge of the cake with the ridged edge facing up, apply even pressure as you travel down the side of the cake to make a vertical line all the way to the bottom, pulling away sharply at the base.

Next, starting just to the left of the top of the vertical line you just piped, pipe a short horizontal line over the top, covering it completely. Leaving a space the width of the piping tip between each piped horizontal line, repeat all the way down.

Now pipe another vertical line close to the first, covering the right-side ends of all the horizontal lines. Pipe the next set of horizontal lines offset from the first to create the woven effect. Place the tip at the edge of the first vertical line, just under the first horizontal line, and pipe over the second vertical line. Continue all the way down to the bottom.
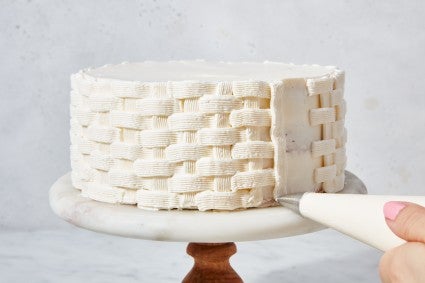
Now repeat until you come full circle back to where you began.
From here you’ve got options. What we’re looking for is at least a rainbow’s worth of colors. Use fresh edible flowers, fresh fruits, candy, or any combination thereof. You can simply cover the whole top of the cake with decorations, or you could pipe a basket-weave design all over the top, making sure to line up with the piping on the side, before mounding decorations in the center. Piping a basket-weave over half the top and covering the other half with decorations looks great as well. Or go with another decorative piping style to cap things off (like the St. Honore tip used here).

For added drama, you can pipe a basket-weave design on a large round wafer or cookie that’s the same diameter as your cake, then set it at a jaunty angle on top as a basket lid. And if you have extra buttercream, you can add a final flourish: Use a medium plain, star, or French tip to pipe a border around the top and bottom of the cake. (This has the added benefit of concealing any imperfections.)
If you’re planning on serving cake at a park or somewhere else on the go, mini basket cupcakes are just as cute with the added benefit of being handheld. Simply use a small basket-weave tip to pipe the design on the top of cupcakes. Finish each with two or three pint-size decorations. They’ll almost look too good to eat! Almost.
This Pride Month, King Arthur Baking Company has donated to Outright Vermont and encourages you to do so as well. You can also find an organization in your own community supporting LGBTQ+ youth here.
Cover photo by Rick Holbrook; food styling by Kaitlin Wayne.