Gifts for your favorite bread novice
The essential tools and ingredients anyone needs for making great bread.

Date
December 6, 2021

 Love sourdough, but looking for a bit more flexibility and ease when you bake with a starter? In The Casual Sourdough Baker, PJ shows you just how wonderfully stress-free sourdough baking can be, from simple but richly flavored loaves to countless easy ways to use your discard. If you're just beginning your journey, our Sourdough Baking Guide lays out the basics you need for success — whether you decide to become serious or go casual!
* * *
Guess what time it is? It’s time to think gift-giving and, with that in mind, I’ve put together a gift list for the beginning bread baker: you, or someone you know who’s ready to turn their baking creativity to the wide and wonderful world of yeast breads.
Now, this isn’t an official gift registry; you won’t be competing with your fellow baby shower attendees to see who can nab that super-cute bundle of onesies. This is simply an “If you’re going to bake bread, this is what you need” list. But it’s also not just a thrown-together list of mere bread frippery — tools that are used once, then never reached for again. No, everything you see here is either must-have, or super-useful.
So without further ado, here’s the gear (and a couple of ingredients) that your favorite aspiring bread baker simply shouldn’t go without.
I’ve listed the following tools in order of importance, starting with “You really shouldn’t make bread without this” and finishing up with “Definitely nice to have, though not crucial.” After the tools I’ll change gears and share your two most critical ingredients for bread-baking success: not surprisingly, flour and yeast.
Note that I’ve made some basic assumptions about what you already have on hand, namely, a mixing bowl and baking sheet. And an oven; you know, the baking givens.
One final thing: If you’re considering making up a gift basket, go ahead and mix and match anything from the list below. Either of the buckets (flour or dough rising) is a handy receptacle for an assortment of goodies: just snap on the lid, add a bow, and you’re ready for some serious holiday rock and roll.
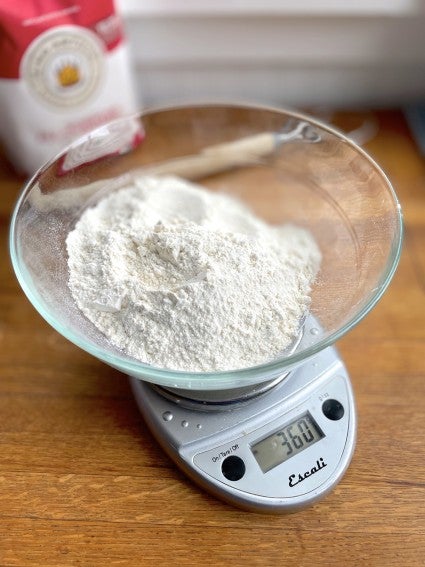
Really? A scale is THAT important? Yes: For the best, most consistent yeast bread results, you should weigh your ingredients. Yeast bread is made mainly from flour, so using the correct amount of flour has a huge impact on your bread’s success. And flour is notoriously difficult to measure with a measuring cup. (Do you pack it down? Fluff it up? Level it off?) Use a scale and you’ll measure flour accurately right down to the gram.
My choice: I’ve used this Essential Digital Scale in my home kitchen for years; it’s a simple workhorse.
Why: Aside from the usual features — add and weigh (tare), easy switching from metric to American weights, power-saving automatic shutoff — this scale comes with a large weight range (up to 11 pounds), and small footprint for easy storage.
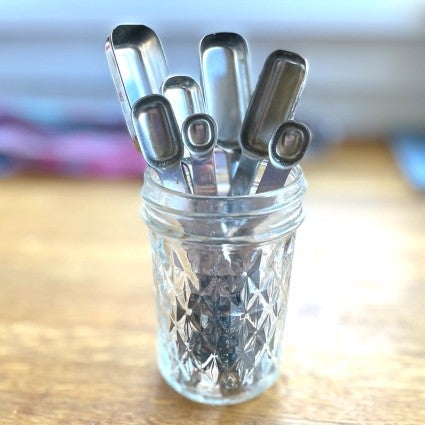
Wait, what? I thought we were supposed to measure by weight. Actually, it’s fine (and quicker) to measure small amounts of ingredients, such as yeast or salt, with good-quality, accurate measuring spoons.
My choice: Stainless steel measuring spoons. Remove them from their attached chain and stand them upright in a small jar for easy access.
Why: Stainless steel is dishwasher-safe, won’t warp or wear, and offers a good, clean edge for scraping ingredients level.
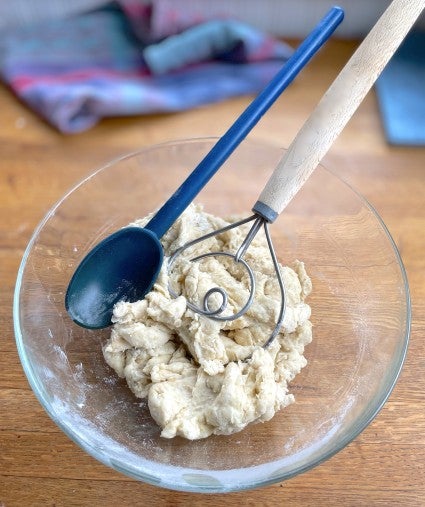
If you plan on mixing and kneading yeast dough with an electric mixer, you can skip this one. Ditto if you already have a big (at least 12”), strong spoon. But if you’re making bread by hand, you’ll need something long and strong for stirring the ingredients together prior to kneading.
My choice: Sturdy spoon or dough whisk
Why: Both of these tools are long enough for the good leverage you need when dealing with a large, sticky mass of dough. The spoon is a more all-purpose tool, great for stirring soup and big batches of hot granola as well as bread dough. The dough whisk is meant specifically for yeast bread dough and stiff batter (e.g., thick muffin batter). Its flow-through design makes it simple to stir together even the stiffest dough.
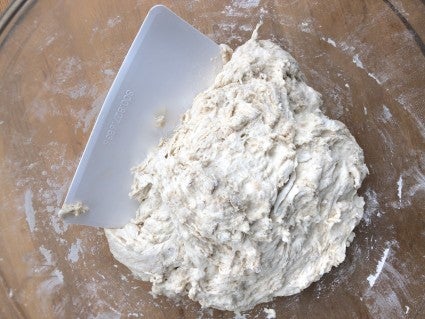
This simple, inexpensive tool is just what you need for scraping sticky yeast dough out of the bowl onto your kneading surface; or risen dough from the bowl to the counter for shaping. Use it for portioning dough into rolls, too. (Or shaping biscotti, or even scraping the ice off your car windshield — really!)
My choice: King Arthur bowl scraper. At just $2.95, this is a great “add on” gift.
Why: With its ideal flex and perfect slight curve, this bowl scraper outshines any other version I’ve ever used.

Most yeast bread recipes call for you to use lukewarm water, which measures between 98°F and 105°F; nail that reading with a digital thermometer. Many recipes also indicate what temperature the fully baked loaf’s interior should be, usually from 190°F to about 205°F depending on bread type. Is your loaf ready to come out of the oven? Take its temperature and you’ll know for sure.
My choice: Entry level: Exec Needle Thermometer; Special gift: Classic Thermapen
Why: Both of these thermometers offer a huge temperature range, thin probe (because who wants a major hole in your baked bread?), and quick readings. While ideal for bread, they’ll also step in seamlessly for your candy, meat, or other kitchen thermometers.
If you already have a wide-mouth flour canister, great; skip this. But leaving your flour in its opened paper sack can become a painful exercise when it comes to pouring or scooping. And flour in a more secure container is less likely to attract “unwelcome visitors” (e.g., pantry moths).
My choice: Our small flour bucket, the perfect size for a 5-pound bag of flour.
Why: A super-wide top opening for easy access, secure snap-top lid for security, and easy-grip handles make this food-safe bucket my personal top choice for flour storage.
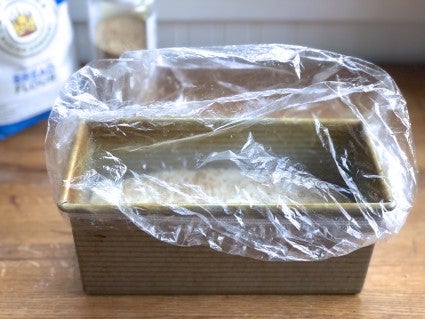
If you’re going to bake pan bread (e.g., the squared-off sandwich-shaped loaf with which we’re all familiar), you need a loaf pan. But which of the two standard sizes should you choose: 8 1/2” x 4 1/2”, or 9” x 5”? Our 9” x 4” pan stands in beautifully for either of those sizes. So no matter which your recipe calls for, the 9” x 4” has you covered: It’s the only loaf pan you’ll ever need.
My choice: King Arthur 9” x 4” x 4" loaf pan. While positioned as a gluten-free bread pan, this sturdy steel-aluminum pan is superb for all kinds of yeast loaves.
Why: Perfectly straight (not flared), tall sides yield a high-rising loaf without the typical “mushroom” top most bread pans create. The resulting slices are a perfect fit for your toaster, and a nice shape for squared-off, easy-to-pack sandwiches.
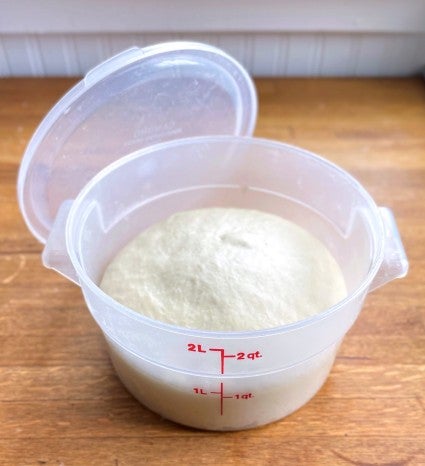
If you’re a serial baker (i.e., you use your stand mixer for bread dough, then cake batter, and then you whip up some cream), you can’t afford to tie up your mixing bowl with fermenting dough. Enter the dough-rising bucket, the perfect draft-free haven for rising yeast dough.
My choice: Standard dough-rising bucket (for recipes using up to 4 cups of flour); or extra-large dough-rising bucket (for larger recipes, including our wildly popular No-Knead Crusty White Bread).
Why: The snap-on lid keeps moisture in, drafts out. Markings on the side let you see exactly when your dough has doubled in size, the benchmark for most yeast bread recipes. And as mentioned, you’re not tying up one of your mixing bowls for several hours with rising dough.
The heart of any yeast loaf is the flour it’s made from. Nail that single ingredient, and you’re at least 75% of the way to baking great bread. Contrary to what you might think (“Don’t I need bread flour to make, uh, bread?”), your best everyday flour for most yeast breads is a medium-protein (11.7%) all-purpose flour.
My choice: King Arthur Unbleached All-Purpose Flour, good for everything from soft sandwich loaves to crusty baguettes.
Why: Quality and consistency — season after season, year after year stretching back to the company’s founding in 1790. Also, King Arthur all-purpose flour’s protein level is slightly higher than that of most all-purpose flours on the market, meaning your bread can rise higher.
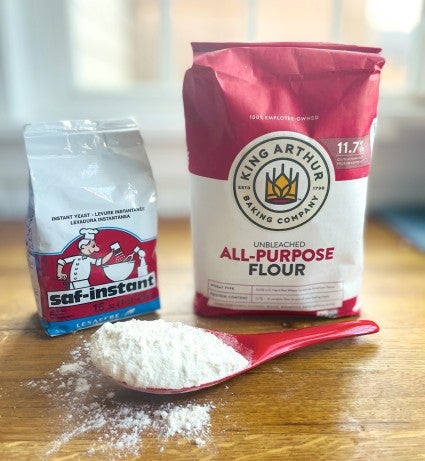
Flour and water make up the bulk of any yeast loaf. But without yeast — well, all you’ve got is a flat, floury puddle! Yeast is what makes bread rise, whether to the lofty heights of a cinnamon swirl loaf or the understated density of a chewy focaccia.
My choice: SAF Red instant yeast, the newest (and handiest) iteration of the active dry yeast bread bakers have used for decades. Use it in any recipe calling for either instant or active dry yeast; there’s no need to fiddle with the amount, it’s an easy 1:1 substitute. And even better: there’s no need to dissolve (“proof”) it in liquid before using; simply add it along with the rest of the dry ingredients.
Why: SAF Red yeast is the choice of professional bakers worldwide. It’s simple to use and ridiculously reliable. Plus, when bought in bulk you can’t beat the price! Store it in the freezer, where it can stay good for up to several years.
Whether you spring for all of these tools or hand-select just a few, you’re guaranteed to help someone get a good start on their yeast-baking journey. Looking to jump into bread-baking yourself? Please share this article with your nearest and dearest; you never know what kind of nicely wrapped surprise you might find on your doorstep!
What about sourdough bread? It’s a bit more involved than bread made with instant or active dry yeast. We highly recommend you (or your favorite new bread baker) become comfortable with the ingredients and techniques for making “straight” bread before you venture into sourdough baking. But when you do — get started with this recipe for success, or take a simple shortcut.
Cover photo illustration by Michelle Chen.