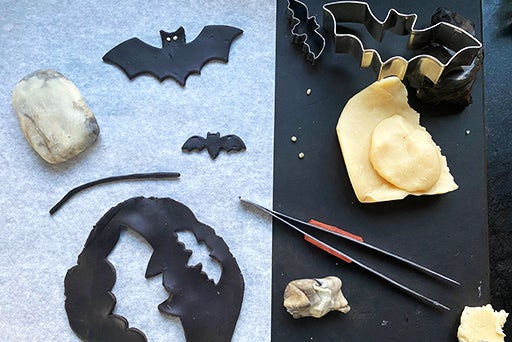
Modeling Chocolate

Recipe by Susan Reid

Modeling chocolate is simple to make and fun to work with; once mixed and rested it has the consistency of a Tootsie Roll. When kneaded, the warmth of your hands makes it pliable enough to roll, cut into shapes, or form into flowers or other designs. It can be made with dark or white chocolate, tinted for your desired effect, and is much tastier than traditional gum paste.

Prep
20 mins
Yield
about 1 1/4 cups
This page contains affiliate links that allow King Arthur Baking Company to earn a sales commission at no additional cost to you.
Modeling Chocolate - select to zoom
Cutouts made from rolled out modeling chocolate - select to zoom
Modeling Chocolate - select to zoom
A rose made out of modeling chocolate - select to zoom

Instructions

Prevent your screen from going dark as you follow along.
  1. In a heatproof bowl set over simmering water (or in a double boiler), melt the chocolate. Stir constantly until melted; don’t let its temperature rise above 110°F. Remove from the heat.

  2. Warm the corn syrup to 110°F, add to the melted chocolate, and stir until the mixture is uniform. It will look grainy at first but smooth out as you keep stirring.

  3. Allow the mixture to cool, then cover and let rest at room temperature for 2 hours. It will set up and become quite stiff.

  4. When you’re ready to use it, take a chunk and work it in your hands until it softens. From this point you can tint it with gel colors, roll it out and cut it with decorative cutters, or shape it any way you choose, like modeling clay; the chocolate will set once more as it cools. See our blog post, Modeling chocolate 101, for step-by-step instructions on how to make chocolate roses, letters, and other kinds of decorations.

  5. Store modeling chocolate in an airtight container, cool and dry, for up to three weeks.

Tips from our Bakers

  • Chocolate with a wide range of cocoa percentages will work in this recipe; the only difference will be the consistency of the final modeling chocolate. (The lower the cocoa percentage, the softer the modeling chocolate will be.) Our test kitchen likes using Guittard semisweet chocolate wafers or Ghirardelli semisweet chocolate bars to make dark modeling chocolate, and Ghiradelli white chocolate bars to make white modeling chocolate.

  • To tint white modeling chocolate, work a portion of it with your hands until pliable and add 3 to 5 drops of gel food coloring. Fold the chocolate over on itself until it’s marbled; you can roll and shape it at this point for a nice look, or keep kneading until the color is uniform. Add more coloring until you have the look you want.

  • If the chocolate becomes too soft and starts to stick, dust your work surface/rolling pin/hands with unsweetened cocoa (for dark chocolate) or confectioners’ sugar (for white or colored chocolate).

  • Modeling Chocolate can be rolled out and cut into shapes using any cutter you like; the chocolate stays flexible so you can place it on the curved contours of a layer cake. Roll into thin strips to make letters, mix white and dark chocolates for a marbled effect, or sculpt individual flower petals for delicious edible roses.

    Dark and white modeling chocolate rolled out and cut into bat shape