Things bakers know: For picture-perfect slices, cut your pie with this knife
For the best slices, use the best tool.

Date
July 8, 2025


You put a lot of effort into creating a beautiful homemade pie, and it’s finally cooled and ready to cut. What type of knife will yield the best slices — no broken crimp, no ragged sides?
The tool our Test Kitchen swears by is a serrated knife, and here’s why. The teeth of a serrated knife gently (and gradually) saw through pie crust, leaving nary a crumb or pastry shard scattered across the bottom of the pan. Applying too much force to delicate crust causes it to shatter and flake apart. But the tiny teeth on a serrated knife allow you to cleanly saw through pie crust with minimal downward pressure — unlike a non-serrated knife, which requires you to press down firmly as you cut. A regular chef’s knife — especially one that’s even a little bit dull — will compress pie crust before slicing through it, leading to a broken crimp and crumbling edges.
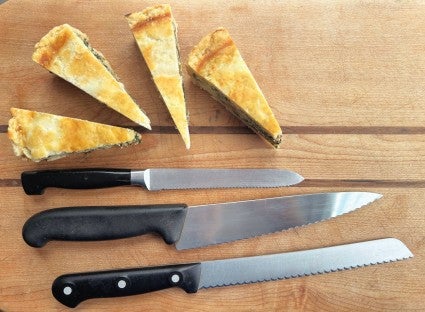
You may have a variety of serrated knives in your knife block, especially if you’re a bread baker. Which one should you choose for slicing pie? Here are the features that matter most:

Room-temperature pie slices best. Cutting into a hot, just-baked pie will produce flakes and crumbling (and the filling is likely to be runnier, too); let the pie cool completely first. If you like, pop that sliced pie back into a preheated 350°F oven to warm up before serving. Place the pie on a baking sheet (for easiest handling), and bake it on the oven's middle rack for about 20 to 25 minutes for a whole pie, 10 to 15 minutes for individual slices, until the filling is as hot as you like it — anywhere from barely warm to bubbling hot.
If your pie has been refrigerated (and its crust is hard and stiff), bring it to room temperature before slicing, then rewarm.
Use a gentle touch. Let the knife do the work, not pressure from your hand.
Keep that crimp intact! Start by cutting from the center of the pie to the edge. When you reach the crimp, stop cutting. Reposition the knife above the crimp, wipe off any filling, then gently saw through the crimp until you reach your initial cut. Cutting the crimp from the outside down (rather than inside up) offers you optimal control.
When you slice into that picture-perfect pie, is the filling as beautiful as the neatly cut crust — or does it collapse in a sea of juice? For help, see The best way to thicken fruit pie filling.
Cover photo by Mark Weinberg.