There is a wide variety of fresh pastas you can make at home without any special equipment such as a pasta roller or extruder — or even a rolling pin! What follows is a guide to some of those pasta shapes, and the best dough to make them with.
The hand-shaped pastas described below traditionally call for an eggless dough made simply of fine-ground durum wheat, water, and a bit of salt. You can find my recipe for Eggless Pasta Dough here.
While the dough linked above works well for any hand-shaped pasta, some cooks include a splash of olive oil in their dough for pici (it makes them extra smooth). In addition, trofie are sometimes made with chestnut flour swapped in for a portion of the durum.
The beauty of these hand-shaped pastas is that you don’t need any fancy equipment. For most, all you need is your hands, a work surface (ideally large and wooden), and a knife or bench knife. Just one — strozzapreti — requires a rolling pin (for which a wine bottle can substitute, if you’re really in a pinch).
For all the pastas below: Line two large baking sheets or a section of your work surface with parchment paper lightly dusted with durum flour. Divide your dough into four equal pieces (about 146 grams each). Work with one piece of dough at a time; leave the others covered so they don’t dry out. Shape according to the instructions below.
After shaping, give the pasta about an hour at room temperature to slightly dry out and firm up before cooking. To cook, add the pasta to a pot of well salted boiling water and boil for 2 to 5 minutes. Drain it (reserving some of the cooking water to add to your sauce; a couple splashes will give the sauce body and help it cling to the noodles) and stir it over medium heat with the sauce for 1 to 2 minutes.
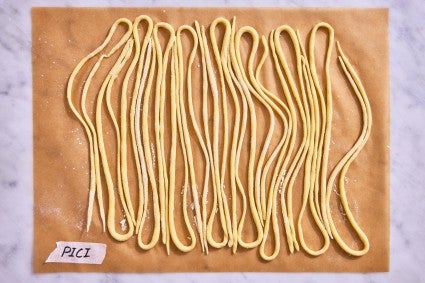
These noodles resemble long, fat spaghetti with tapered ends. The name is thought to come from “appiciare,” which, in the dialect of Tuscany whence this pasta shape hails, means “to stick,” as a minor amount of stickiness is ideal for rolling these cords.
To make pici: Cut off about 10 grams (approximately a 1" ball) of dough and roll it under your outstretched fingers until you have a cord about 24" long with a diameter of about 1/8"; the ends will taper as you roll. Don’t worry about making a perfect cylinder; irregularities are what make hand-shaped pici special. Set the noodle on the parchment-lined baking sheet, forming it into a long, narrow “U” that takes up as little room as possible. Repeat with the remaining dough. You should end up with about 60 pici in total (roughly 15 per dough quarter).
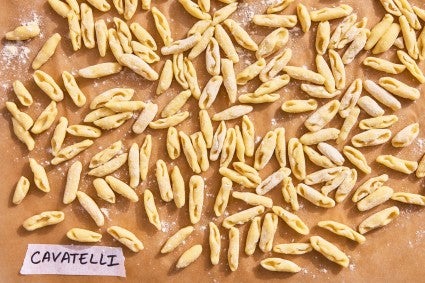
Cavatelli come from Southern Italy, and their name reflects their hollowed-out (“incavato”) shape; they resemble miniature hot dog buns, ready to welcome sauce to nestle in their trenches.
To make cavatelli: Roll one piece of dough under your outstretched fingers to form a skinny log, about 34" long with a 1/2" diameter. Use a bench knife or a knife to cut six or so 1/2" pieces from the log (each will weigh about 3 grams), so you have a small group of mini pillow-shaped pieces to work with at a time.
With your index and middle fingers held snugly together, press firmly into the far side of one of the dough pieces and pull your fingers towards you along the work surface, dragging the dough with your fingertips so that it curls over them as you move. Once you’ve reached the end of the piece of dough, set the newly formed cavatello aside and move on to the next piece of dough. Every so often, once you’ve amassed a significant batch, use a bench knife to transfer the cavatelli to the prepared baking sheet, leaving just enough space between pieces so they don’t touch. Continue cutting 1/2" pieces from the log and shaping the remaining dough; in the end, you’ll have about 200 cavatelli (roughly 50 from each quarter of dough).
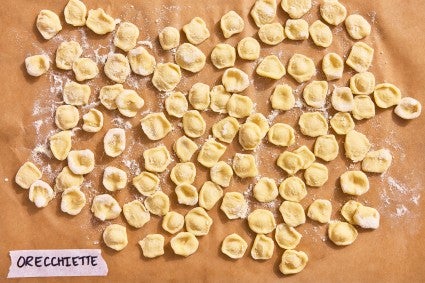
These “little ears” (“orecchie” means “ears,” and the “-ette” is a diminutive suffix) originated in the Puglia region of Southern Italy. As their name suggests, they look like nickel-sized cartoon mouse ears.
To make orecchiette: Just as you would for cavatelli, roll one piece of dough under your outstretched fingers to form a skinny log, about 34" long with a 1/2" diameter. Use a bench knife or a knife to cut six or so 1/2" pieces from the log. (Each will weigh about 3 grams.)
Pick up a serrated table knife (the small serrations give orecchiette a coarse surface for ideal sauce adhesion), face the serrated edge of the blade away from you and align it with the far end of one of the little pieces of dough. Pull the knife towards you along the work surface while also firmly pressing it into the dough, using the thumb of your free hand to gently keep the dough from curling over the knife. Once you’ve reached the end of the piece of dough, invert it as you would a rubber popper toy so that the rougher side that was touching the knife is convex. Set the newly formed orecchietta aside and move on to the next piece of dough. Every so often, once you’ve amassed a significant batch, use a bench knife to transfer the orecchiette to the prepared baking sheet, leaving just enough space between pieces so they don’t touch. Continue to shape the remaining dough; in the end, you’ll have about 200 orecchiette (roughly 50 from each quarter of dough).
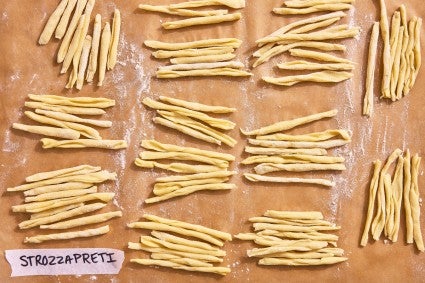
Each piece of this pasta, which originated in Emilia-Romagna, looks like a 2" or 3" segment of thick, roughly spiraled ribbon. The name suggests the strangling of priests (“strozzare” means “to strangle” and “preti” means “priests”), and while there are many legends to justify the appellation, perhaps the most plausible explanation lies in the hand motion used to create them; it is reminiscent of strangling, and the long ribbon of dough that dangles and spins below the maker’s hands evokes clerical vestments.
To make strozzapreti: Keep a small bowl of cool water nearby to dip your hands in as necessary; slightly clammy hands provide the best friction for shaping strozzapreti. Roll one piece of the dough out to a somewhat rectangular oval, about 1/16" thick. (It should be roughly 8" x 9".) Using a pizza cutter or a sharp knife, cut the dough into long strips about 3/4" wide. Pick a strip up and gently stretch to elongate and make it slightly thinner (roughly 1/4" wide and 16" long). Starting at one end, place a segment of the dough strip between your palms — the rest of the strip will dangle below — and rub your hands together back and forth in opposite directions a couple of times (as if you’re trying to warm them). The pasta between your hands should appear rolled; snap that rolled portion off between your fingers and set it aside onto the floured parchment. Continue down the strip until you reach the bottom, then continue with the remaining strips. Repeat with the remaining quarters of dough; in the end, you’ll have about 180 noodles.
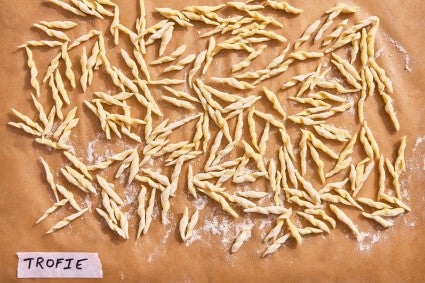
The origin story of this Ligurian pasta’s name is murky, but its distinctive shape — each piece resembles a tiny corkscrew-curled lock of golden hair or a twisted worm, anywhere from 1/4" to 3" in length, that tapers at the ends — is easy to spot.
To make trofie: Working with a small amount at a time — say, the size of a golf ball or so — roll the dough under your outstretched fingers to form a skinny log with a diameter of about 3/8". Use a bench knife or a knife to cut a dozen or so small (approximately 3/16") pieces from the log (each will weigh about 1 gram), so you have a group of tiny pillow-shaped pieces to work with at a time. Roll one of these pieces under your fingers to elongate it just a bit.
Now comes the tricky part. But don’t be discouraged; once you get the hang of this movement, it will be set in your muscle memory.
Place the outer edge of your palm — the area between your little finger and the heel of your hand — over one of the small pieces of dough. Your fingers should be facing away from you, your thumb pointing toward the left (if you’re right-handed) or right (if you’re left-handed). Drag your hand towards you, angling your hand as you move so that eventually your thumb is pointed towards your body. As you pull your hand towards you, you will see a twisted trofie emerge from beneath the edge of your palm. Repeat with the remaining dough. It might take several tries at first to get the right shape, but don’t give up! An entire batch of dough, should you have the will to work your way through it, will yield about 400 to 600 trofie.
Learn more about making pasta at home in this guide on How to Make Pasta.
Cover photo by Patrick Marinello; food styling by Yekaterina Boytsova.