How to make a gingerbread house — and cute gingerbread people, too
The right cookie, icing, and cutters for whimsical and well-built confections.

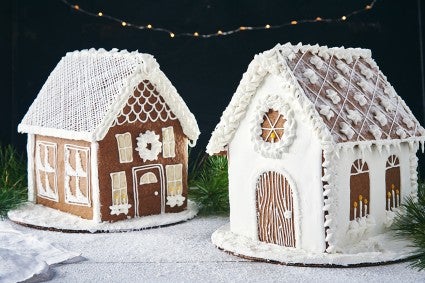
Picture a festive gingerbread house, draped with white icing and trimmed sweetly with peppermints and gumdrops, with happy little gingerbread people making marshmallow snow sculptures in the front yard. The whole scene glistens with a fresh dusting of Sparkling Sugar.
Is that image inspiring — or intimidating? Worried you’ll end up with a crumbling, crooked shack, decorations dripping off, misshapen cookie inhabitants looking on with despair? Don’t let the idea of building a gingerbread house fill you with dread — with the right recipes, tricks, and tools, you can make the best one on the block, no architectural training or construction experience required. Let’s break ground.
For a gingerbread build that is more house than hovel, you’ll need to start with the right dough for sturdy, warp-free walls. If you’ve ever built from a store-bought kit, you’ll probably recall that the house pieces are firm, dry, and unyielding (read: unappetizing). Great for building, not so great for eating. I like to choose a recipe that looks good and tastes great; here are my favorite options.
If you plan to make houses and gingerbread people that will be snacked on shortly after decorating (a great choice if you’re building with youngsters), choose a roll-out cookie recipe with great flavor, like these Gingerbread Cookies (or these Gluten-Free Roll-Out Gingerbread Cookies). This recipe is perfect for simple houses and tasty gingerbread people.
If you plan to build a house just for display, appearance and aroma are more important than flavor, so choose a stiffer dough like this Construction Gingerbread. It has the flavor and aroma of a cookie meant for munching, but with a texture that’s a bit firmer and tougher than other recipes. This is ideal if you’re building a complicated design or if you want to display your gingerbread house for a long time.
Baker’s tip: The added flour and egg in this recipe help give the dough structure. You’ll want to gently knead it to a smooth, stiff dough with no crumbling. Don’t worry about overmixing this recipe — that extra toughness is good for construction!
And if you want to save your time and energy for decorating, simplify the baking by using a mix. I love to use our Gingerbread Cake and Cookie Mix (or Gluten-Free Gingerbread Cake and Cookie Mix) as a shortcut for houses and gingerbread people. It has a sweet and spicy flavor and rich color, and it yields sturdy cookies that hold up well to layers of icing and candy.

Next, you’ll need icing to hold the whole thing together: Royal Icing is the versatile answer for both assembly and decoration. It’s stiff, sticky, dries quickly and completely, and has the classic bright white look of fresh snow. Royal icing is more than just a tasty cookie glue — it’s perfect for cookie decorating of all kinds, including gingerbread people.
Enhance your icing with your favorite extracts, like pure vanilla extract, to boost the flavor of your build or cookies. And if you want to simplify things, our White Icing Mix is a great shortcut too.
The right tools will make your construction project go much more smoothly. You’ll need a few baking basics like a rolling pin, parchment paper, a thin spatula, a sharp knife, and piping bags. You’ll also need an electric mixer for the royal icing.
Once you have the tools, you’ll need a blueprint. The sky is the limit — gingerbread houses can be as simple or complex as you wish. For a basic house, you’ll need six cookie pieces: two rectangular roof panels, two smaller rectangular side walls, and two peaked pentagonal end walls. A ruler and a little bit of basic math will come in handy here. Design your house pattern on light cardstock. (Cereal boxes work well.) Cut out the cardstock template, tape it together to check the fit, then lay the pieces on the rolled-out dough to trace and cut with a sharp knife.
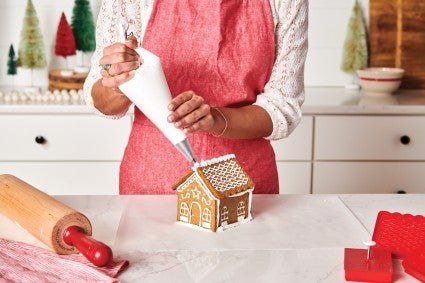
Of course, you can also turn to tools that do all this work for you. These awesome Gingerbread Pop-Out Cutters simplify the design process in a snap. Just roll your dough, cut out two of each shape, imprint the design, and bake — you’ll have a sweet house that fits together perfectly, no math required! The set includes the roof pieces, side walls, and peaked end walls which overlap to create a petite 4.5" house, so you can cut a few from a single batch of dough. The pop-out cutters also emboss the dough with windows, doors, and festive trim that looks cute on its own, or can be used as a guide for decorating and piping icing.
And for gingerbread people, you could freehand shapes or make life simpler with a sturdy steel cutter.

Roll out the dough on a sheet of lightly floured parchment paper (so you can easily transfer it to a baking sheet later). Keep it at least 1/4" thick for strong walls. Lightly flour the surface of the dough and place your cutters or pattern pieces about 1" apart. Cut out all the shapes, then remove the excess dough between your pieces. By removing the excess rather than moving your cut pieces, you will avoid distorting the shapes, which can affect how well they’ll fit together. Re-roll the excess dough to cut any remaining shapes, or use it to make extras like gingerbread people.
Slide the parchment onto a baking sheet, then bake the cookies one pan at a time in the center of the oven.
Baker’s tip: A lower oven temperature (325°F) and longer baking time will yield a firmly set cookie that is evenly colored. The actual bake time can vary based on the size and thickness of the pieces. Bake a single test piece to determine the perfect baking time. Just out of the oven, the cookie should be firm to the touch rather than puffy and completely stiff once cooled.

While the cookies are hot out of the oven, slide the parchment onto a cutting board. Some dough recipes rise and spread while baking, so it’s a good idea to check the size of the cookies against your pattern after baking. Using a sharp knife and working quickly, while the cookie is still warm and yielding, trim away any excess around the edges.
Underbaking the cookies can lead to warping and cause your gingerbread house to collapse. If your cookies are still soft after trimming and cooling, you can place them back in the oven to continue to dry out to the desired texture. Then, let the cookies cool completely while you prepare your icing.
Baker’s tip: For neatly cut edges and crisp imprints with our gingerbread house pop-out cutters, you can first cut the cookie dough without embossing it, then bake. Immediately out of the oven, transfer the parchment onto a cutting board — don’t use the cutters on the hot pan! Re-cut and stamp the warm cookie for clear imprints and shapes that will fit together perfectly.
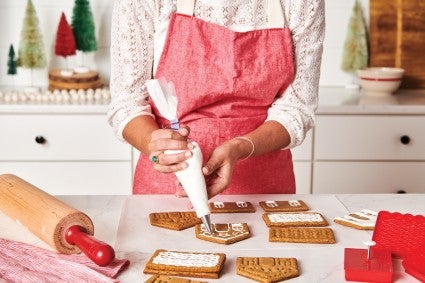
For the icing, a stand or hand mixer is necessary to get the right texture to hold the house together. The icing is ready when it is smooth, glossy, and holds a stiff peak. Transfer the icing into piping bags and tightly cover any excess for later use — it dries out easily. You can fit the piping bag with a coupler if you want to change the piping texture for decorating, but simply trimming 1/8" to 1/4" off the end works well for assembling the house and affixing candy to the outside.
Houses can be assembled directly onto a plate or cake stand, but if you’re making many or want a portable choice, foil-wrapped cardboard makes a great base. Cut a circle a bit larger than the house from corrugated cardboard and wrap in a layer of heavy-duty aluminum foil.
Baker’s tip: Depending on the design, it’s easier to decorate the panels before assembling, while they’re laid flat, and then build the house. This works great if you plan to use sprinkles or elaborate piping. Let the decorated pieces lay flat to dry completely. Then assemble and add finishing touches along the joints.
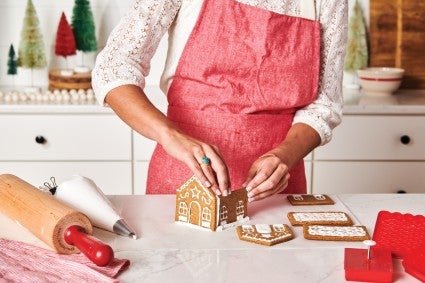
Stand up two walls at a time so they support each other. Starting with an end wall and side wall, pipe a thick L-shaped line of icing on the prepared base to secure the bottoms of the two walls. Place another line of icing where the walls meet. Repeat for the other pair of walls. Use your hands or a sturdy object like a can or box to support the walls while they set. With royal icing, this should only take a few minutes. The icing is set when the pieces hold steady without sliding apart. You should now have all four walls assembled.
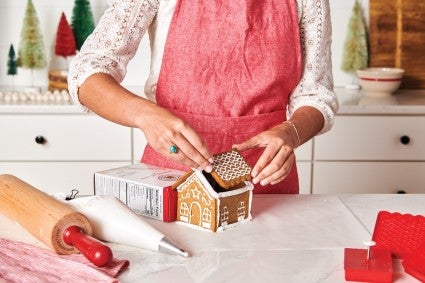
To add the roof panels, pipe icing along the top of the walls. Place the roof panels and support them while the icing sets (again, only a few minutes if you’re using royal icing). Finish with a thick line of icing along the top where the roof panels meet. Allow the icing to fully set in a dry place before adding decorations. This could take a few hours, or overnight. If you’re decorating with kids, it helps to assemble the houses the day before, so they are fully stable and ready to pile on the candy.
Finish off your house design with some landscaping. Coat the base around the house with royal icing, and sprinkle with Sparkling Sugar — keep your decorations simple or go as wild as you’d like (gumdrop topiaries, pretzel fencing, candy cane trellis!). Decorate happy little gingerbread people to complete the scene.
You can use leftover royal icing to pipe small details or follow this step-by-step guide of basic decorating techniques for extra-festive gingerbread folks. And of course, a dash of sprinkles — like these Supernatural Christmas Softies Sprinkles — add a fun pop of color.
There you go — your sweet house is move-in ready! Enjoy your cheerful centerpiece all season or admire your handiwork before breaking off the best bite. (I’d start with the gingerbread people.)
Cover photo by Danielle Sykes; food styling by Brook Lewis.