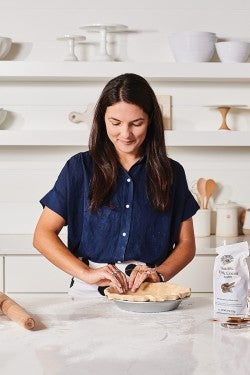
My quest to make a perfect Bûche de Noël
Here’s what I learned about making roll cakes without cracking.


With the holiday season approaching, I had one baking project on my mind. It wasn’t a perfect cookie plate or homemade natural food coloring or even a new spin on classic stollen.
It was a Classic Bûche de Noël, the yule log cake defined by a tight spiral and whimsical woodland decorations. You see, I’m not good at making roll cakes. Whenever I attempt them, they always crack or slump or unfurl, which only makes me more anxious, which leads to more errors, which leads to me abandoning my roll cake dreams and instead dumping a bunch of cake scraps in a bowl with whipped cream and calling it a trifle.
But not this year, I decided. This year, I’d set out to make a stunning yule log, one with a perfect spiral, pristine decorations, and absolutely no cracking.
I knew the best way to begin my quest would be to consult an expert. I called up Melanie Wanders, who’s led countless bakers through the yule log process in classes at our Baking School. She patiently answered my questions, providing tons of advice (and plenty of encouragement). Some of the biggest things I learned from Mel:
Choose a chiffon-style cake. As Mel explains, “It tends to have a lot of oil in it and be more moist, so it's less likely to crack when you're rolling.”
“When you’re folding, don’t mix the batter too vigorously. Use an up-and-over motion, as opposed to stirring, to keep the lightness in the batter.” This applies to both mixing and spreading the batter in the pan.
Make sure your parchment fits precisely into the corners of your pan, so your cake will be flat and release evenly from the pan — perfect for an even roll.
Don’t overfill the baked roll! The filling should be thin and level. “Press any mix-ins, like berries, into the filling so they don’t pop up as you roll, causing cracking.”
Use parchment or a tea towel to lift the cake and make it roll over itself. The cake’s own weight will help it roll evenly.
And so, with Mel’s tips fresh in my mind, I began baking.
Before I even began mixing cake batter, I learned to set myself up for success with a well-prepped pan. Following Mel’s advice, I lined a half-sheet pan with parchment so the cake would easily release after baking. As Mel explained, the parchment needs to fit entirely in the pan because the batter is thin enough that it can pool under flaps of parchment or stick in exposed corners.
I also greased the parchment for extra non-stick insurance — but I didn’t grease the sides of the pan. That’s because I wanted the cake to rise as high as possible. Leaving the sides ungreased allows the batter to “grip” the pan as it climbs.
Also, be sure to use the exact pan size called for in your recipe. If you use a different size, your cake could be harder to roll because it’s either too thick or too thin.
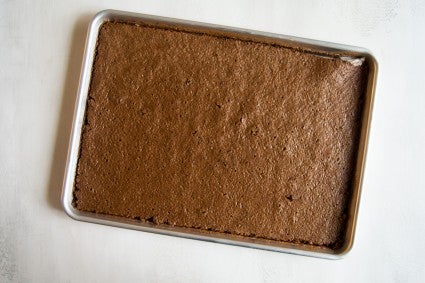
This was, without a doubt, the hardest part. A good cake roll starts with — unsurprisingly — good cake. Makes sense, right? You want your cake to be light, airy, and moist so that it’s flexible enough to roll easily. If you overbeat the batter or bake the cake too long, it could become dense, gummy, or dry — and thus more likely to crack.
Our yule log recipe has 1/4 cup (25g) oil in it, which provided some helpful moisture. It also uses a chemical leavener (baking powder) for lift, instead of relying just on eggs. That was a nice bit of insurance to guarantee my cake was light enough to handle easily, even if I accidentally knocked some air out of the beaten eggs.
As I made my cakes (spoiler alert: I had to make a lot of them!), I focused on four things:
The first few times, my cakes turned out too dense and thin, despite my best efforts to keep the batter as light as possible. Finally, I got something that was workable enough to actually try (gulp) rolling.
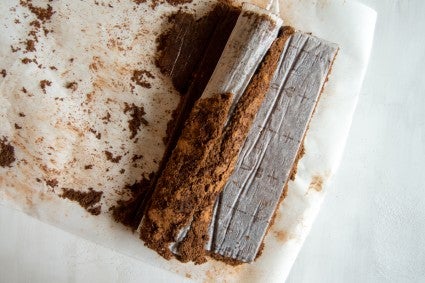
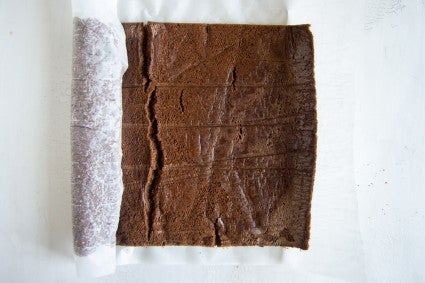
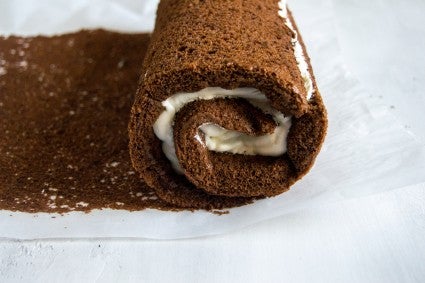
After working so hard to make a fluffy and delicate cake, it felt wrong to start handling it straight out of the oven. But alas, that’s what I had to do: The secret to making a roll cake that doesn’t crack is to roll it up, unfilled, while it’s still warm from the oven and at its most pliable. Then let it cool, unroll and fill, and roll right back up.
(This isn’t always the case. Mel shared that in her Baking School class, their chocolate cake was moist enough that it could cool as a flat rectangle and only need to be rolled up once: with the filling inside.)
After many, many disastrous attempts at rolling my warm cake and a lot of trial and error, I learned a few key things that worked for me:
You can’t just dump the warm cake straight onto your counter and roll it. It will stick, and your roll will be over before it ever had a chance.
Instead, turn your warm cake out onto either parchment or a tea towel — both work equally well.
I prefer keeping the parchment on the cake as I roll, to ensure it doesn’t stick to itself.
The very first curl of the spiral — what will be the center of the cake — should be done tightly. After that, though, be loose with the roll and let the weight of the cake guide itself, instead of trying to make it too tight and causing it to crack.
I finally got a roll I could live with, and left it to cool for an hour or so while I prepared the filling.
While the cake is definitely the hardest part here, I learned you need to pay more attention to the filling than you may think. You want the filling to have a thick consistency, so it doesn’t smush out the sides of the roll. If you use whipped cream, add a stabilizer like Instant ClearJel or confectioners’ sugar.
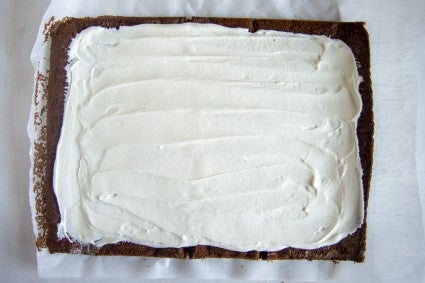
Your filling layer needs to be thin, because if it’s too thick you won’t get a tight spiral. Mel’s rule of thumb is that the depth of the filling should be slightly less than the height of the cake. My recommendation is to err on the side of too little, rather than too much.
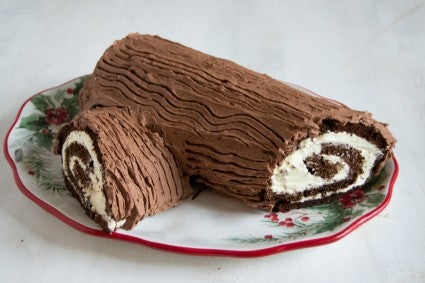
Surprisingly, this part is pretty easy. That’s because, unlike a pristine layer cake, the woodsy decorations on a yule log are meant to be somewhat rustic. Just pile on the frosting (the whipped ganache in our recipe is incredibly easy to spread) and comb through it with a fork to make it look like bark. The only thing to keep in mind: Make sure the frosting isn’t too thick, as a thinner layer makes for neater, more distinct lines.
While our Yule Log recipe keeps things simple, some traditional recipes call for flourishes like meringue mushrooms or fondant holly leaves. I didn’t make any of these extra decorations, but they can be fun additions to your cake, if you choose.
In addition to my miserable history making roll cakes, I’ve never been that good at actually serving them. The filling oozes, or the cake smushes, and any final hope of a stunning slice disintegrates.
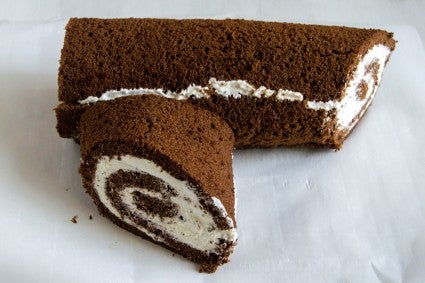
Mel stressed that the slicing knife should be cleaned between each use, to make a pristine cut. She also recommended letting the cake cool in the fridge for a bit before serving to help it set and stabilize.
With Mel’s guidance and endless practice, I finally ended up with a beautiful cake roll, one that was hands down the best I’ve ever made …
And it still had a big crack running the length of it.
Like me, you may follow all the best tips and still wind up with a cracked cake. And that’s OK. If your cracked cake is rolled up, slather that roll with frosting and make any offending cracks disappear. (That’s what I did.)
If the cake splits before you can get it fully rolled, you can always tear it into small pieces and turn it into a holiday trifle instead. No one will ever have to know!
And when it comes to mastering the yule log, tell yourself the same thing I kept repeating as I baked: Regardless of what it looks like, cake always tastes good.
If you’re ready to roll, try our recipe for Classic Bûche de Noël, a reverse twist on Bûche de Noël (made with vanilla sponge cake), Gluten-Free Chocolate Yule Log, or this Almond Roll.
Cover photo by Liz Neily.