Maybe you’re an enthusiastic bread baker, but fumble a bit when it comes to shaping artisan loaves. Or you’re getting tired of slashing the same old baguettes or cross-hatched boules. Thankfully, there's a solution. The striking couronne (crown) loaf is a joy to create, once you discover its few simple shaping secrets.
If you've baked with us before (in person or virtually), perhaps you've already experimented with shaping different bread doughs. From giant babka knots to baguettes resembling sheaves of wheat, you know how fun it is to roll, twist, and score your way to stunning loaves. That's great! You'll certainly delight in discovering the couronne (or crown) shaping method.
For those of you who are new to bread shaping or are daunted by the thought of stepping outside the bounds of an 8 1/2" x 4 1/2" loaf pan, fear not. The couronne will make you look like a pro.
The couronne technique comes to us from the Bordeaux region in France. Traditionally this ring-shaped loaf is composed of six to eight balls of country bread dough, blanketed by another flat disk of dough that holds the loaf together.
By process of this clever design, as the couronne bakes, the disk of dough rises away from the balls, making it seem as though the loaf was expertly scored rather than simply shaped.
Though the technique may seem complex, a few simple photos and instructions will have you well on your way to couronne success.
We'll start by getting the dough ready for our No-Knead Multigrain Crown recipe. I really like the nutty wholesomeness of this loaf, but just about any lean (no added fat) bread dough recipe will work.
Starting the night before you'd like to bake bread, prepare your dough.
Combine the following ingredients in a large, 6-quart mixing bowl, or a large, similar capacity dough-rising bucket:
4 1/2 cups (478g) Super 10 Blend
4 1/2 cups (478g) First Clear Flour or 4 cups (482g) King Arthur Unbleached All-Purpose Flour
1 tablespoon (17g) salt
1 1/2 tablespoons (14g) instant yeast
3 cups (680g) lukewarm water
3 tablespoons (64g) honey
Mix and stir everything together to make a very sticky, rough dough. If you have a stand mixer, beat at medium speed with the paddle attachment for 30 to 60 seconds. If you don't have a mixer, just stir with a big spoon or dough whisk until everything is combined.
Cover the bowl or bucket and transfer to the refrigerator to rest overnight, or for up to three days.
When you're ready to make bread, generously flour a 10” to 12” ringed brotform. If you don't have a ringed brotform, there's a neat trick for creating a homemade version later on in this post.
Grease your hands and pull off about one-third of the dough (about 510g to 567g if you have a scale). You'll have the opportunity to make 3 loaves out of this one batch of dough.
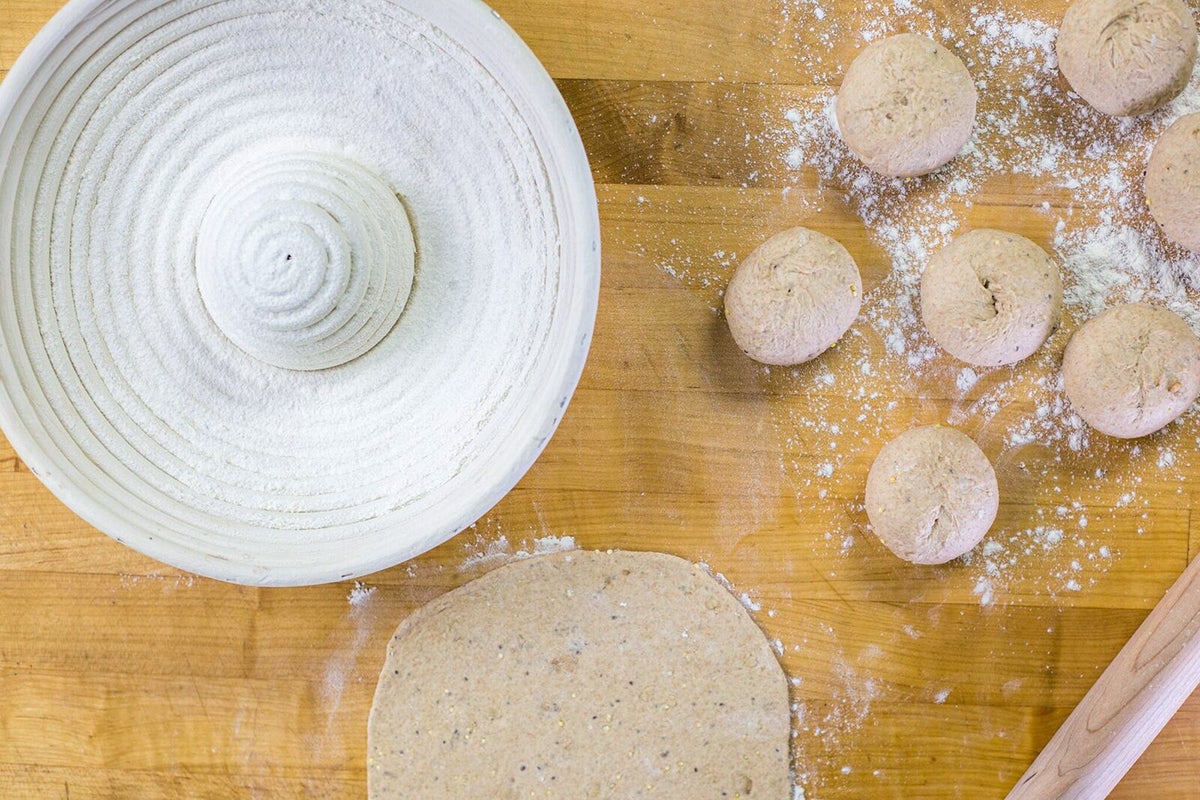
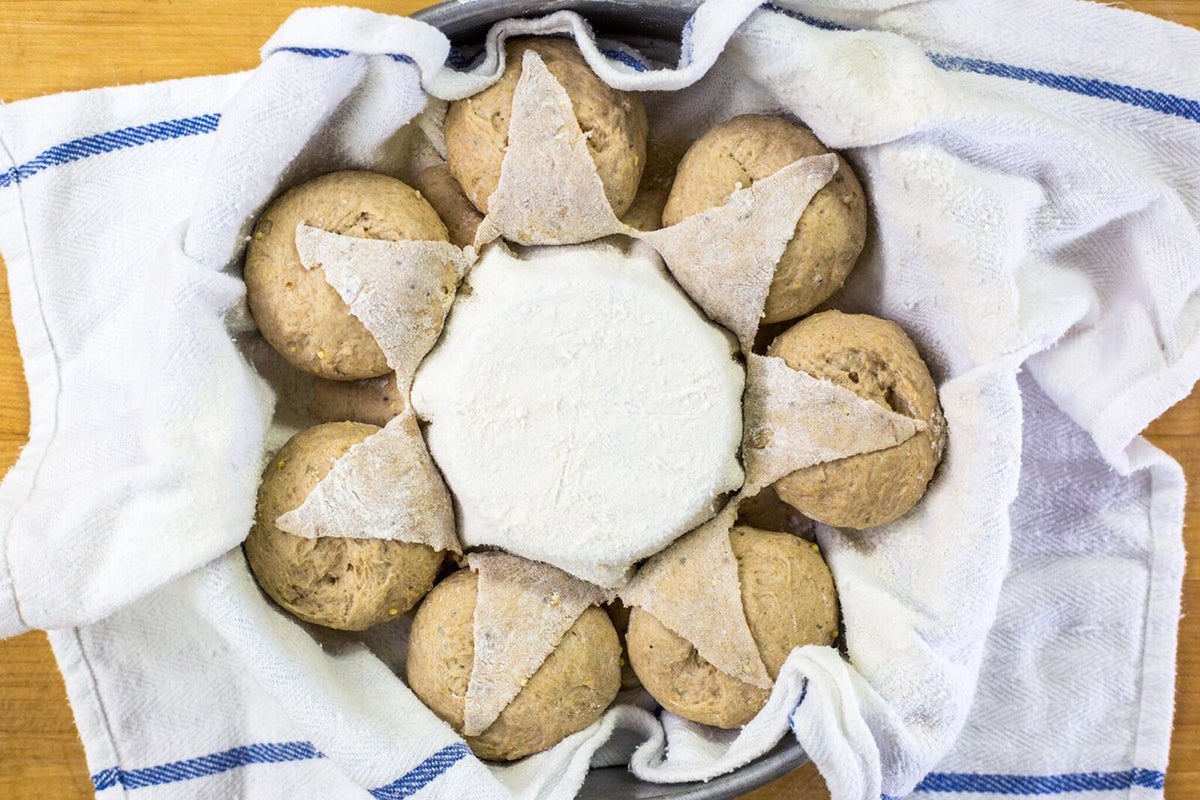
Place the dough onto a floured work surface, divide it into eight equal pieces, and shape each piece into a ball. Set aside seven of the balls smooth-side down (upside down). This is a good reminder that you'll be placing the balls upside down in the brotform later.
Roll the 8th ball into a thin disk roughly 8" in diameter.
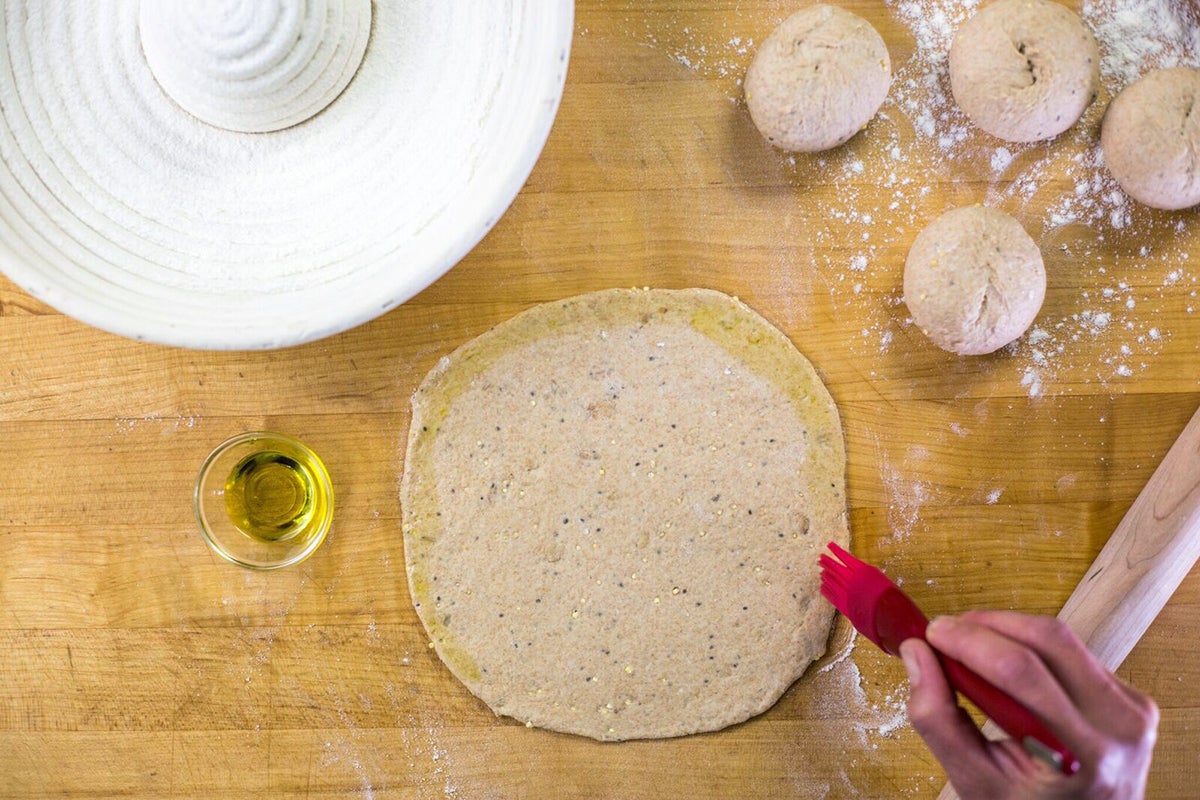
With all the pieces of our couronne laid out, let’s shape our loaf. Brush a thin coat of oil around the perimeter of the dough disk. The separation of the disk from the balls is what creates that lovely crested ring (or "ear") around the top of the finished loaf. The oil will prevent the balls of dough from sticking to the disk.
Next, carefully drape the disk, oiled side up, over the center hump of your mold; it should cover about 1” beyond the base of the brotform's center hump.
Again, your brotform should be generously dusted with flour here. If not, the dough will stick to it when you try to turn it out of the mold. I can attest to that!
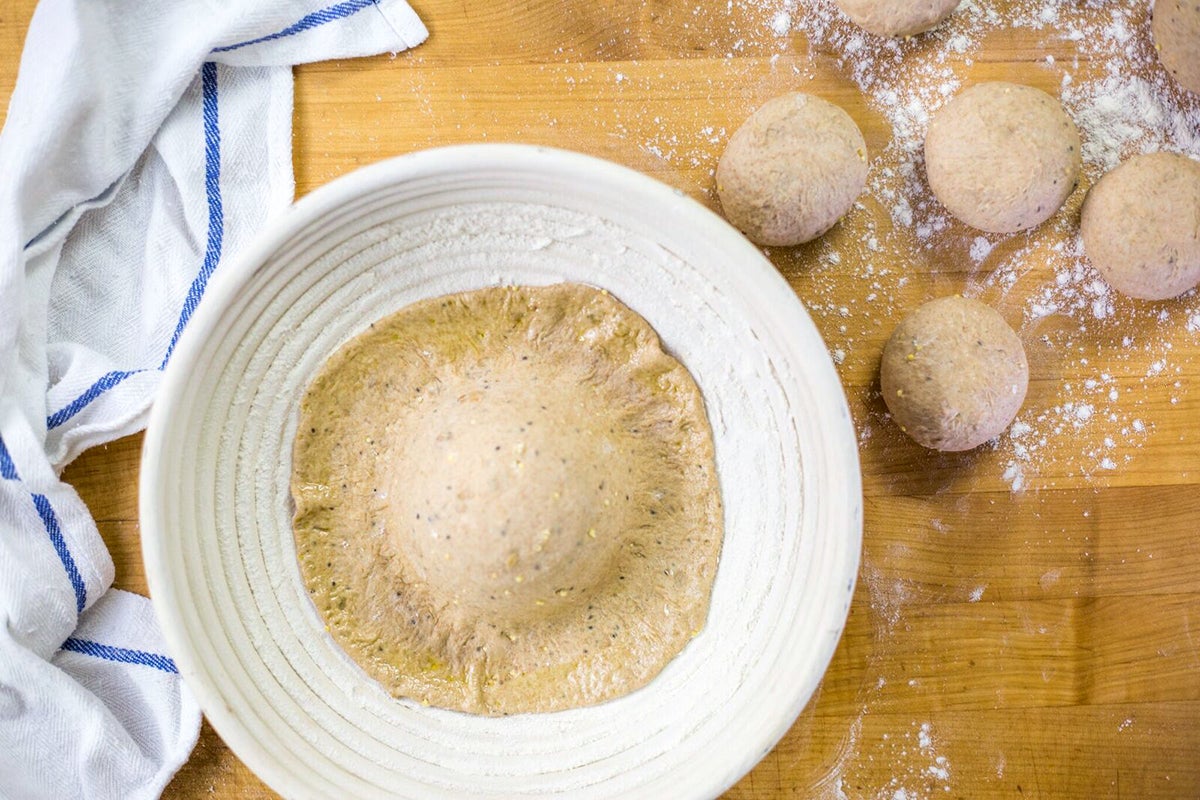
Now it's time to add the dough balls. Space them evenly around the center hump, partially on top of the dough disk, smooth side down. The balls will barely touch, and the middle of the top of each ball will fall about even with the perimeter of the disk.
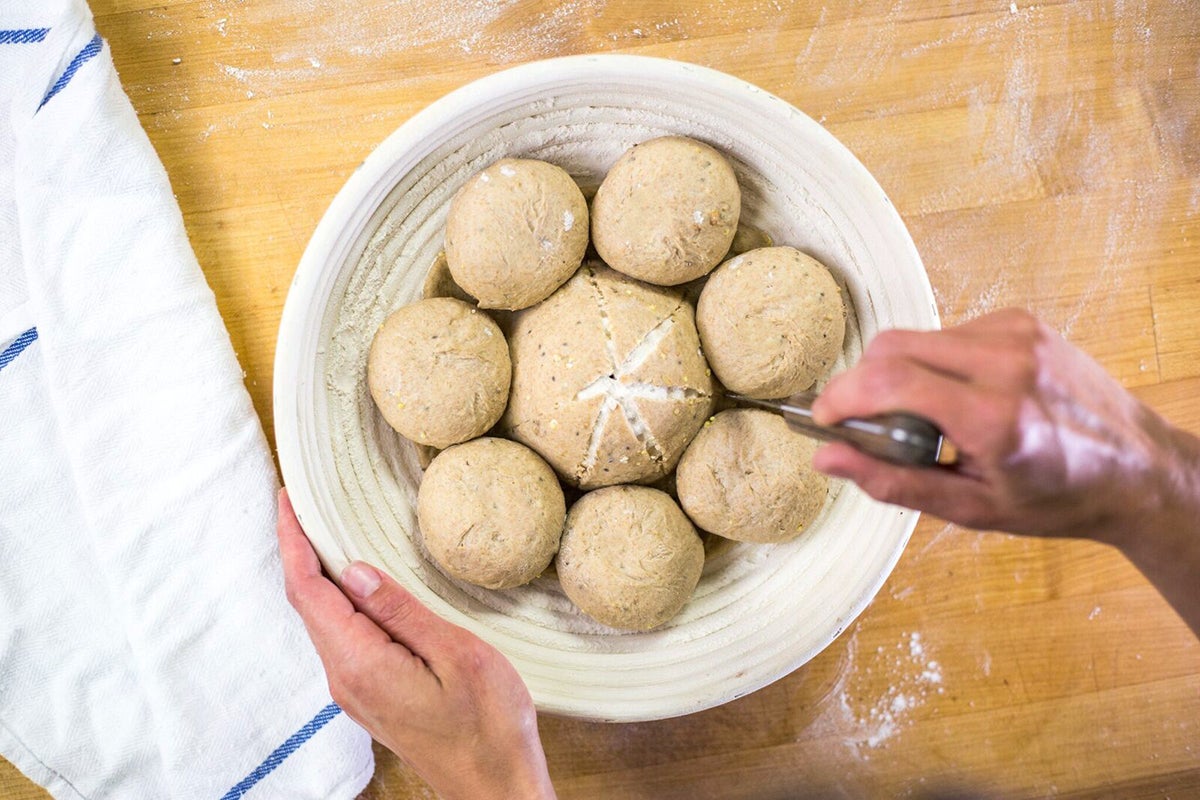
The final piece of shaping involves a little cutting (no slashing, I promise). Using a paring knife, cut from the center of the dough disk down to each point between two balls of dough. Wrap each triangular section of dough over its corresponding ball of dough to form a star-like pattern.
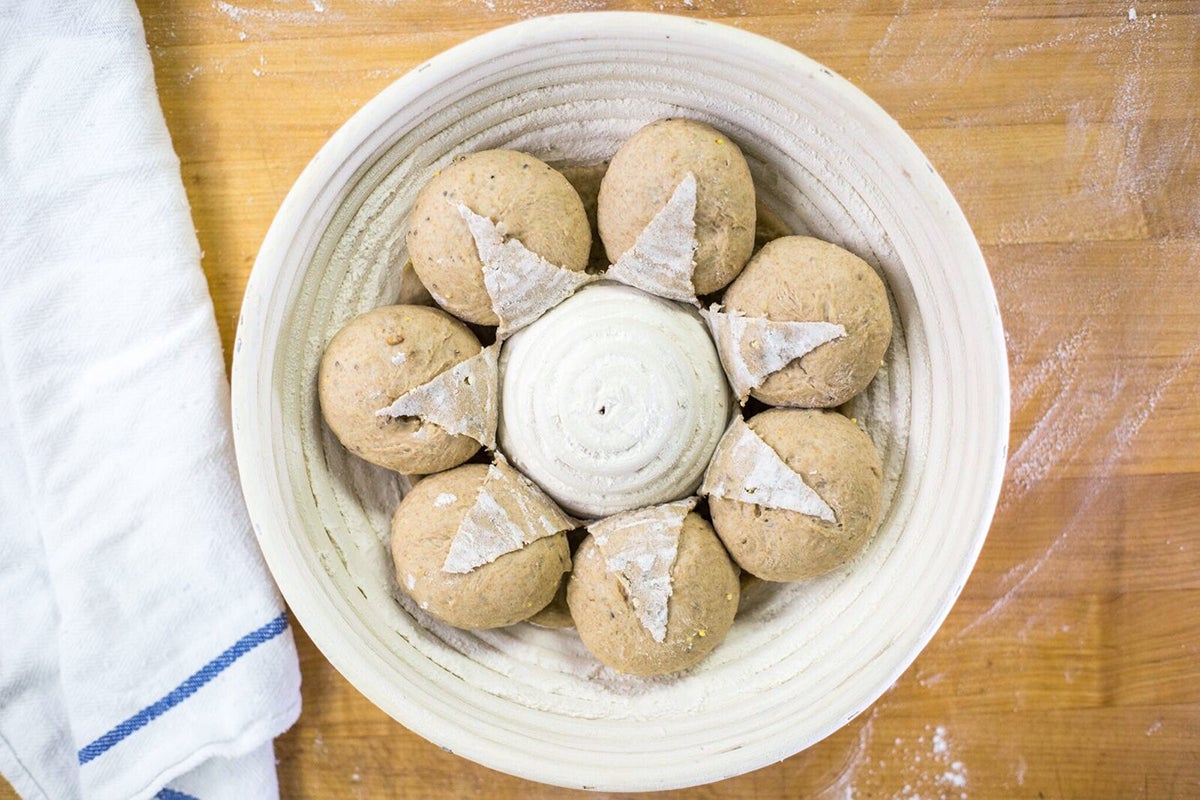
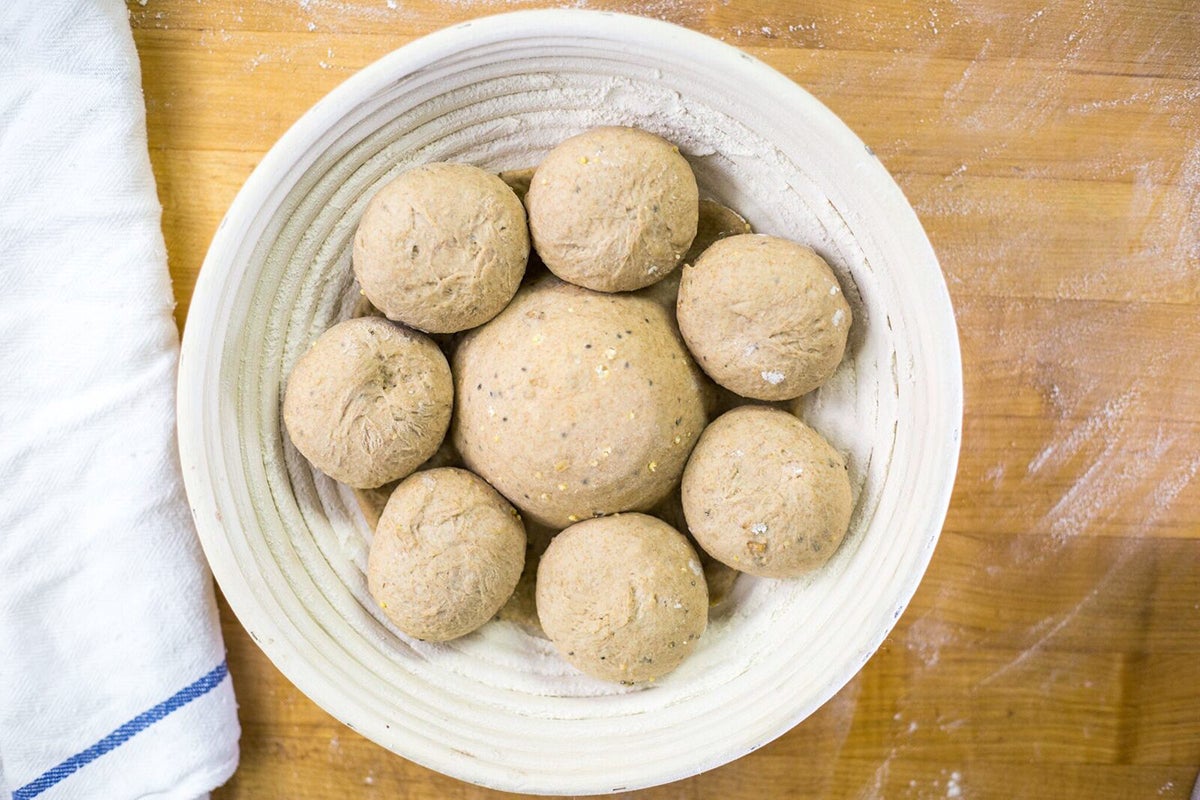
That's it. You're done with the shaping! Now cover the dough and let it rest until it's a little puffy and no longer cool to the touch. Like most no-knead dough, this one doesn't do a lot of rising. You're mostly looking for a relaxed, non-springy reaction when you lightly press on one of the balls with your finger.
This 60 to 90 minute rest offers the perfect window to start preheating your oven to 450°F. If you're using a baking stone - which I recommend for an extra crispy crust - place it in the middle of the oven. Then, place a shallow metal or cast iron pan (not glass, Pyrex, or ceramic) on the lowest oven rack. We'll add hot water to the pan when the bread goes into the oven, again, for an extra crisp, crackly, bakery-style crust.
This is the moment I eagerly anticipate every time I make this loaf. It's the moment when I get to see the result of my careful shaping and crafting.
The easiest way to do the turn out is using parchment paper. Simply lay the parchment over the loaf. It will be the easy-to-maneuver vehicle by which your sticky dough will make it to the hot oven.
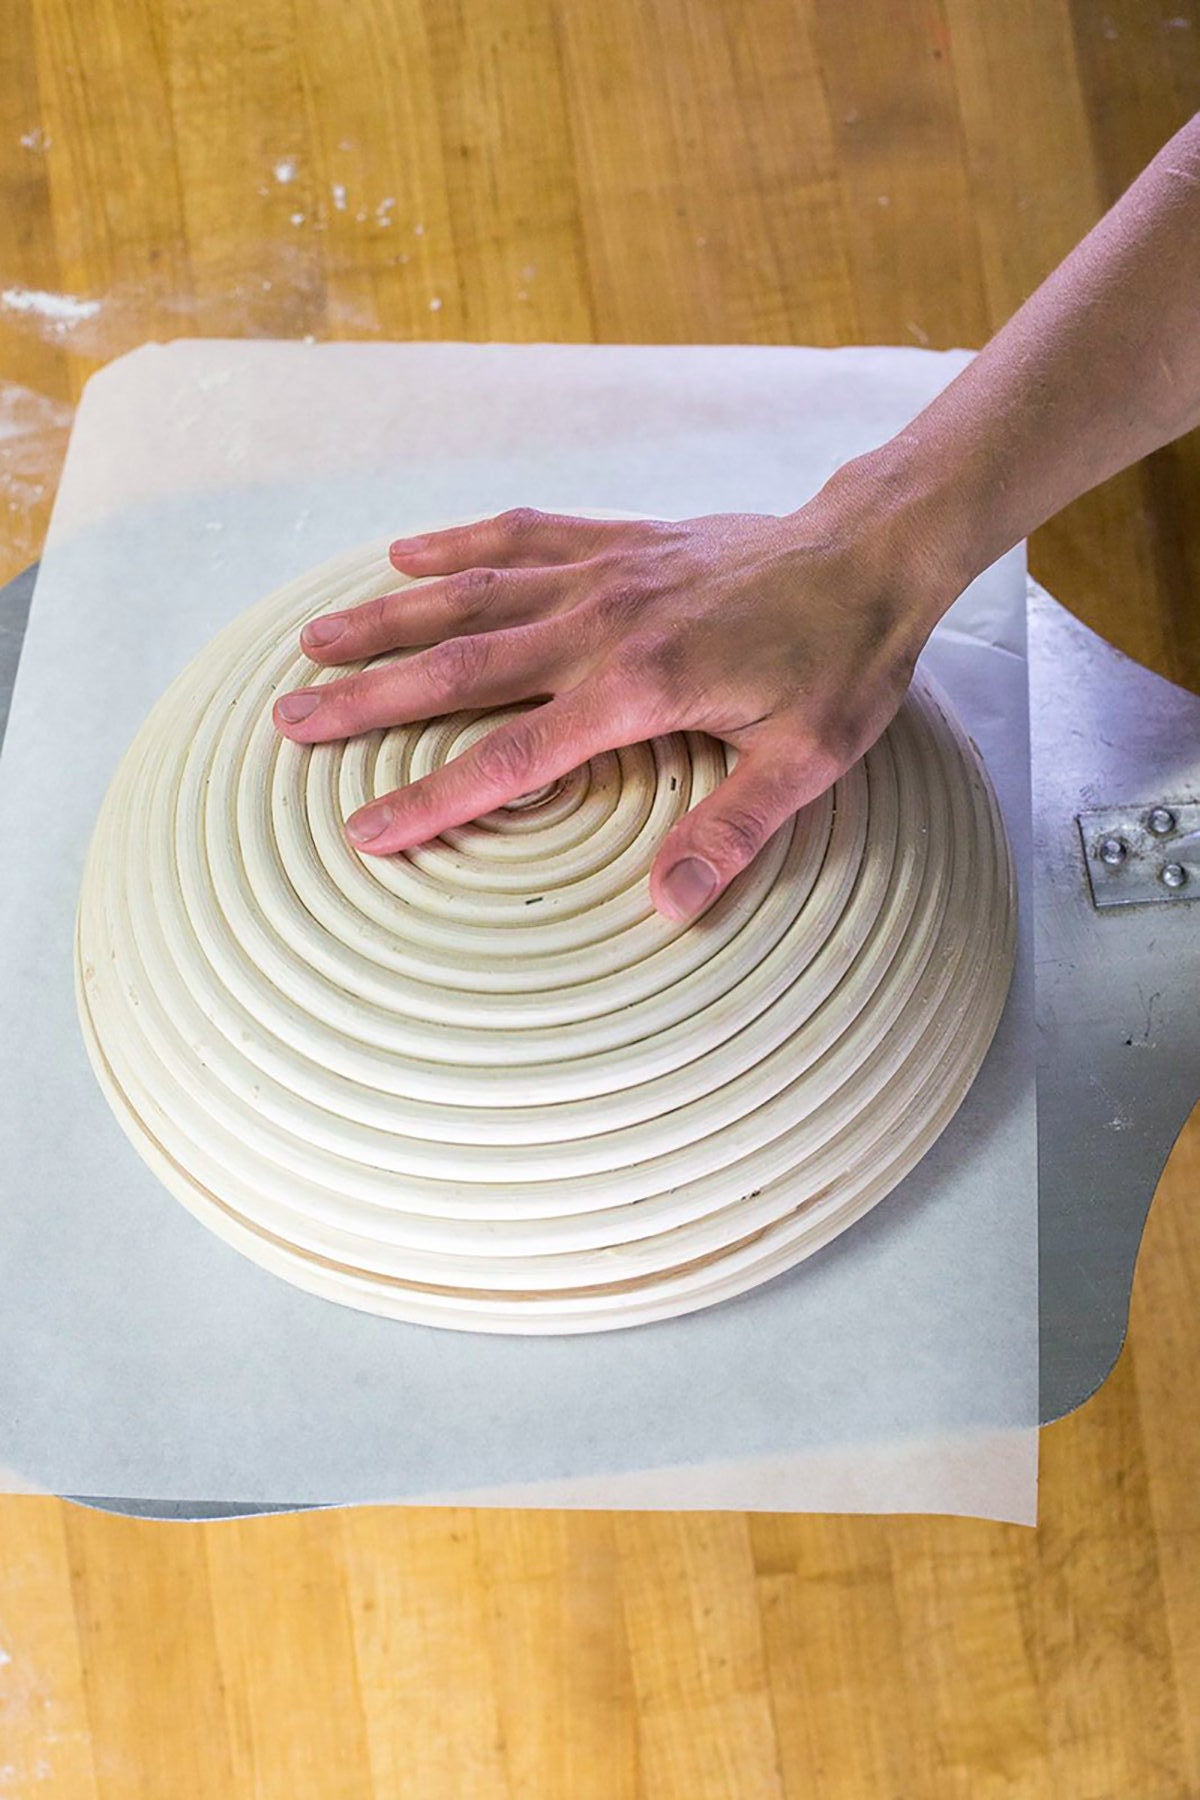
Your next move, if you're baking on a stone, is to pick your transferring weapon. I've always liked a baking peel, but an upside-down sheet pan also works. Both serve to help you get the loaf to the oven without burning yourself. Center the peel or bottom side of the pan over the parchment-covered loaf. With one hand under the brotform and the other in the middle of the peel or pan, swiftly flip all parts at once. Your hands will have switched positions.
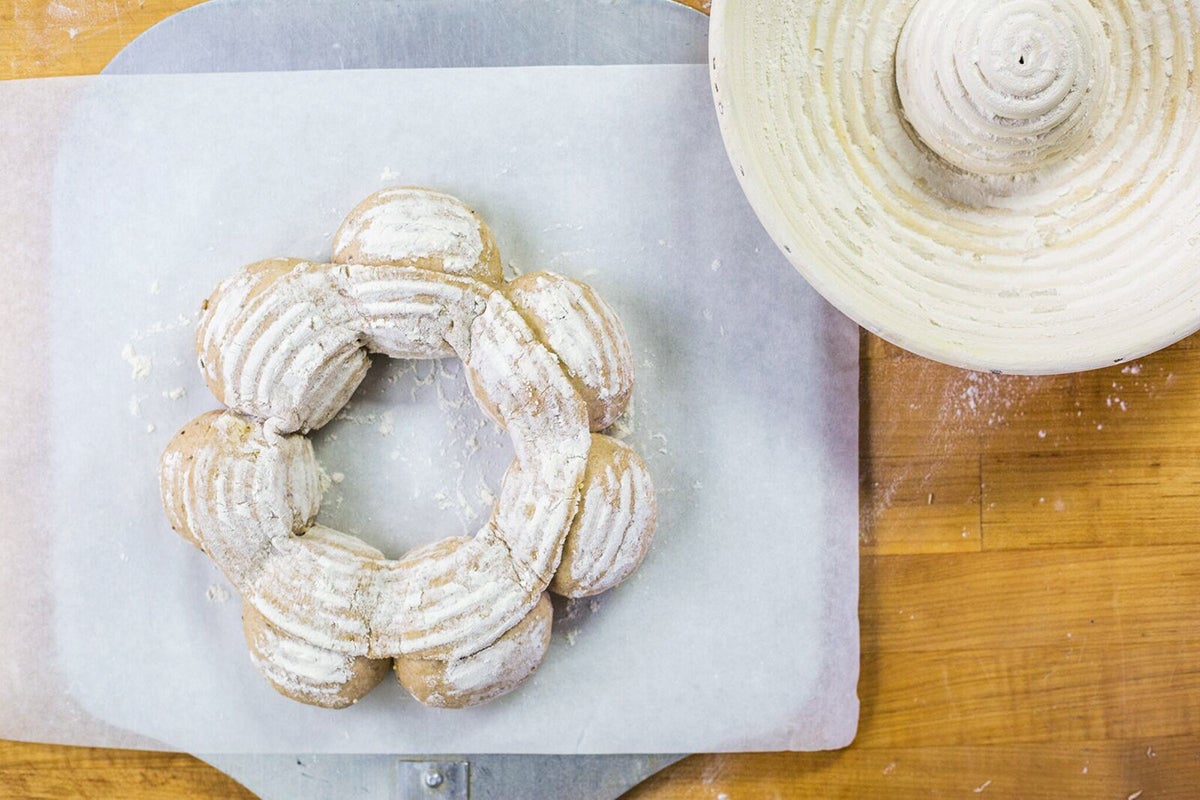
Place the peel or pan back on the work surface and gently remove the brotform to reveal the loaf. Ta da!
You can use this same method if you're baking on a pan. Center it top side down over the parchment covered loaf and follow the flipping instructions above.
Have about a cup of hot water at the ready before you open the oven.
Quickly transfer the loaf to the oven on parchment onto the hot stone, if you’re using one, or simply onto a middle rack, if it’s on a pan.
Carefully pour the hot water into the hot pan at the bottom of the oven; it'll bubble and steam. Immediately shut the oven door to prevent the steam from escaping.
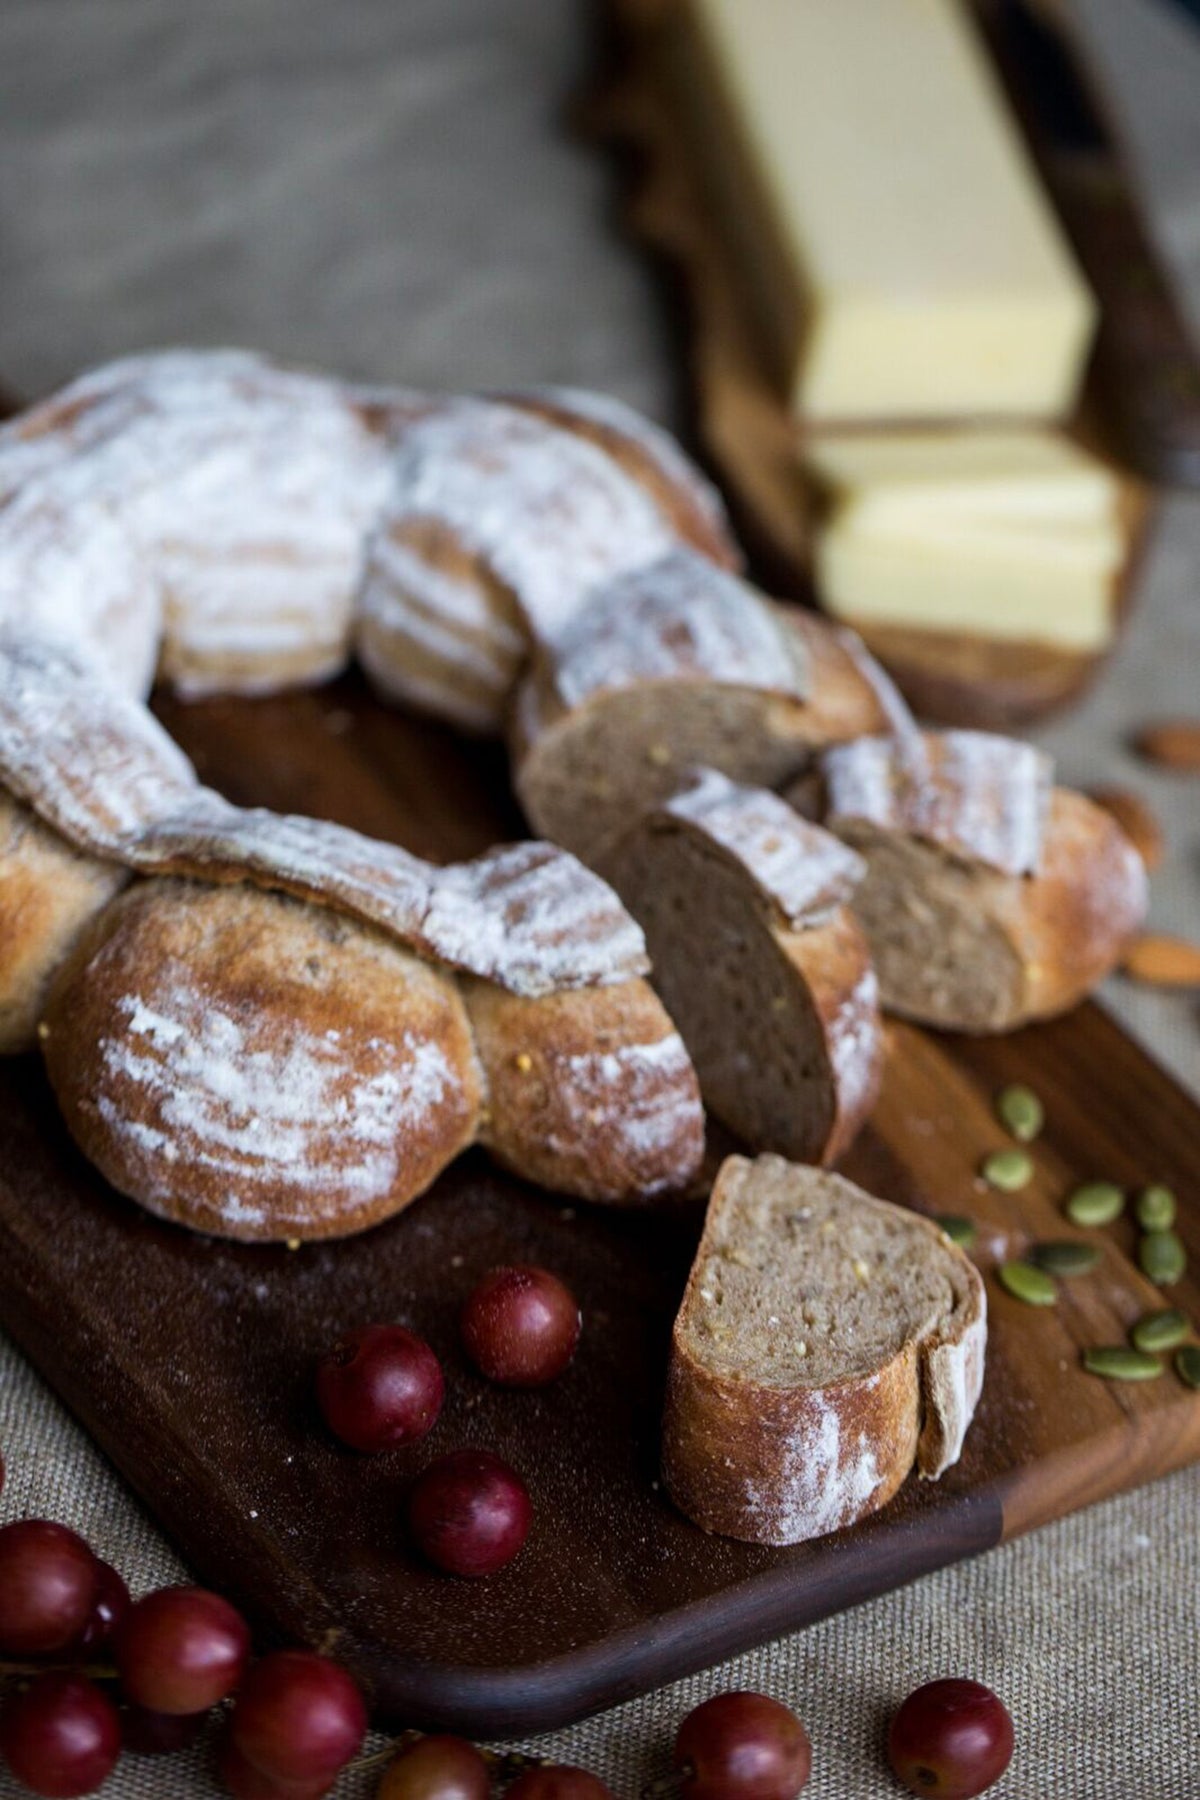
Bake the couronne for 15 to 20 minutes, until it's a deep, golden brown and the internal temperature is at least 190°F on a digital thermometer.
Remove the loaf from the oven and transfer it to a rack to cool.
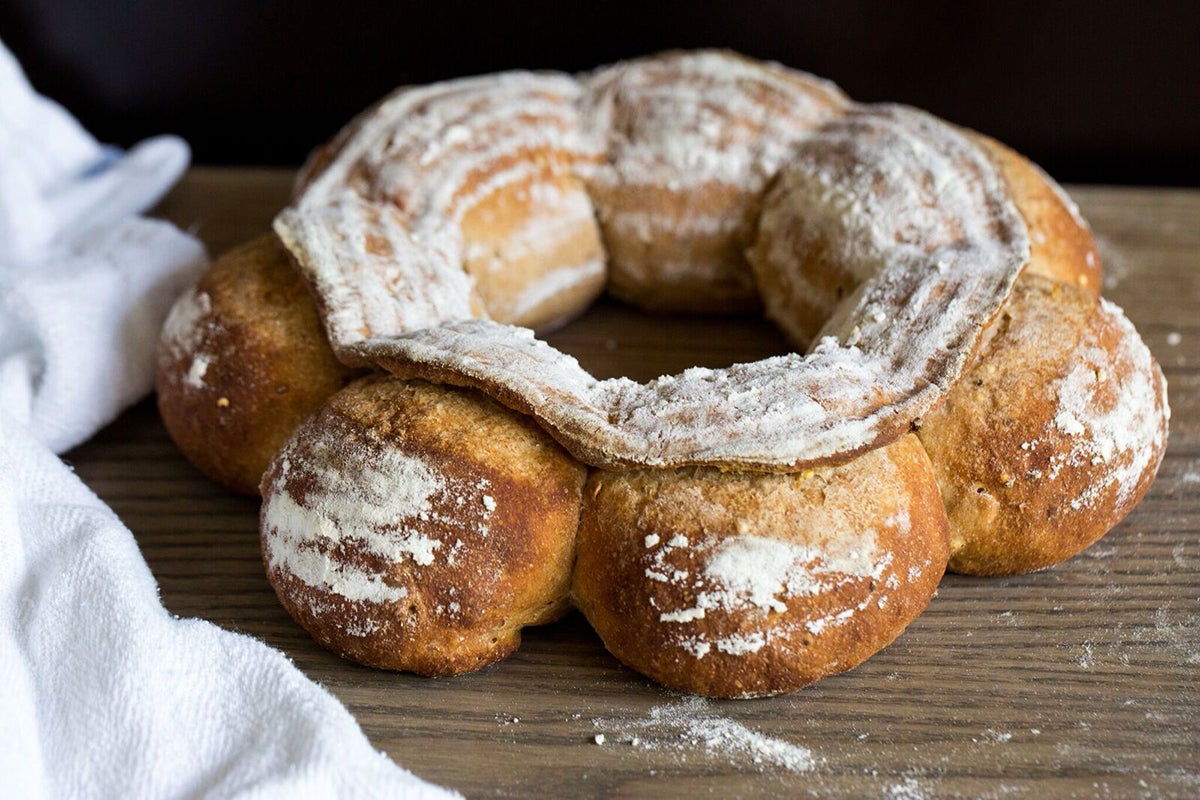
Voila! Your very own couronne.
If you're like me, you'll need to practice at least a couple times to perfect your technique. The best part about this recipe is that it can make three loaves. Moreover, you have up to three days to use it. So, if your first try was not everything you wanted it to be, simply tear off another piece of dough and have another go.
Although the ringed brotform is a handy tool to have when shaping a couronne, it's not obligatory. All you need is a 9" round cake pan, a ramekin, and a tea towel, and your very own homemade ringed vessel will be ready in no time.
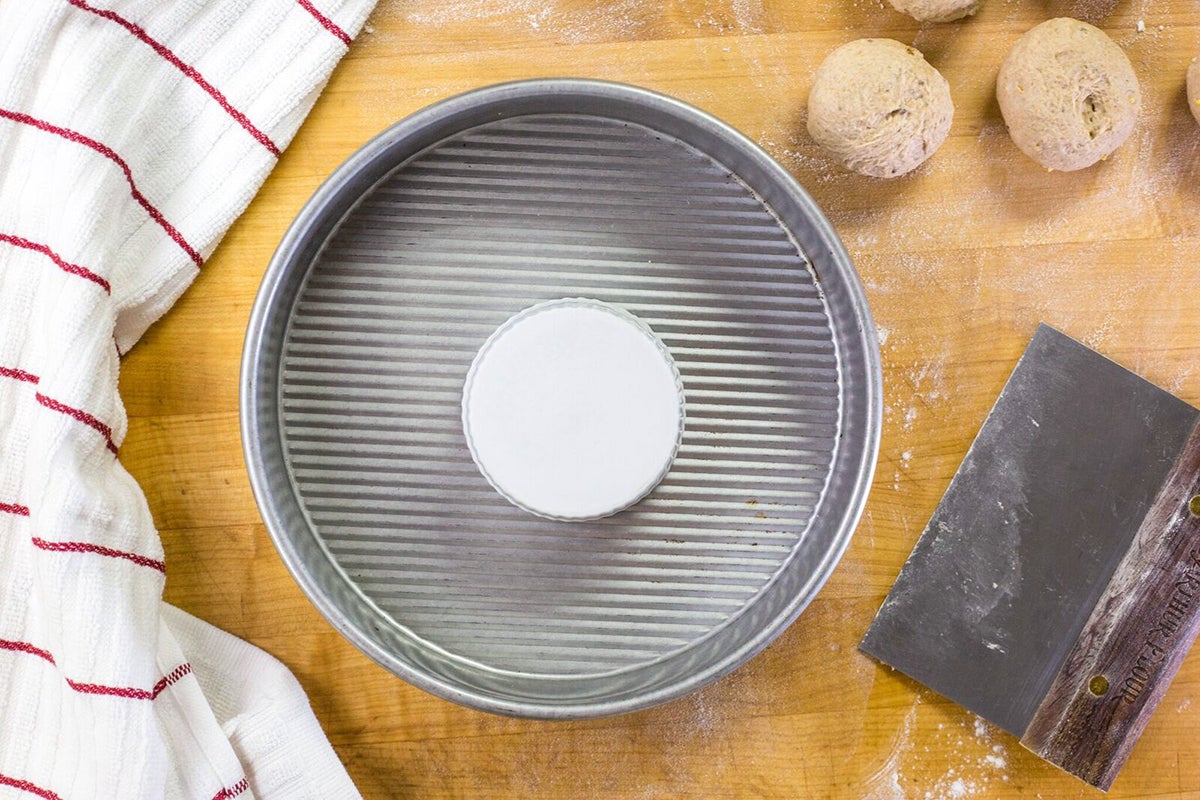
Simply place the ramekin upside down (or right side up for that matter) in the center of your 9" pan.
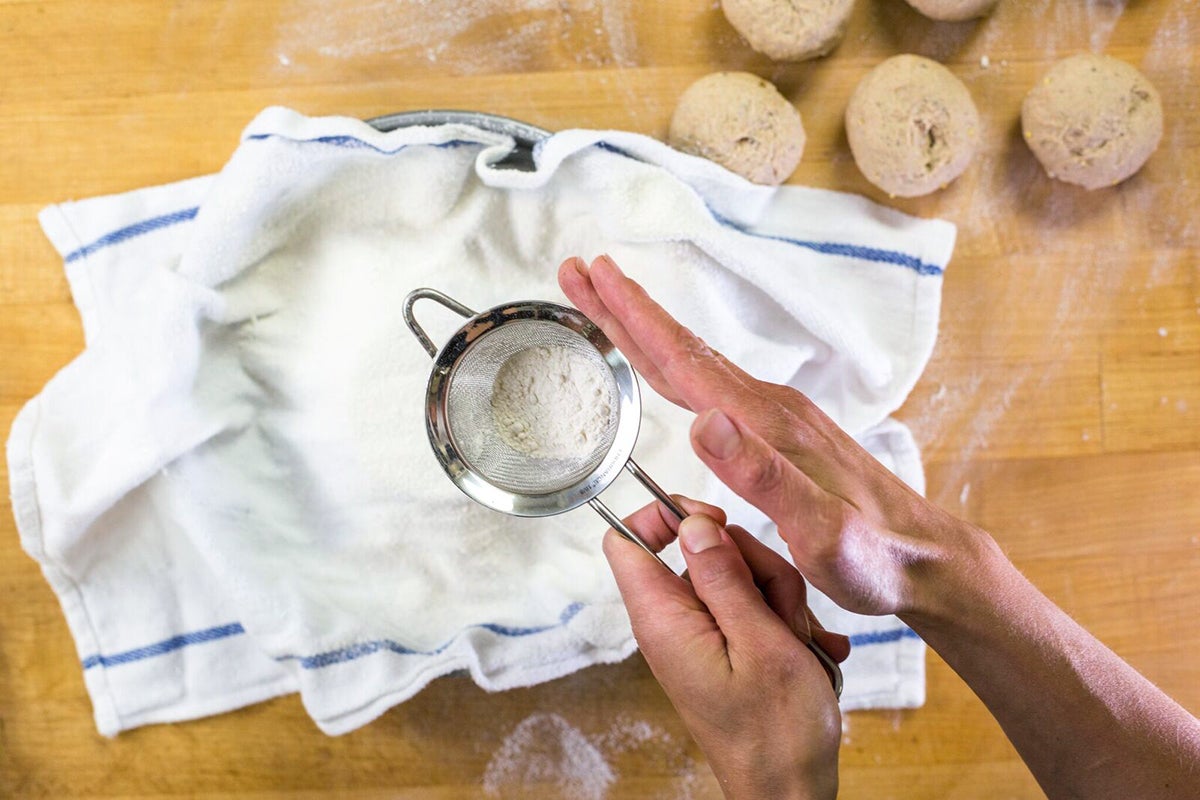
Drape the tea towel over the pan and press it into the trench you've made around the ramekin. Now liberally dust the tea towel with all-purpose flour.
Just like that, your homemade mold is ready.
You'll follow the same process for preparing and shaping the dough as we did for the brotform, so that's easy. The trickiest part comes when you need to turn the dough out of your mold. It's less tricky if you can find a ramekin and pan that are roughly the same height. This will avoid any gaps between peel or pan and the mold, making for smooth maneuverability. If you do happen to have an uneven top surface, you'll just need to be extra careful when flipping. A steady, firm hold is all it'll take.
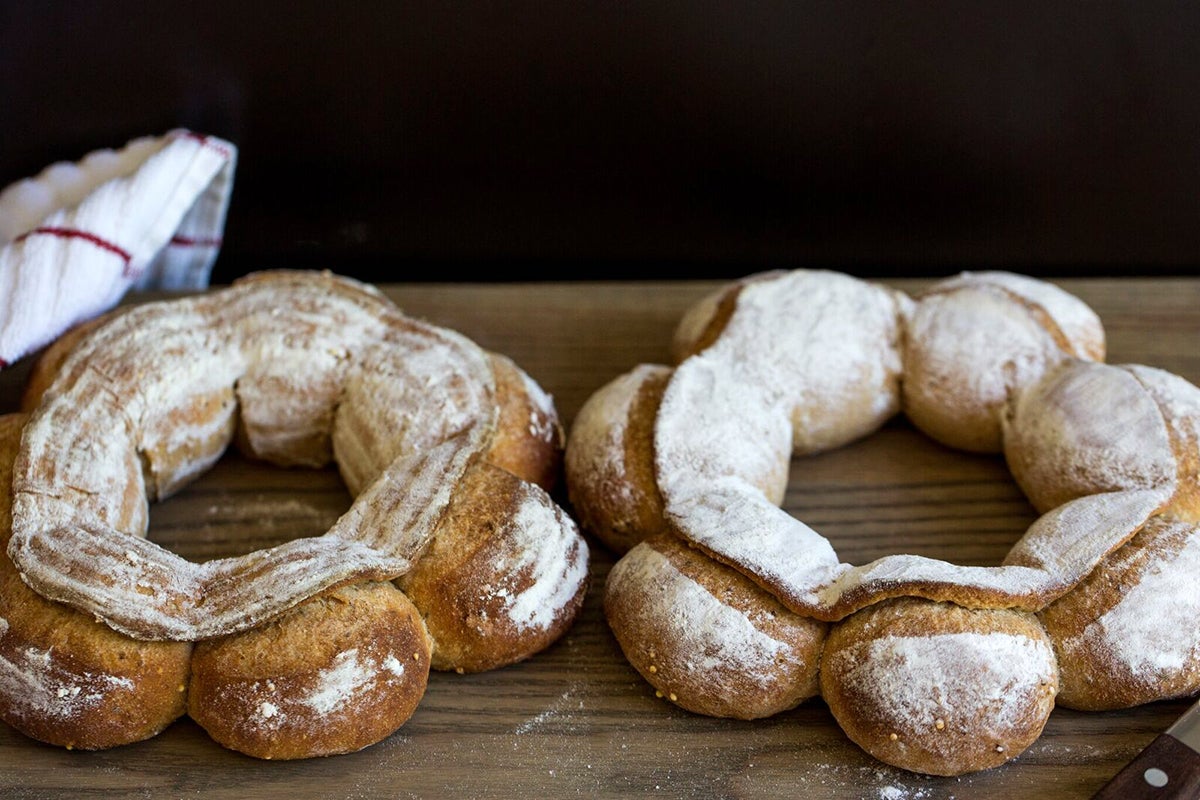
In a side-by-side tasting, you won't notice a difference between a loaf that was shaped in a ringed brotform and one that was shaped in its homemade cousin. The bread will be unaffected in both flavor and texture.
Visually, however, the finished loaf shaped in a homemade mold will look evenly white compared to a brotform-shaped loaf (which will show its mold's ringed pattern). You can brush away any excess flour, but a little on the surface creates a nice contrast against what lies beneath the ear.
All told, don't these loaves make a beautiful pair?
It is best to use a lean dough without enrichers like butter, oil, or milk, and/or much sugar. Bread that has added fat will have a softer crust, which will affect - in addition to the texture of the loaf - the beautiful ear that forms during baking.
Be sure to generously dust your shaping/proofing mold with flour. The last thing you want is for your beautifully crafted loaf to stick to the mold when you're ready to bake it. Believe me, I know!
It's good practice to brush oil around the perimeter of your dough disk. If you don't remember, it's not the end of the world. Your loaf just may not have the same loft to its ear.
Remember that you're shaping this loaf upside down. What you're seeing as you form the couronne will become the bottom of the finished loaf. You won't see the top, so just be sure to place the dough balls in top side down.
Last but not least, don't get discouraged. If your first loaf doesn't turn out exactly the way you want, you have two other opportunities with this No-Knead Multigrain Crown Recipe to try again. I've made a countless number of couronnes, and they have all come out differently. Fear not. With these step-by-step instructions and photos, and a little practice, you'll have the couronne down in no time.
Do you have other favorite bread-shaping techniques? We're ever curious. Please share your tips and techniques in comments, below.
Thanks to Anne Mientka for taking the photographs for this post.