How to turn any home oven into a pizza oven
You’ll never hit 900˚F, but with the right tools (and a few bricks), great pizza is possible.


Pizza is not a special-occasion food — it’s an every occasion food. To help you embrace it, we've put together a four-point plan for designing the perfect pizza night, the one you can repeat week after week after week. This is Pizza Night, Perfected.
* * *
Neapolitan-style pizza — with its blistered, puffy rim and thin interior — is baked in wood-fired ovens that approach 900˚F.
New Haven pizzas, with their thin, charred crust and crisp-tender texture, are forged in coal-fired ovens exceeding 1,000˚F.
Even New York pies — well-browned but not charred on the exterior, and chewy-crisp within — are baked in electric or gas ovens that commonly run between 700˚F and 800˚F.
Meanwhile, the average home oven tops out at 500˚F or, if you’re lucky, 550˚F. Which means that it’s impossible to make restaurant-caliber pizzas at home, right? Actually, no: Good, nay, even great pizza can be made at home, but to do so, you need to set up your oven to mimic a high-temperature one.
Who better to ask for advice on how to recreate restaurant pizza at home than someone who’s had a lifetime of practice doing so? I've been making pizza at home myself for years, and am pretty confident in my technique, but I’m hardly a pro. Which is why I reached out to Dan Richer, the chef-owner of Razza Pizza Artigianale in Jersey City, NJ, and the author of the forthcoming book, The Joy of Pizza. (Heads up: We only recommend the cookbooks that we, as bakers, truly love. When you buy through external links on our site, we may earn an affiliate commission.)
Not only has Dan been making acclaimed pies in Razza's two wood-fired ovens since the restaurant opened in 2012, but he's been thinking about how to get the same caliber of pizza out of his home oven for at least as long. The Joy of Pizza is the culmination of years of pizza knowledge, and a must-have for serious pizza makers. I asked him to share the secrets it contains on how home pizza chefs can make the most of their ovens.
The first thing Dan wanted to emphasize is that while standard home ovens can never get as hot as professional pizza ovens, there are strategies a baker can employ to maximize the heat you pull out of them.
“Pizza cooks from many different directions: the top, the sides, the bottom,” he explains. “We bake pizza using two main sources of heat transfer — conduction and radiation.”
Radiation is the movement of energy by electromagnetic waves, which can move through air or a vacuum (just like solar radiation can give you a nasty sunburn if you don’t apply sunblock at the beach). Conduction is the direct transfer of energy from one object to another (like when you burn your bare feet on the sand at that beach). The top and sides of the pizza cook via radiation; the underside cooks by conduction. Radiant heat is supplied by the oven's heating element and sometimes the broiler (more on using the broiler for pizza in a moment); conduction is supplied by whatever surface you bake the pizza on.
The trick to great pizza is getting those two sources of heat to work in tandem. “Pizza is such a unique food because we’re cooking, but we’re also baking,” Dan points out. “Pizza is a flatbread with condiments baked onto it, so we have to get our bread baked and we have to get [our toppings] to cook at a similar rate.” And because the crust of the pizza has to keep up with the cooking rate of the toppings, this balance mostly comes down to conduction.
“For conduction to really do its thing, you need thermal mass,” says Dan. Thermal mass refers to the heat-storing (and delivering) capacity of a material; the greater the thermal mass, the longer it can supply heat to whatever it's in contact with. (It’s more or less equivalent to a battery, like the one in your smartphone — the larger the battery, the longer you can run that phone before it’s in need of a recharge.)
It’s usually the baking surface that’s the limiting factor for pizza: It takes a lot of heat to get the underside of the pie to cook at the same rate as the top and sides, so the more thermal mass, the more likely it will be able to keep up. Thermal mass is directly related to the density and weight of the surface material in question — denser and heavier is better, provided it has been preheated (or, to continue with the battery metaphor, “charged up”) sufficiently long.
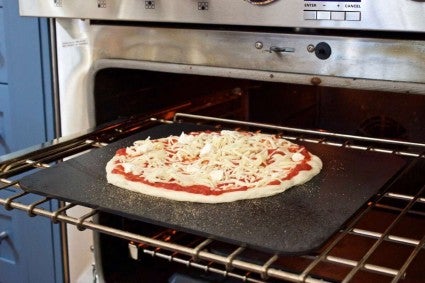
The simplest and most accessible baking surface you can use for cooking pizza in a home oven is a preheated half sheet pan. While that can work in a pinch, a half sheet pan is so lightweight that it quickly cools down after you place the raw pie on it. It just doesn’t have the heat-holding capacity pizza demands. Which means that even once the cheese is browned and bubbling and the rim is golden and crisp, the underside is likely to remain pale and soft.
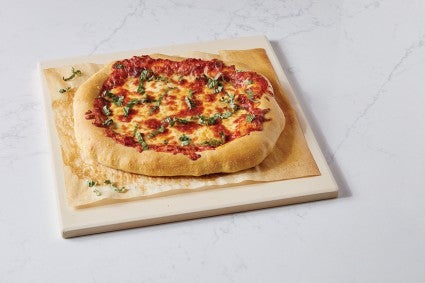
Switching to a baking stone is a major upgrade in terms of thermal mass. (There’s a reason those things are so freaking heavy.) So long as it’s been sufficiently preheated — Dan suggests heating it for at least an hour at the oven's maximum temperature — it will do wonders to help the underside keep pace with the top and sides.
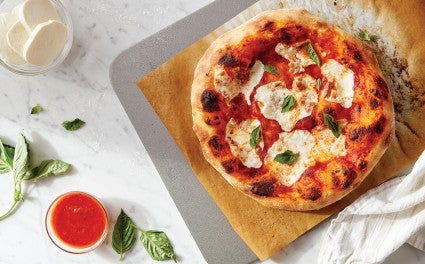
Better yet, there’s the baking steel, which is Dan's preferred pizza-baking surface at home. These 1/4"-thick slabs of raw steel have a thermal mass comparable to baking stones, along with another trick up their sleeves: higher thermal conductivity. Being a metal, steel is far more conductive than ceramic, which means that not only do baking steels hold heat well, but they also transfer it to the pizza more quickly than stones. And faster heat transfer means faster cooking.
Dan admits that baking steels, while great, are expensive at about $100 each. Which is why he also mentions a budget alternative: firebricks. Firebricks are heavy, heat-resistant bricks made for fireplaces and ovens, and they cost a mere couple of dollars apiece. “[They are] the least expensive way to go, and ironically, probably have the most thermal mass, because they’re the thickest,” he tells me. And what they lack in conductivity relative to a baking steel, they make up for in sheer mass. But, as he notes, they’re not without their drawbacks: They're so massive that you can’t really leave them in the oven all the time (as Dan does with his baking steel), and they take time to arrange on your oven rack ahead of each bake.
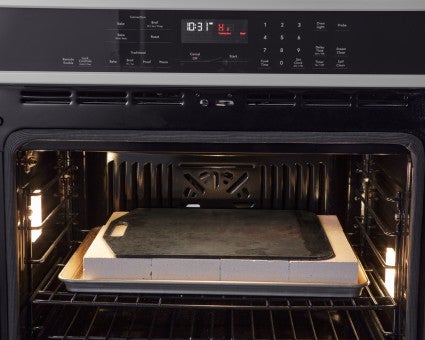
Finally, you can combine two of these surfaces for even more oomph. “You can do firebricks in the oven first and [put] the pizza stone or steel on top of them,” he says. “And that’s like supreme thermal mass.” I actually use this layered approach myself all the time. I happen to own both a baking stone and a steel, and I tend to use them both for pizza: The stone (for added thermal mass) below the steel (for its superior conductivity). It's the best of both worlds — a heat-pumping baking steel attached to a heat-storing stone.
Of course, radiation has a role to play here, too, so Dan also has advice on where in the oven to place your baking surface. “I put the stone anywhere between 6” and 8” from the top of the oven,” he says. “All ovens are slightly different, but for the ovens I’ve tested, that’s a good spot.” Heat rises, so placing the surface close to but not quite at the very top of the oven maximizes the amount of heat the top and sides of the pie are exposed to, while still leaving ample room to get the pie in and out of the oven without disaster.
Moreover, as Dan points out, it allows the baker to take advantage of the broiler for additional heat both before and during the bake: “I typically flip on the broiler about 10 minutes before I start to bake for that really intense heat to get the stone or steel as hot as possible. And then I flip the broiler on or off as I’m baking, based on how the top of the pizza is going in relation to the bottom.” With experience, Dan knows about how long it’ll take to get the underside of his pies to crisp up nicely, so if it seems like the top of the pizza isn’t keeping pace, he’ll turn on the broiler to give it a little boost.
Using your broiler to superheat your baking surface and to goose the top of the pie while it cooks is definitely an “advanced” technique, requiring practice and a good sense of how hot and how evenly your particular broiler element runs; it’s easy to overdo it and end up with a pizza that’s more scorched than charred. But, like Dan, I agree it’s definitely worth exploring once you’ve maximized the heat output you can get from your baking surface and the bottom element alone.
In the end, though, the best way to keep track of how your pies are cooking is to get as close as possible to the action. As Dan explains, “When I make pizza, I’m sitting on the floor of my kitchen — there’s no other way to do it.”
Learn more pizza tips in our four-point plan for designing your best pizza night: Pizza Night, Perfected.
Cover photo by Rick Holbrook.