How to give any bread a chocolate makeover
Considerations for off-roading in the land of cocoa.


I grew up with a weekly bread tradition. Saturdays, rain or shine, one of my parents clocked in as the baker and made bread for our family (and a lucky neighbor or two). It was no small feat; 13 loaves, two pounds each, hand-mixed with equal parts whole wheat and white flour. The mass fermented directly on the counter (and sometimes over the edge) for a variable chunk of the day.
While the schedule was reliable, the bread changed from week to week. My dad was consistent with his high-rising loaves but my mother made bread like she did scrap quilts. A piece of this, a bit of that, a pan of leftover oatmeal; no two batches the same.
The idea that we can bake with what we have (or don’t have) is a great jumping off point for creativity. I carry my mother’s baking and her influence in my heart. I see bread but not a recipe fixed in place — I see something that can be changed; something flexible, something in motion.
Here’s an example: Lately I’ve been on a cocoa kick. Cocoa in my puff pastry, cocoa in my croissant dough, and cocoa in my milk bread. This began with a search for a tender, enriched loaf that didn't require the time commitment of my standard brioche. I tried our Japanese Milk Bread and, to no surprise, I loved the texture. Considering what else I could make with it, I thought of a chocolate version. Thanks, Mama.

But where to begin? Rather than guessing, I always start with what I know works. I checked my recipe files for chocolate versions of doughs, I looked through the Bread Bakers Guild of America member files, and I searched our King Arthur website. Once I had a sense of how ratios tend to look in chocolate doughs, I converted my numbers to baker’s percentages and noted some considerations.
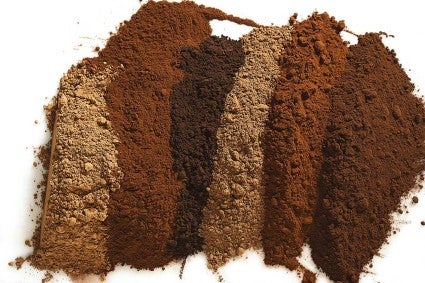
Cocoa: A cocoa quantity of around 10% of flour weight is a good starting place. More than that and I’d have to make measurable adjustments to hydration. Also, the pH of cocoa powder could impact yeast activity. Regarding type — Dutch-process, black cocoa, or natural — I have some choices to make.
Sugar: The chocolate version I dream of is barely sweet and slightly bitter. The Japanese Milk Bread does have some sugar, but is it enough? Maybe if I add sparkling sugar or Swedish pearl sugar to the exterior of the loaf, I won’t need too much in the dough? Sugared doughs can be sluggish as they pull necessary water from the yeast, and a sluggish dough will be dense. I decide to keep the sugar as-is for the first test.
Chocolate chips: I was on the fence here but people at my house offered up the opinion that a chocolate dough with no chips was like a trip to the Maine coast without doughnuts from Congdon's. So I decide to start with 15% chips-to-flour by weight.
Other: There are many ways to further turn up the flavor. Honey swapped in for a portion of the sugar, a dash of espresso powder, rum-soaked dried Bing cherries — so many options. And, recognizing my tendency to overcomplicate, I shelve some of these until I get the base dough up and running.
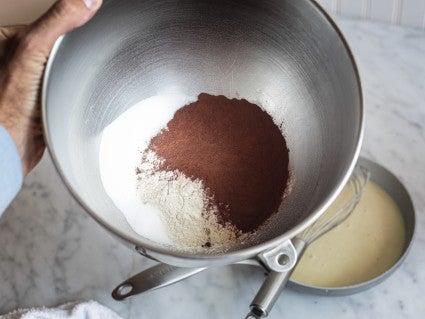
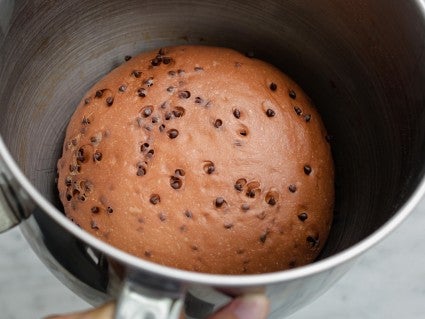
I gathered my ingredients and weighed out the cocoa (again, 10% of flour weight) and the 15% of chocolate chips. (I had mini on hand and used them. When my colleague Posie tested it, she chopped larger pieces of her favorite chocolate down to size for better distribution. Both work.)
One additional note before I jump in. Whenever I “off-road” like this, I am extra-attentive. I look, listen, and feel at each step of the process. Is the dough appropriately hydrated? What’s the dough temperature at the end of mixing? What’s the ambient condition in my kitchen? Did the dough rise well? How did the bake go? All of these clues will be helpful and necessary when making adjustments for the next bake. (I never get it right the first time!)
With these thoughts in mind, my only doubt was related to hydration. My plan was to leave the milk quantity unchanged. While the cocoa powder would pull some liquid as it hydrates (just as flour does), it's not the same as adding flour to the recipe, because some portion of cocoa powder is fat (meaning it won’t absorb as much liquid as flour). Furthermore, the dough needs to be strong enough to support the chocolate chips. A slightly firm dough with well-developed gluten structure is the goal. Upping the hydration could potentially yield a dough that is too soft.
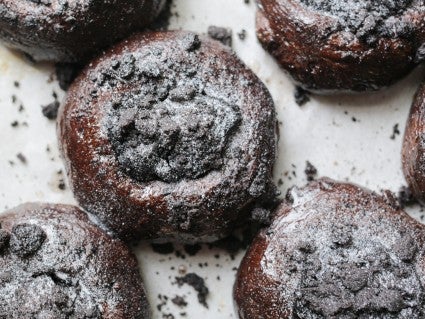
Batch one was promising. The dough rose well in the bowl and pan, suggesting that the yeast quantity, available moisture, sugar level, and pH were in a happy range. It rose so well, in fact, that it was higher than I wanted after the bake, slightly spilling over the edge of the pan. The level of sweetness seemed good to me — subtle and present but not decadent. But the amount of chocolate chips was too low. I didn’t want it to eat like a dessert, but 15% chocolate wasn’t enough. So, I went back, doubled the quantity and retested with a slightly smaller loaf size. Success! (Our recipe is here: Japanese Chocolate Milk Bread.)
The chocolate version was so successful that I wondered if I could try it in any bread or pastry recipe. But I also thought, what if I’m missing something? Is there a dough catastrophe in my future if I continue throwing 10% cocoa into everything?
Looking for answers, I started with our test kitchen, asking if there were any functional considerations or things I should avoid. Frank Tegethoff, one of our R&D specialists, got back to me immediately.
“Cocoa is essentially just fiber and fat ... even in a high fat cocoa, [it] will not likely have any effect on dough development,” he wrote, also noting that I should keep an eye on hydration. Perfect.
And, for my second opinion, I reached out to Jacquy Pfeiffer and Sebastien Canonne. You may know them from the documentary “Kings of Pastry,” or the French Pastry School, or Butter Book, or their new collaboration with Rouxbe, or their many accolades.
What they sent back was a treatise on baking with cocoa, organized into five topics to consider:
Hydration: As I noted when I made the initial dough, hydration should be considered when adding cocoa powder to any dough. Softer doughs can handle the addition of cocoa with no adjustments, firmer doughs may need additional hydration. The additional amount of moisture (water, milk, etc.) may need to equal the quantity of cocoa in order to fulfill the hydration requirements of the yeast.
Cocoa type: Cocoa choices, from natural to Dutch-process, black, burgundy and blends offer a broad range of flavor options. Natural is non-alkalized, with a lower pH and brighter, slightly acidic flavor. Dutch-process, being alkalized, has a higher pH and tastes less acidic, which some perceive as sweeter and more full-bodied. PJ wrote a survey of available choices. In my testing I’ve found that I like a blend of our Dutch-process with some black cocoa mixed in, mostly for color.
Cocoa quantity: Jacquy and Sebastien prefer cocoa amounts in the 5% to 8% range. My 10% was a little higher, but I didn’t perceive the flavor as bitter, perhaps owing to the high quality of the cocoa.
Dough types: Going beyond yeasted bread dough, what about puff pastry and croissants? As long as hydration factors are considered, adding cocoa to puff pastry and croissants is possible. For a stiff dough like puff pastry, rather than adding 10% cocoa in addition to the weight of flour, I would recommend substituting anywhere from 5% to 10% of the flour weight with cocoa. With pie crust I would take the same approach as with puff pastry, subbing anywhere from 5% to 10% of the flour with cocoa. Alternatively, and perhaps as a better solution, I love Erin McDowell’s Chocolate Pie Crust, which includes some sugar to balance the bitterness of the cocoa. It’s good enough to eat plain.
Baking: Jacquy and Sebastien advise that judging the level of bake with the chocolate doughs can be difficult — you just can’t judge the change in color very well, especially with the darker cocoas. I agree, and have both under-baked and burned some of my chocolate product tests. My suggestion is to make sure your oven is calibrated or that you’re using a thermometer to ensure that the heat is correct and be sure to set a timer during the bake. Toward the end of bake, check to see if any edges are browning slightly (yes, the dough is dark but you will see small changes), make note of what you smell — things will change as the browning begins. Bakers who prefer to measure the internal temperature of loaves to determine doneness might look for a temperature around 190°F. And when you taste, make notes for the next bake (“These were done at 27 minutes” and so forth).
Back in Arkansas, my mother’s still making her bread and my dad’s eating toast. She recently texted me a picture of a bowl of dough that had risen over the edge and onto the counter. She was short on yeast and had added time (maybe a little too much). She scooped it up, gave a fold, and proceeded to proofing and baking. No problem. As you find your own creative path, I encourage you to bring the same attitude — keep moving, keep creating, and eat your mistakes along the way. Especially the chocolate ones.
Cover photo by Martin Philip.