It's always time for cake, and to help you master the art of decorating naked cakes, baker and blogger Zainab Storms is here to share her best tips and techniques.
* * *
Making layer cakes has always been one of my favorite baking adventures. From selecting flavors to choosing the final decorations, there's plenty of room for creativity and expression. As I’ve grown as a baker, my cake decorating style has evolved from elaborate designs to easy, chic, and elegant cakes.
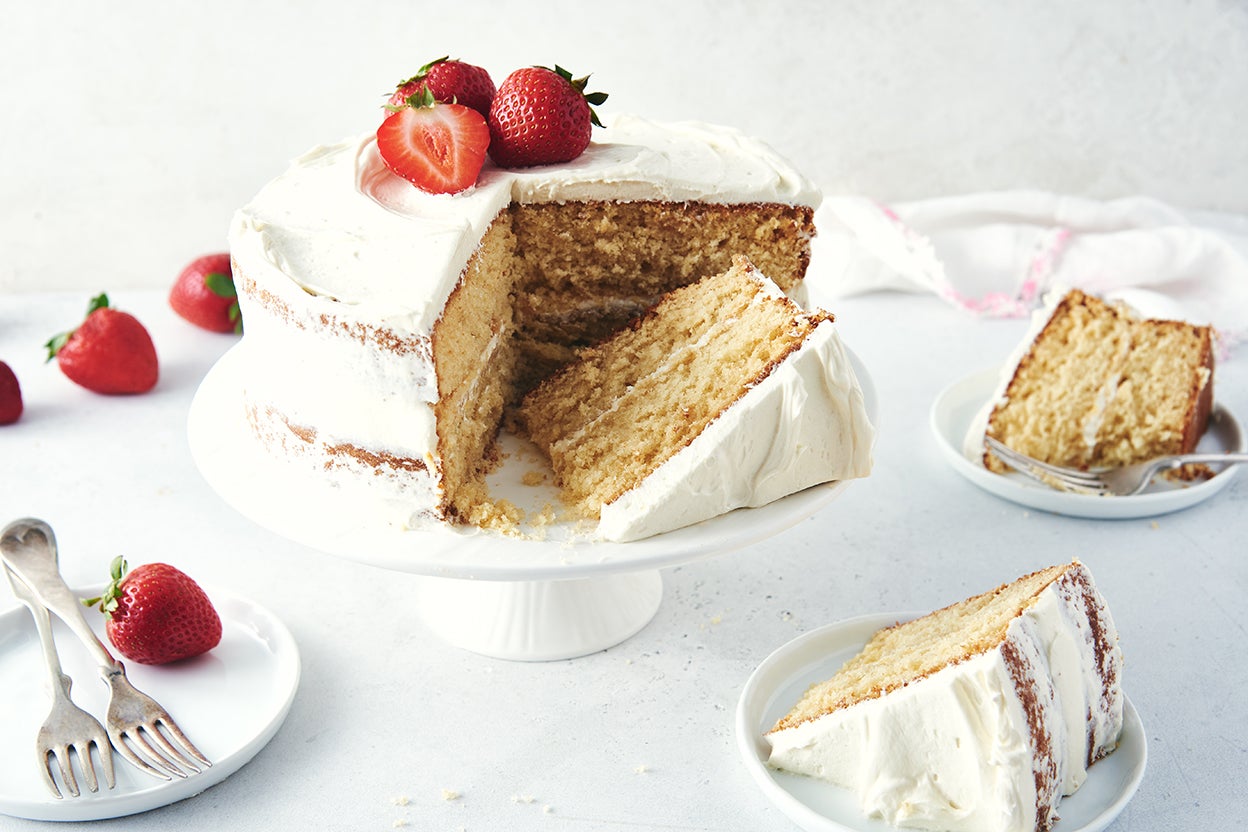
Lately, naked cakes have been my go-to. A naked cake is a decorating style that leaves the exterior of the cake exposed by using a very thin layer of frosting. (Don’t worry, you won’t miss the frosting, as the cake layers are filled with it.) My favorite thing about naked cakes is that they're forgiving and approachable, making them perfect for bakers who aren't comfortable with more complicated cake decorating.
Join me in experimenting with naked cakes!
For naked cakes, you can use any cake recipe you like. Whether it’s classic yellow, vanilla, or chocolate cake, you just need to make sure the cake you choose is sturdy enough to stack.
Since the cake itself will be visible, your choice will also determine the final aesthetic. A chocolate cake, for instance, will provide a striking contrast to white icing. You could also color your layers with natural food dye to bring your own unique creativity to your cake.

Here are two suggestions for classic cakes to use as your base:
For the example I'll be showcasing below, I used a lemon cake paired with a blueberry filling for a summer-inspired dessert.
Any cake size can be used here. You can make your naked cake in 6", 8", or 9" round pans — whatever you feel comfortable with. The same goes with the number of layers! Two, three, or even four layers are easy to do. Just be sure to secure your cakes with a cake dowel if using more than three layers.
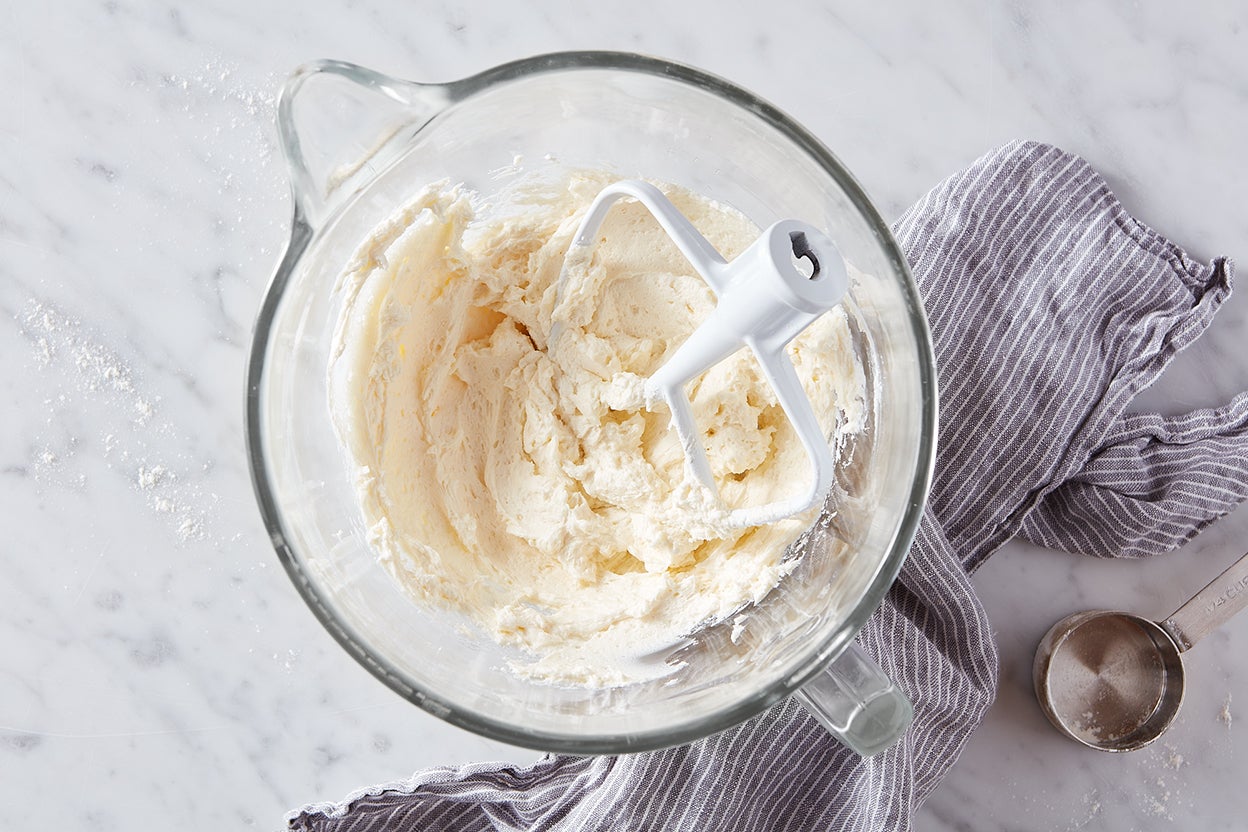
One of the reasons naked cakes are so forgiving for all skill levels is that they don’t require complex buttercreams like Swiss or Italian Meringue. An easy vanilla buttercream frosting or stabilized whipped cream is my go-to for decorating naked cakes. Any frosting that's smooth, easily spreadable, and holds its shape would work. For example, this Ermine Icing would be a great one to use.
If you do use whipped cream, make sure you refrigerate your cake after assembly and serve as soon as possible, since it's not as stable as most frostings. (Instant ClearJel can also help stabilize whipped cream; see details on this blog post, How to whip cream.)
While adding a filling is optional, I do think it adds a nice flavor component to cake. I love berry fillings, but curds also work well. For my naked cake below, I used a blueberry compote filling. If you don’t want to bother with a separate filling, you can always just use frosting between your layers instead.
Once you’ve prepared your cake layers, frosting, and filling, you’re ready to assemble and decorate your cake.
You’ll need:
Start by leveling your cake layers. Use a cake leveler or a sharp knife to cut off the domed top of each layer, ensuring the surface is flat and even. (Or ensure smooth tops after baking by using cake strips, as outlined in this post on how to bake cake evenly.)
Place one layer of cake on a cake board. Place the cake board on a revolving cake stand.
Fill a pastry bag with about 1/2 cup of the frosting. Pipe a 1" border around the cake. This will serve as a dam to keep your filling in place. Spoon about 1/2 cup filling into the middle well you just created. Smooth with an offset spatula. (If you're not using filling, simply spread frosting across the surface of the cake layer.)
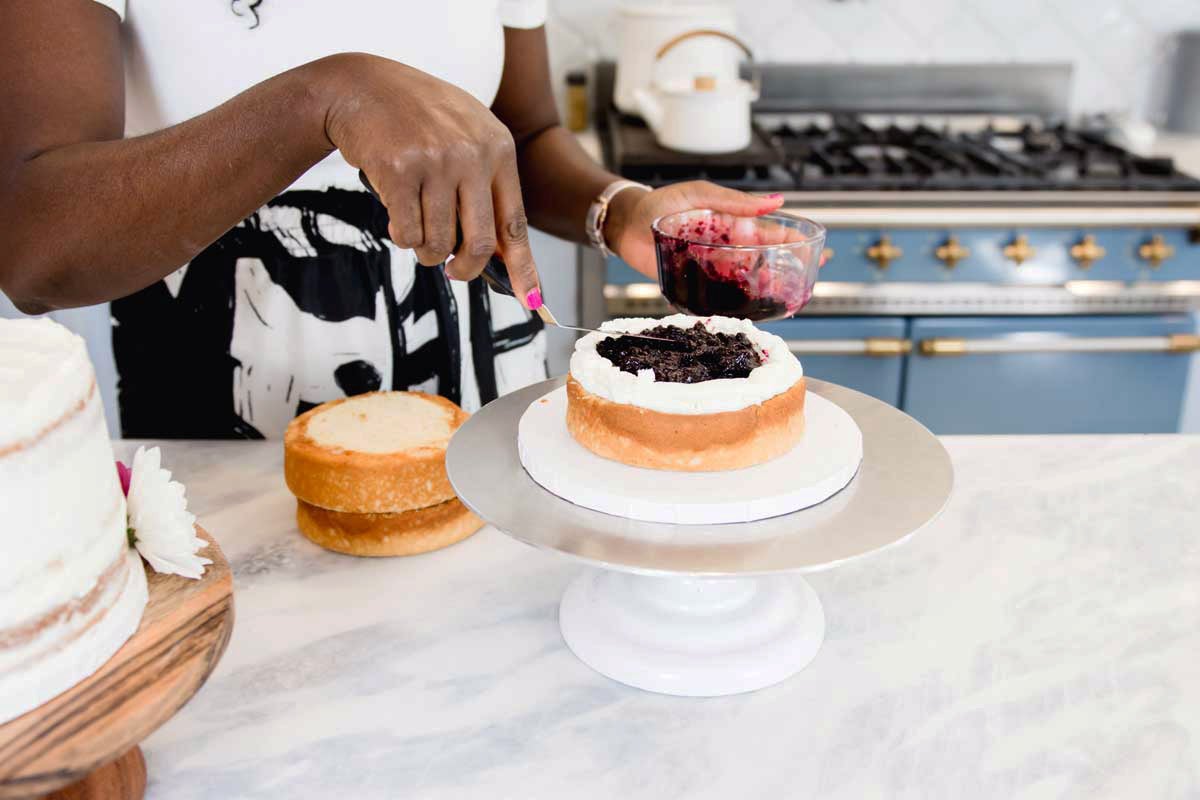
Top the filling with about 1/2 cup buttercream and smooth evenly. It doesn’t have to be perfect.
Layer with another cake and repeat the above steps until the last cake layer.
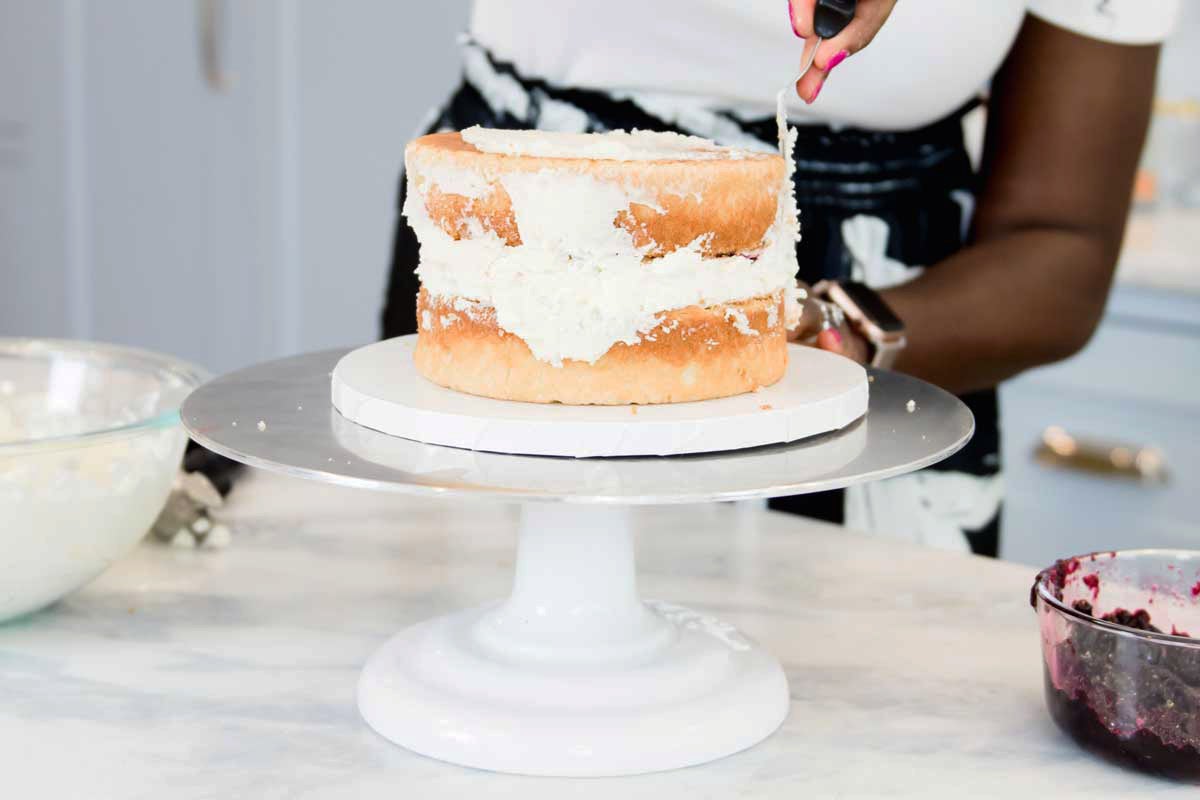
Crumb coat the entire cake with a thin layer of buttercream. You want an extra-thin layer of frosting as that's the essence of naked cakes — make sure the cake is still clearly visible through the frosting. Smooth as much as you can with the offset spatula.
Chill the cake for 30 minutes. This helps the layers to stay put as you decorate.
The next step is adding another very thin layer of buttercream. Smooth the frosting using a large angled or offset spatula, rotating the cake using the revolving cake stand as you do. You can also use a bench scraper to smooth out the frosting.
It's better to start with more frosting than you think you want. You'll thin out the frosting as you smooth it out and remove excess. Plus, it's always best to have more than you need to fix any potential mistakes. Keep smoothing and removing frosting until you have a finished design you like — your final layer can be thick enough for just a hint of cake to peek through, or so thin almost the entire cake is visible. Use your creativity here!
Finally, don’t stress too much about having the perfect smooth finish. The beauty of rustic naked cakes is that they can be imperfect and beautiful.
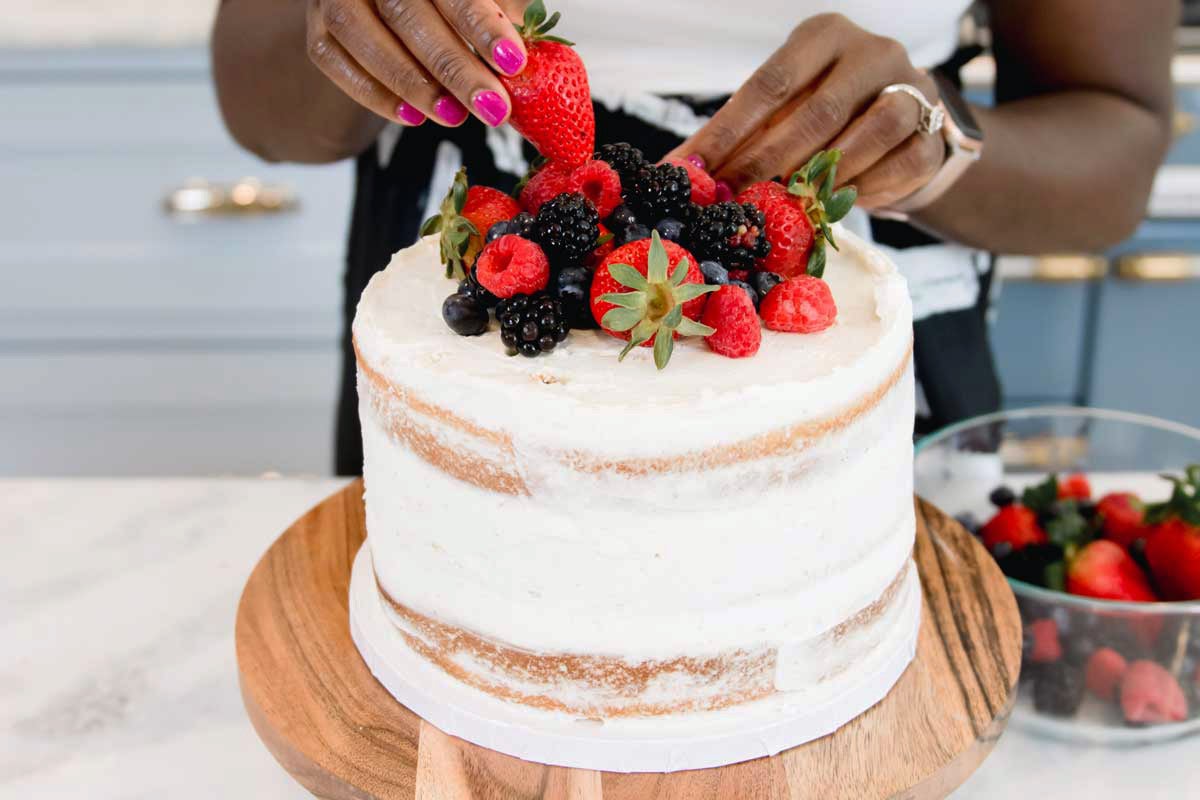
One of the best things about naked cakes is that they're easy to decorate. To finish your lightly frosted cake, top with fresh berries and an optional dusting of confectioners' sugar. Candied fruit slices (such as oranges or lemons), chocolate drippings, or simple piped buttercream borders are all great ways to finish a naked cake.
You can also transfer your cake to a decorative cake stand and adorn it with fresh blooms on top and around the bottom.
What’s your favorite way to decorate a naked cake? Please share in the comments, below!
Photos by Jen Tilley unless otherwise noted