The holidays are a time for baking. Deeply rooted in this tradition are rich sweet breads like stollen, panettone, babka, and brioche.
But let's face it, these breads can be projects. And in the hustle and bustle of the holiday season, they might be intimidating enough to stop you in your tracks.
It doesn't have to be like that, though. Armed with the right knowledge, any baker from novice to pro can craft beautiful holiday sweet breads without anxiety. From having the right ingredients on hand to putting the finishing touches on each loaf, I’ll explain what you need to know to perfect these traditional breads (and how to keep calm in the process).
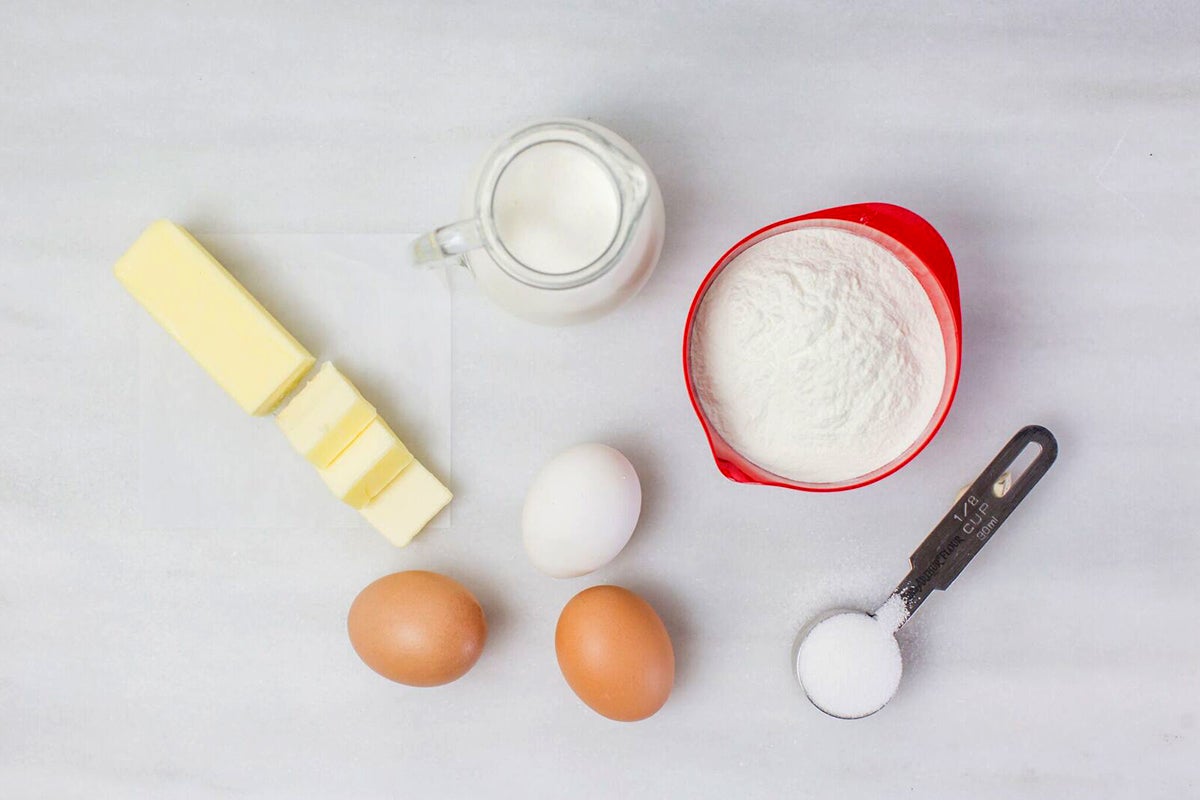
First things first: stock your kitchen! Sweet (or enriched) breads are made from yeasted doughs that have been enriched with fat (typically butter or oil), eggs, sugar, and milk. These ingredients are what make sweet breads pillowy soft and tender. Be sure to have plenty of them on hand (along with flour, salt, and yeast) before getting to work.
In some recipes, you'll notice that instead of liquid milk we call for Baker's Special Dry Milk or nonfat dry milk. I'm a big fan of this ingredient simply because of its convenience.
When used in combination with water, milk powder softens and tenderizes sweet breads just as effectively as liquid milk. Yet, unlike its liquid counterparts, dry milk is shelf-stable and will stay fresh for months.
All this is not to say, however, that you have to use milk powder. You can omit it in just about any recipe that calls for it, substituting liquid milk 1:1 for water in its place.
In addition to having your kitchen well stocked with sweet bread essentials, you'll want to build some time into your busy holiday schedule. While sweet breads don't necessarily demand a lot of hands-on work, they do require significant kneading and resting (fermentation) periods. Fortunately, this affords you the time to check off other holiday to-do list items or simply to rest yourself.
When it comes to mixing and kneading enriched dough, a stand mixer and time are your best friends. Due to their high fat content, many enriched doughs require extensive kneading (up to 20 minutes in a mixer) once you've brought the ingredients together.
While some bakers might argue you could knead by hand, I advocate strongly for a stand mixer. You need to conserve your valuable time and energy at this time of year!
So why does enriched dough require so much kneading time? The answer goes back to the same fat that contributes to the soft, tender texture of the resulting sweet breads. Fat, whether in the form of butter, oil, and egg yolks coats the flour, causing gluten bonds to form much more slowly.
But, you do want strong gluten bonds to form. With all that fat, sweet breads need every bit of strength they can get to hold the fat in place and maintain good structure.
The trick to ensuring that you've achieved strong gluten formation is to perform a windowpane test. Stretch the dough (or a piece of dough) until it becomes thin enough that you can see through it. This "window" should hold for several seconds before the dough tears. If it doesn't, you'll need to mix a bit longer.

Take our Christmas Stollen as an example. The photo on the left shows the dough kneaded about three-quarters of the way towards full gluten development. It tears easily when stretched. The photo on the right shows what happens when the dough is kneaded all the way. It stretches easily until it's thin enough to be transparent.
Like most yeast-leavened doughs, sweet bread doughs require two fermentation phases. There's bulk fermentation, which happens just after the mixing and kneading phase. Then there's final proofing, which happens after shaping. During each of these phases, the dough (and you) can rest while the yeast gets to its own work of eating.
As it happily munches away on the sugars it finds in the flour, the yeast emits both CO2 and alcohol byproducts. These, in turn, contribute to the expansion (rising) of the dough as well as the yummy fermented flavor of the finished bread.
As I mentioned earlier, both these fermentation phases can take quite a while for sweet breads. The reason for this, again, has to do with the ingredients.
Just as fat slows down gluten formation by coating flour, it can also act as a barrier against hungry yeast. In all our recipes, the yeast first has to fight its way past butter and egg yolks before it can enjoy the sugary carbohydrate feast that flour provides. Thus, fermentation slows down as the yeast tries to overcome this fat obstacle.
The second culprit of slow fermentation, ironically, is sugar. Yeast needs moisture to thrive. Sugar, being hygroscopic (a liquid guzzler), is very good at pulling moisture away from yeast. As a result, yeast has to fight for its share of the water, which again leads to longer fermentation times.
With all these hindrances, it can be hard to know just how long sweet doughs need to rise. Our recipes offer a pretty good gauge of what kind of timing you can expect. But, we always like to stress that the look and feel of a dough will tell you much more than the clock.
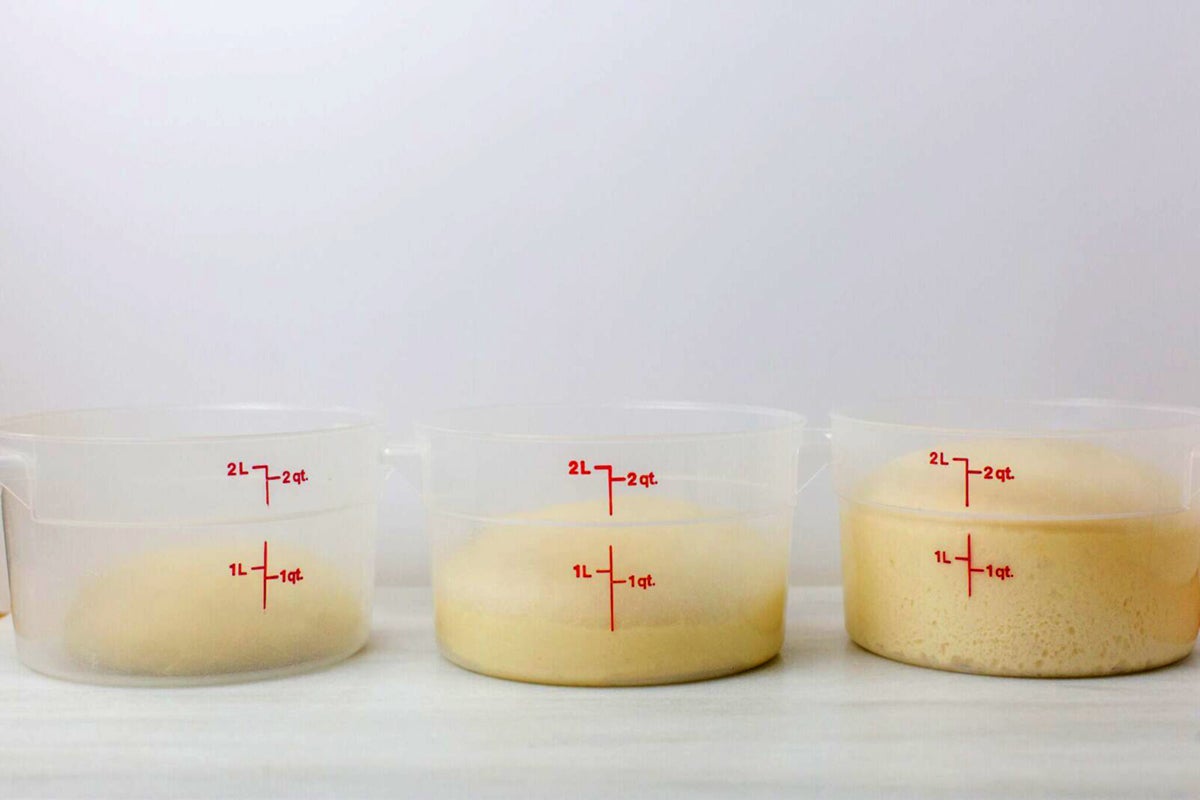
Take our Cranberry-Orange Babka recipe, for example. The recipe states to let the dough "rise until it has just about doubled, 60 to 90 minutes." Your cue here is the word doubled rather than the minutes.
Above you can see a comparison of three babka doughs. The dough on the left has just been kneaded, the middle dough has risen for about 60 minutes, and the one on the right for about 80 minutes. In our warmish (70°F) test kitchen, it took that long for the dough to "double" and be ready for shaping.
In a cool (<65°F) kitchen, the same dough might take 90 minutes or longer. So, be sure to watch for those visual cues.
Baker's tip: Using straight-sided, conveniently-marked dough-rising buckets is a full-proof way of ensuring properly-risen dough. Tape markings on the inside or outside of a bowl will also serve the same purpose.
What do you do when your sweet bread's schedule just doesn't quite fit with yours? Easy: extend or reduce the amount of time it spends fermenting.
Take, for example, our recipe for Brioche. After a one hour rise at room temperature, we tell you to refrigerate the dough for several hours, or overnight.
Why? Well, remember how I said a cooler kitchen will lead to longer fermentation? When it comes to working with yeast, refrigeration buys you time.
You'll need to let the yeast do some of its fermentation work at room temperature in order for it to get going. But any sweet dough, once it's about three-quarters of the way through fermentation, can be transferred to the refrigerator for at least several hours. This is true both for bulk fermentation as well as for proofing after you have shaped your dough.
There are a couple of other benefits to longer fermentation, too. More time for the yeast to work means your sweet breads will come out with more flavor. Plus, because sweet breads contain a higher proportion of fat, chilling the dough can make for much easier shaping. A firm, smooth dough is more shapeable, rollable, and twistable than one that's soft, sticky, and greasy with butter.
Now, what about the reverse? What if you want to speed up the process of fermentation? Your best bet is, again, temperature.
Yeast thrives and does its best work in a 76°F to 78°F environment. A proofer set in this range will guarantee quicker fermentation times. Or, if you don't have a proofer, a microwave or cardboard box will do the trick just as well.
Another option is to enlist the help of a strain of yeast designed specifically to tolerate the lower-moisture environment caused by sugar's liquid-guzzling tendencies. SAF Gold instant yeast does precisely that.
Check it out in our Overnight Panettone recipe. Using just 2 1/4 teaspoons of this special yeast is the equivalent of 1 tablespoon of SAF Red instant yeast. It allows for fermentation times within the 60- to 90-minute range rather than upwards of 2 hours. That's a savings of 1 to 2 hours for every batch of this fruit-studded beauty you make over the holidays! Well worth the yeast investment, in my opinion.
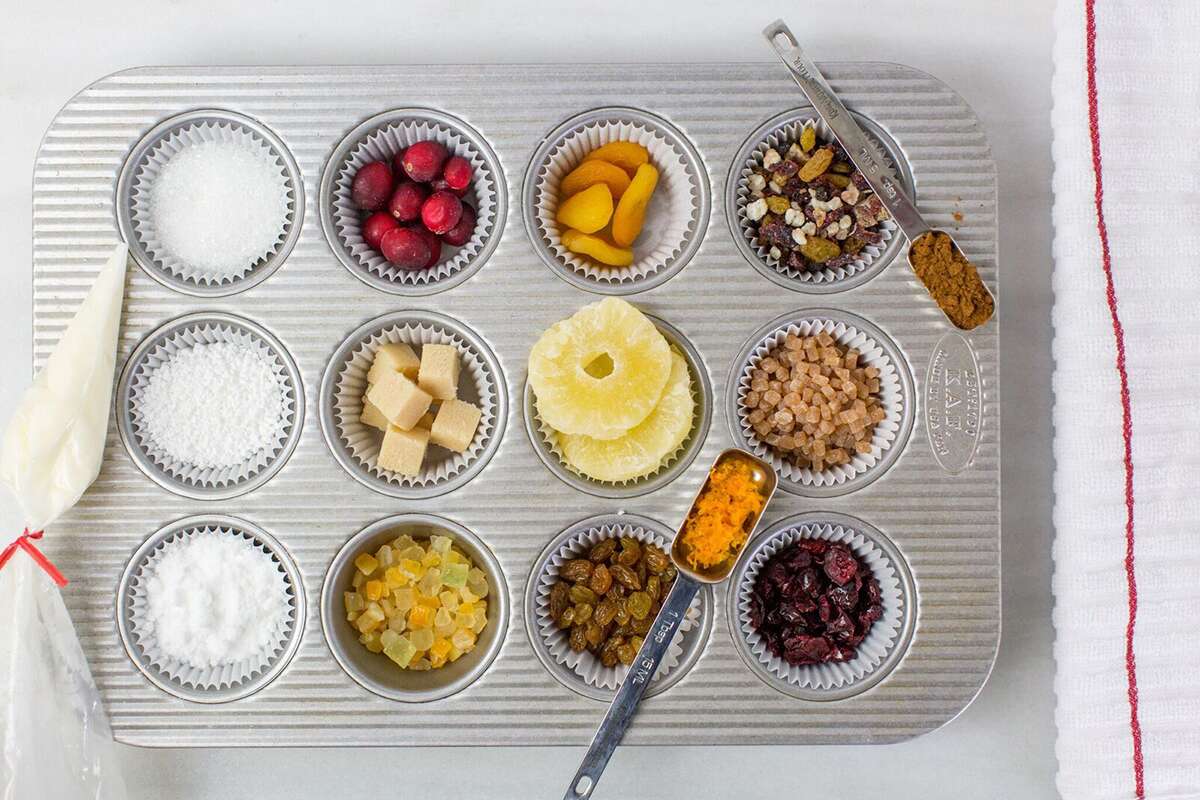
Despite the flavorful ingredients that define sweet breads, they themselves don't tend to taste strongly buttery, sweet, eggy, or milky. To enhance the flavors of these breads, bakers throughout history have added flavorful fillings, inclusions, and toppings.
Additions like spices, citrus zest, dried fruits, and nuts are especially common for holiday sweet breads. You can either knead these into the dough or turn them into a sweet filling around which you can spiral or fold the dough.
The most common way to top sweet breads is with different forms of sugar. I absolutely love the way our pearl sugar looks on just about any loaf, especially brioche and panettone. Of course, sparkling sugar is also an attractive option.
For stollen, our non-melting sugar is a great alternative to confectioners' sugar. Unlike the latter (as its name suggests) this topping sugar won't melt away before you can gift or enjoy the loaf.
Finally, I love topping my babkas with a glaze after they've baked. The drizzled effect somehow enhances the visual appeal of the loaf's natural swirls.
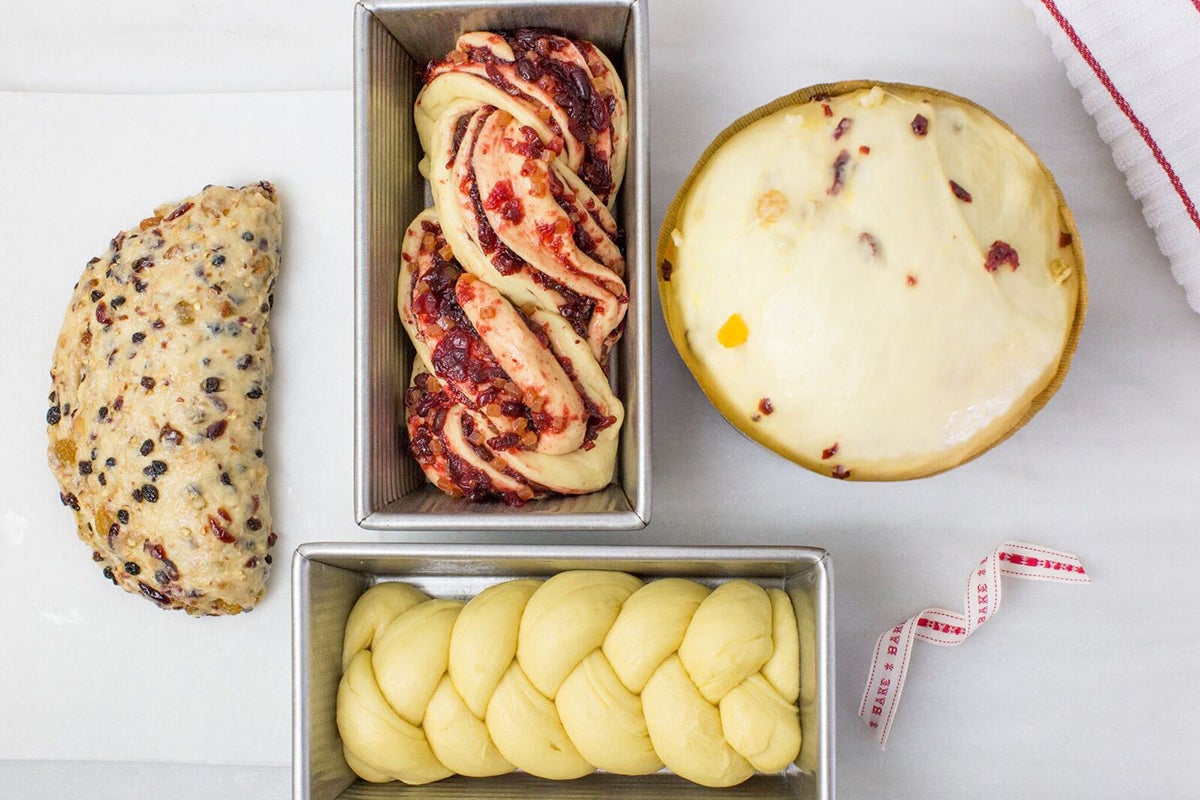
An added benefit of the flavor enhancements mentioned above is that they can beautify an otherwise monochromatic loaf. Shaping can be another way to achieve visual appeal.
Some sweet breads are shaped according to long-standing tradition. Stollen is a good example. Although rather unassuming-looking, the flat, folded-over shape is said to represent a swaddled baby Jesus.
Otherwise, shaping sweet breads is a simple way to add your own creative touch to these loaves. I've shown the most basic shapes above, but the possibilities are almost endless.
Make your babka loaves a bit more elaborate with just a few simple twists and turns. Or expand your braiding repertoire with brioche by tackling the four or even six-strand technique.
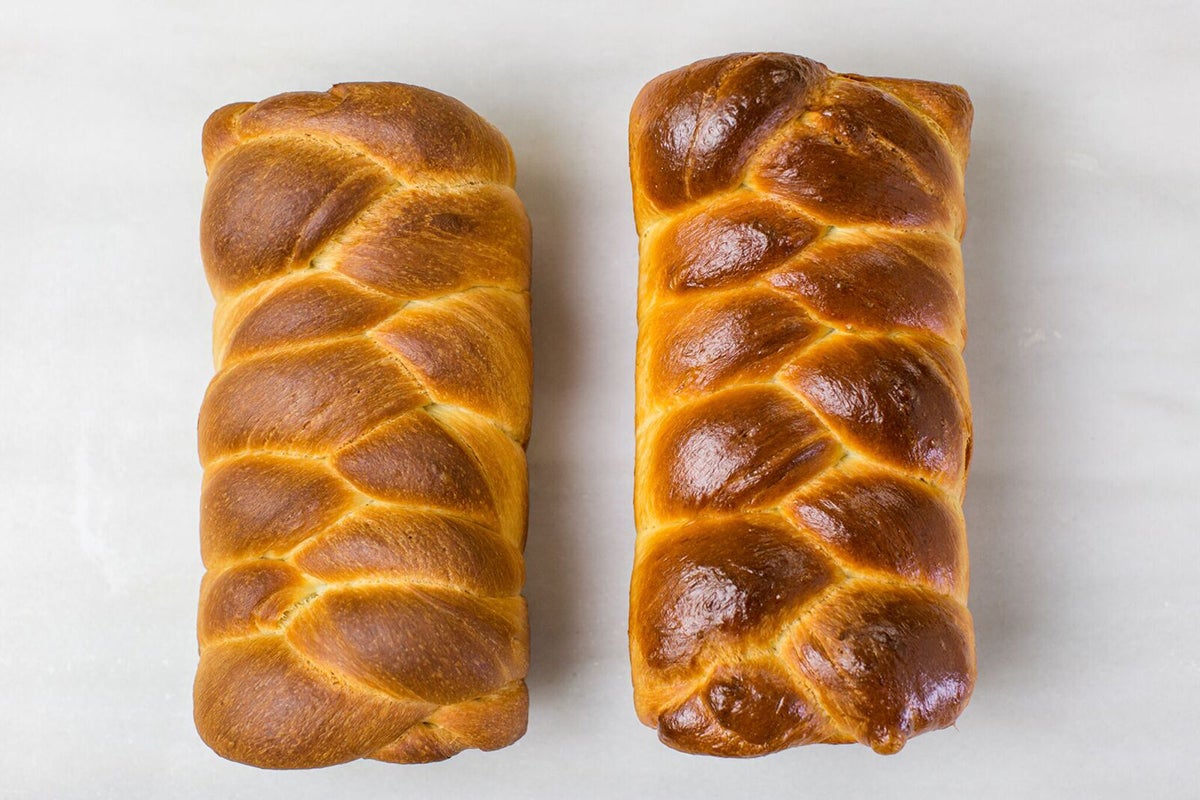
There's a final, pre-baking step to sweet breads that sometimes goes unmentioned, but can dramatically affect the finished look and texture of your loaves. An egg wash (1 large egg beaten with a tablespoon of water), though not obligatory, transforms a matte, muted brown crust into one that's glossy and richly golden. It will also help to lock in moisture during baking, thereby preventing crumbly, dry loaves.
The difference is especially pronounced on otherwise unadorned loaves, like the two Brioche loaves pictured above. For sweet breads like stollen and babka, the egg wash is not as necessary since their beauty relies mostly on their toppings and fillings, respectively.
An egg wash also helps when using sparkling or pearl sugar. Brush the wash on before adding the sugars, and your toppings won't fall off the instant you touch or slice the bread.
For some sweet breads, the final stage of the process is baking. If you're not going to adorn your loaf with an ample dusting of sugar or drizzle it with a glaze after it's out of the oven, baking is your last chance to perfect it. You want to get it right!
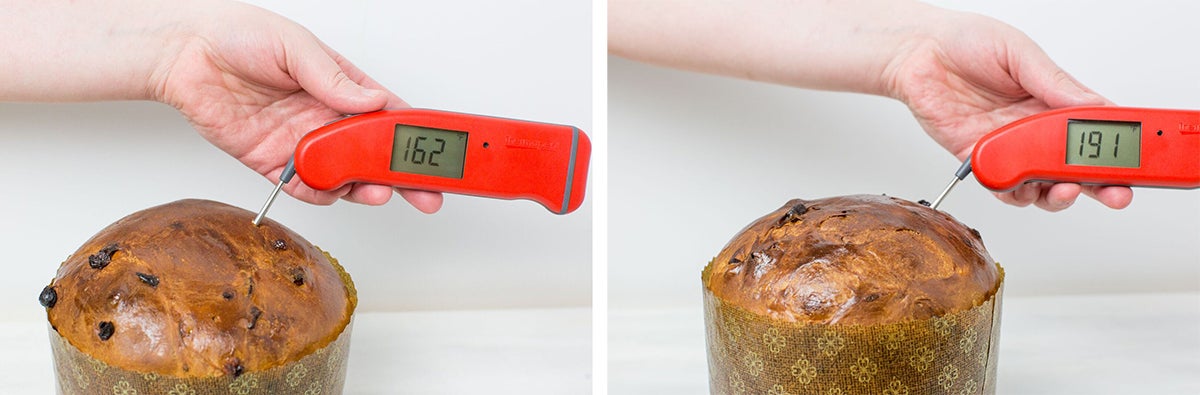
It can be easy to underbake sweet breads. Sugar, dairy lactose, and eggs all contribute to the browning (or Maillard reaction) that occurs during baking. This means that sweet breads tend to brown quickly. While a loaf may appear done on the surface, the interior could still need more oven time.
The best way to avoid this hurdle is to invest in a good digital thermometer. You can also protect the loaf from over-browning by covering it with foil partway through baking.
You'll notice in the photo above that even though both loaves of Overnight Panettone are equally browned, the one on the left is 28°F shy of being fully baked. Since I didn't want it to get any darker, I put it back in the oven with a tin-foil hat, and 8 minutes later it was above 190°F and done.
Whether you're sharing sweet breads with friends and family or gifting them to neighbors, teachers, and postmen, one thing's for sure: these loaves won't let you down. Every bit of planning you put into them is worth it as you witness the smiles they bring and hugs they inspire.
From stars to wreaths to charming little buns, we have dozens of holiday sweet breads to choose from. Try the ones featured in this post or discover your new favorites in our collection of sweet breads for the holidays.
Do you have a favorite sweet bread you like to bake for the holidays? Tell us about it in the comments below.
Thanks to Anne Mientka for taking the photographs for this post. And thanks to Molly Marzalek-Kelly for her long hours of baking support.