


Sourdough bread.
For many, it's the Mt. Everest of bread baking.
If you can "conquer" sourdough, there's nothing you can't do, bread-wise.
Not surprisingly, many new bread bakers want to jump right in and begin with sourdough. After all, it's so distinctive; so delicious; so... well, trendy.
But tackling sourdough bread your first time out of the gate is like nosing into traffic on the Indianapolis 500 speedway when you've just gotten your learner's permit.
Trust me – not a good idea.
Sourdough baking has a long (but ultimately simple) learning curve. If there was ever any process that should be taken one small step at a time, it's baking sourdough bread.
First, you make your starter. Then, you feed it regularly until it's strong and vigorous. These first two steps may take up to a week or more.
Then, and only then, do you bake bread.
Attention, sourdough newbies: don't be discouraged. Our posts on creating your own starter and maintaining your starter take you step by step through the process.
Plus, if you run into a challenge along the way (a crevasse on the trail up Everest), our bakers' hotline folks are ready to help – (855) 371-2253.
Once you're ready to bake, Rustic Sourdough Bread, with added yeast, is a pretty fail-safe way to start.
And once you've mastered THAT, you're ready to plant your banner on the Summit of Sourdough:
The classic sourdough loaf, leavened simply with the starter you've been so lovingly feeding and growing – no Red Star, no SAF, just your own wild yeast.
So, whether you're a seasoned sourdough trekker looking for a chewy, moist, richly flavored loaf of "natural" sourdough; or a sourdough neophyte who's ready to take your baking above treeline, enjoy this recipe.
We call it Extra-Tangy Sourdough Bread, but that's really a misnomer. Extra-flavorful would be closer to the mark; because there's nothing like the nuanced, complex flavor of sourdough bread made simply with flour, water, salt, starter... and time.

First, make sure your starter has been fed, and is good and vigorous: if not ready to leap tall buildings in a single bound, it should at least be prepared to raise bread dough all by itself – without the benefit of added yeast.
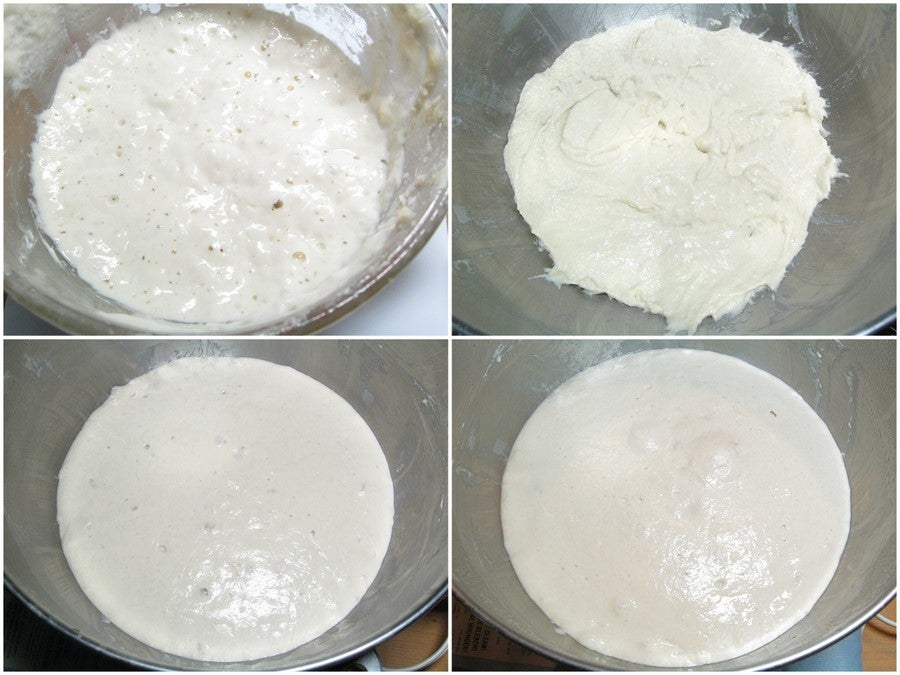
Place 1 cup (about 8 ounces) fed, vigorous sourdough starter in a bowl.
Add 1 1/2 cups lukewarm water, and 3 cups (12 3/4 ounces) King Arthur Unbleached All-Purpose Flour. Beat vigorously.
Cover, and let rest at room temperature for 4 hours. Then refrigerate overnight, or for about 12 hours.
The dough will expand a bit during its overnight rise, but don't expect it to rise too much. You may see some large, lumpy bubbles trying to emerge – kind of like the Creature from the Black Lagoon.

Add 2 cups (8 1/2 ounces) King Arthur Unbleached All-Purpose Flour and 2 1/4 teaspoons salt.
Mix and knead to form a smooth, satiny dough. The dough may seem dry at first; but keep kneading.

It'll eventually become very stretchy (albeit still a tiny bit sticky), and will have a lovely sheen.

Allow the dough to rest in a covered bowl until it's relaxed, smoothed out, and expanded somewhat. Depending on the vigor of your starter, it may become REALLY puffy; or it may just rise a bit. This can take anywhere from 2 to 5 hours.
Understand this: sourdough bread (especially sourdough without added yeast) is as much art as science; everyone's timetable will be different. So please allow yourself to go with the flow, and not treat this as an exact, to-the-minute process.

Gently divide the dough in half. Shape it into two oval loaves, and place them on a lightly greased or parchment-lined baking sheet.
Cover and let rise until very puffy, about 2 to 4 hours. Don't worry if the loaves spread more than they rise; they'll pick up once they hit the oven's heat.
Towards the end of the rising time, preheat the oven to 425°F.

Gently spritz or brush the loaves with lukewarm water...

...and quickly give each one three 1/2" to 3/4"-deep slashes, diagonally across the top surface.
This is scary, I know; you think you're going to deflate your lovely loaves.
Guess what? You will. But if you get them into the hot oven IMMEDIATELY, they'll pick right back up.

Bake the bread for 25 to 30 minutes, until its interior registers at least 190°F on an instant-read thermometer.
The loaves may brown beautifully.
On the other hand, depending on how long you've let the dough/shaped loaves rise, they may brown very little.
Why does sourdough bread often not brown as well as a standard, non-sourdough loaf?
Well, while the dough is going through its prolonged rises, lactobacilli has been helpfully converting starch in the flour into simple sugars for the yeast to consume. Eventually, though, the yeast has been working in the dough for so long, it consumes just about all the sugar there is.
Which means there's none left for caramelization on the loaf's surface: browning.

If they appear to be browning insufficiently for your taste, and you don't mind a bit of oil, remove them from the oven with about 5 minutes left in their baking time. Brush or spray with olive oil, and return to the oven.
The loaf on the left is untouched by oil; the one on the right, sprayed with olive oil. Your choice.

Here's the loaf without oil. It's not a deep golden brown, but hey, it is what it is – sourdough.

Cool completely before cutting.
Nice crumb, eh? Love the big holes.
You'll find this loaf is very chewy, somewhat dense, and nicely moist.
Best way to store this bread: cut-side down on the counter.
That's right - no bag, no refrigerator. It'll stay pretty fresh for several days. If it feels weird not bagging it (or if you fear the cat may give it a lick), place it in a bag, paper or plastic, but don't seal it up; sealing will turn the crust rubbery.
Read, bake, and review (please) our recipe for Extra-Tangy Sourdough Bread.
Note: for added sour tang, try adding 1/2 teaspoon to 5/8 teaspoon sour salt (citric acid) to the dough.
