Have you ever heard the saying “wetter is better” when it comes to bread dough? There’s no question that wetter, stickier dough can lead to a lighter, airier loaf, full of wonderful large and small holes (a.k.a. an "open crumb"). Artisan bakers can even get a little macho when it comes to water content, vying for higher and higher hydrations as a show of prowess. But for home bakers, kneading wet dough by hand can be a messy and frustrating experience.
I’m not one to endorse wet for wet’s sake, or to insist that no machine should ever touch my dough. However, a recipe like ciabatta bread requires quite a lot of water (high hydration) in order to achieve its light texture and plentiful holes. And if you don’t have a stand mixer or bread machine, this type of recipe can be particularly daunting.
In fact, one of our ciabatta recipes includes this caution in its "tips" section: “Because this dough is so soft, it's quite a challenge to knead it by hand... Please use an electric mixer or your bread machine to knead the dough.”
Quite a challenge? OK, maybe I have a teensy-weensy bit of macho baker in me, because I love a challenge! And besides, what if you’re a ciabatta lover who wants to try making the bread at home, and don't have a stand mixer or bread machine? That just doesn't seem fair!
Don't despair, all you wet-dough-fearing hand-kneaders out there! I'm here to teach you some valuable hand-kneading techniques that can help you tackle a high-hydration dough — and live to tell about it.
I practiced these techniques at a recent sourdough bread class I attended at our Baking School here in Vermont. If you've been thinking about taking a class, let me just say that there's no better place to get in touch with your dough-slinging skills! Our devoted baking instructors will set you on the path to success.
So, let’s tackle that "challenging" ciabatta recipe and run a little experiment.
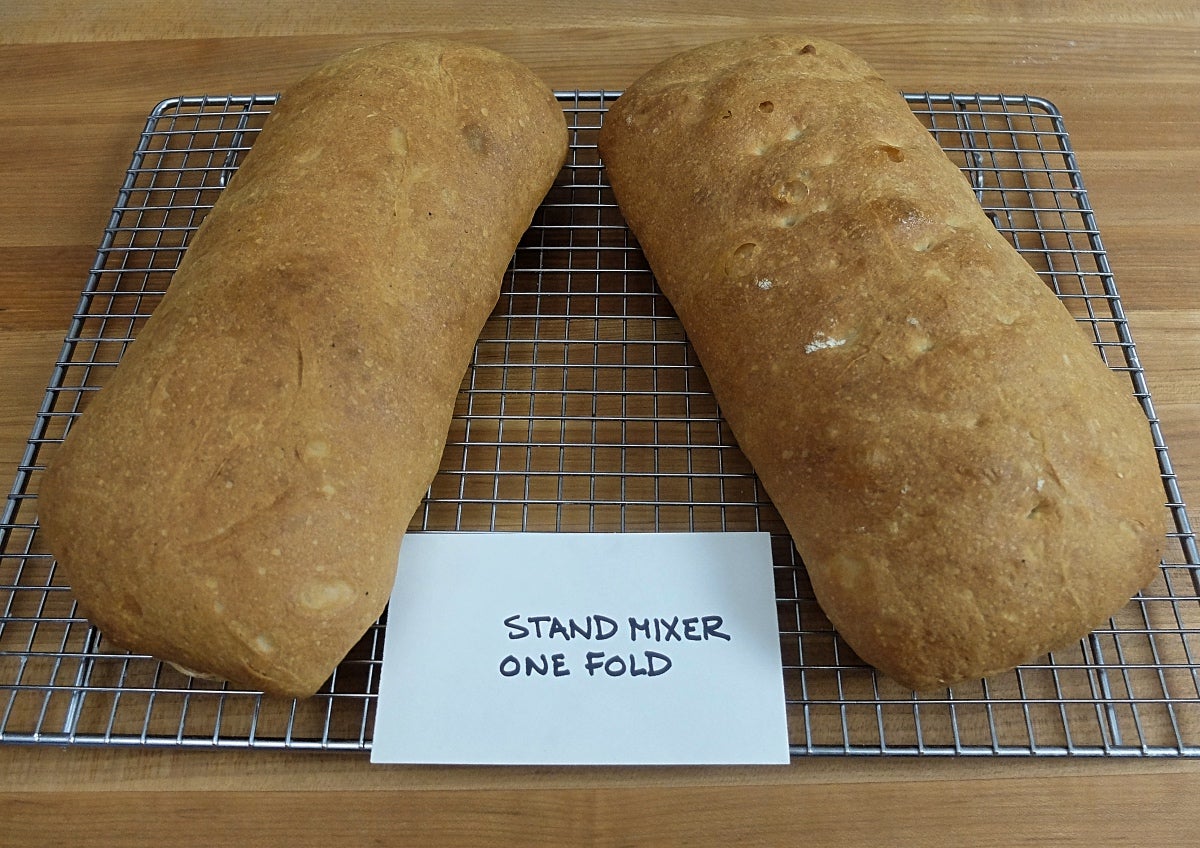
I’ll make one batch of ciabatta following the recipe instructions for mixing in a stand mixer. For the ingredients and detailed instructions for this ciabatta recipe, please visit its recipe page.
The second batch of ciabatta will be mixed and kneaded entirely by hand. Our ciabatta recipe has a hydration level of 80% (the weight of the water compared to the weight of the flour). These hand-kneading techniques work quite well in the 67% to 80% range — as long as you don't mind getting a little messy.
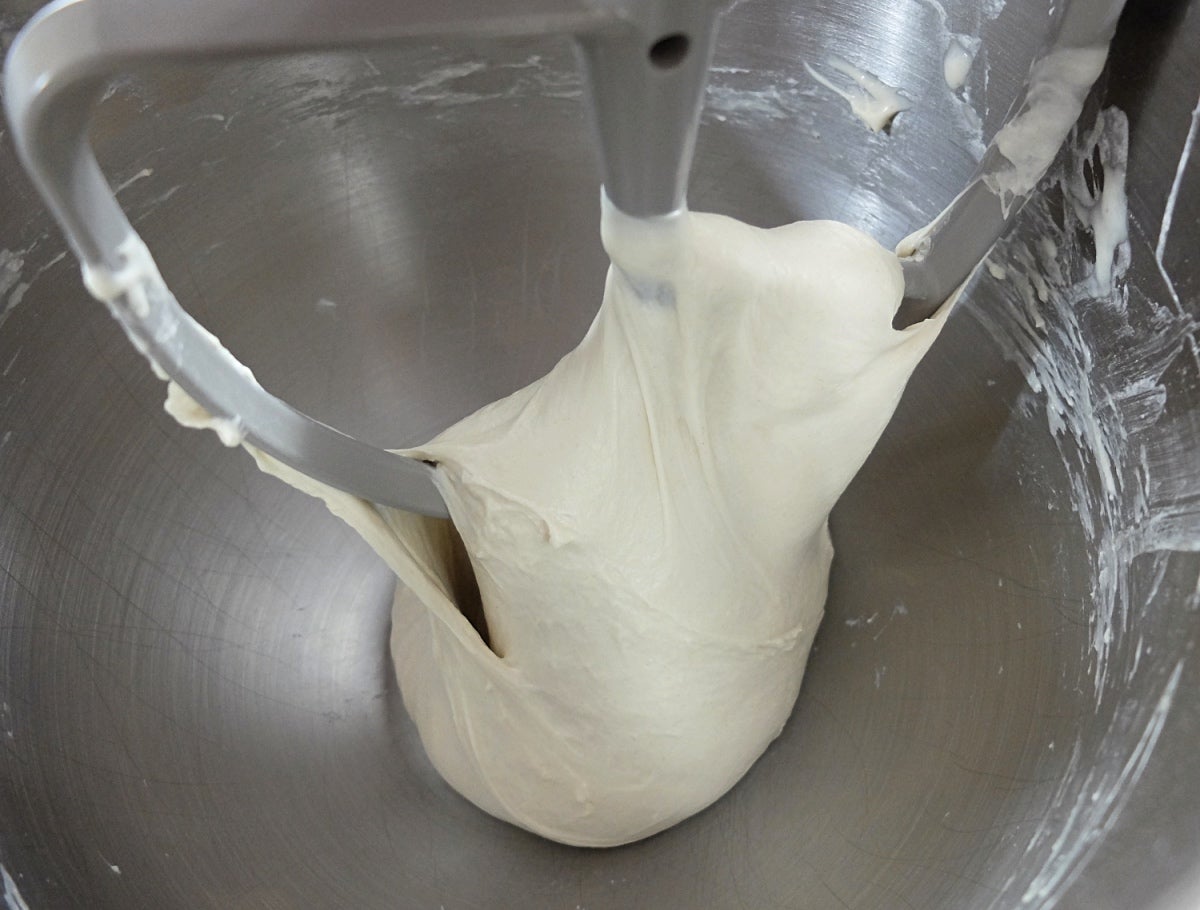
The recipe calls for mixing this dough for 7 minutes with the paddle attachment on medium speed. I used speed 4 on my KitchenAid mixer. When finished, the dough looks soft, moist, and a bit shiny. It even balls around the paddle during the last few minutes of mixing.
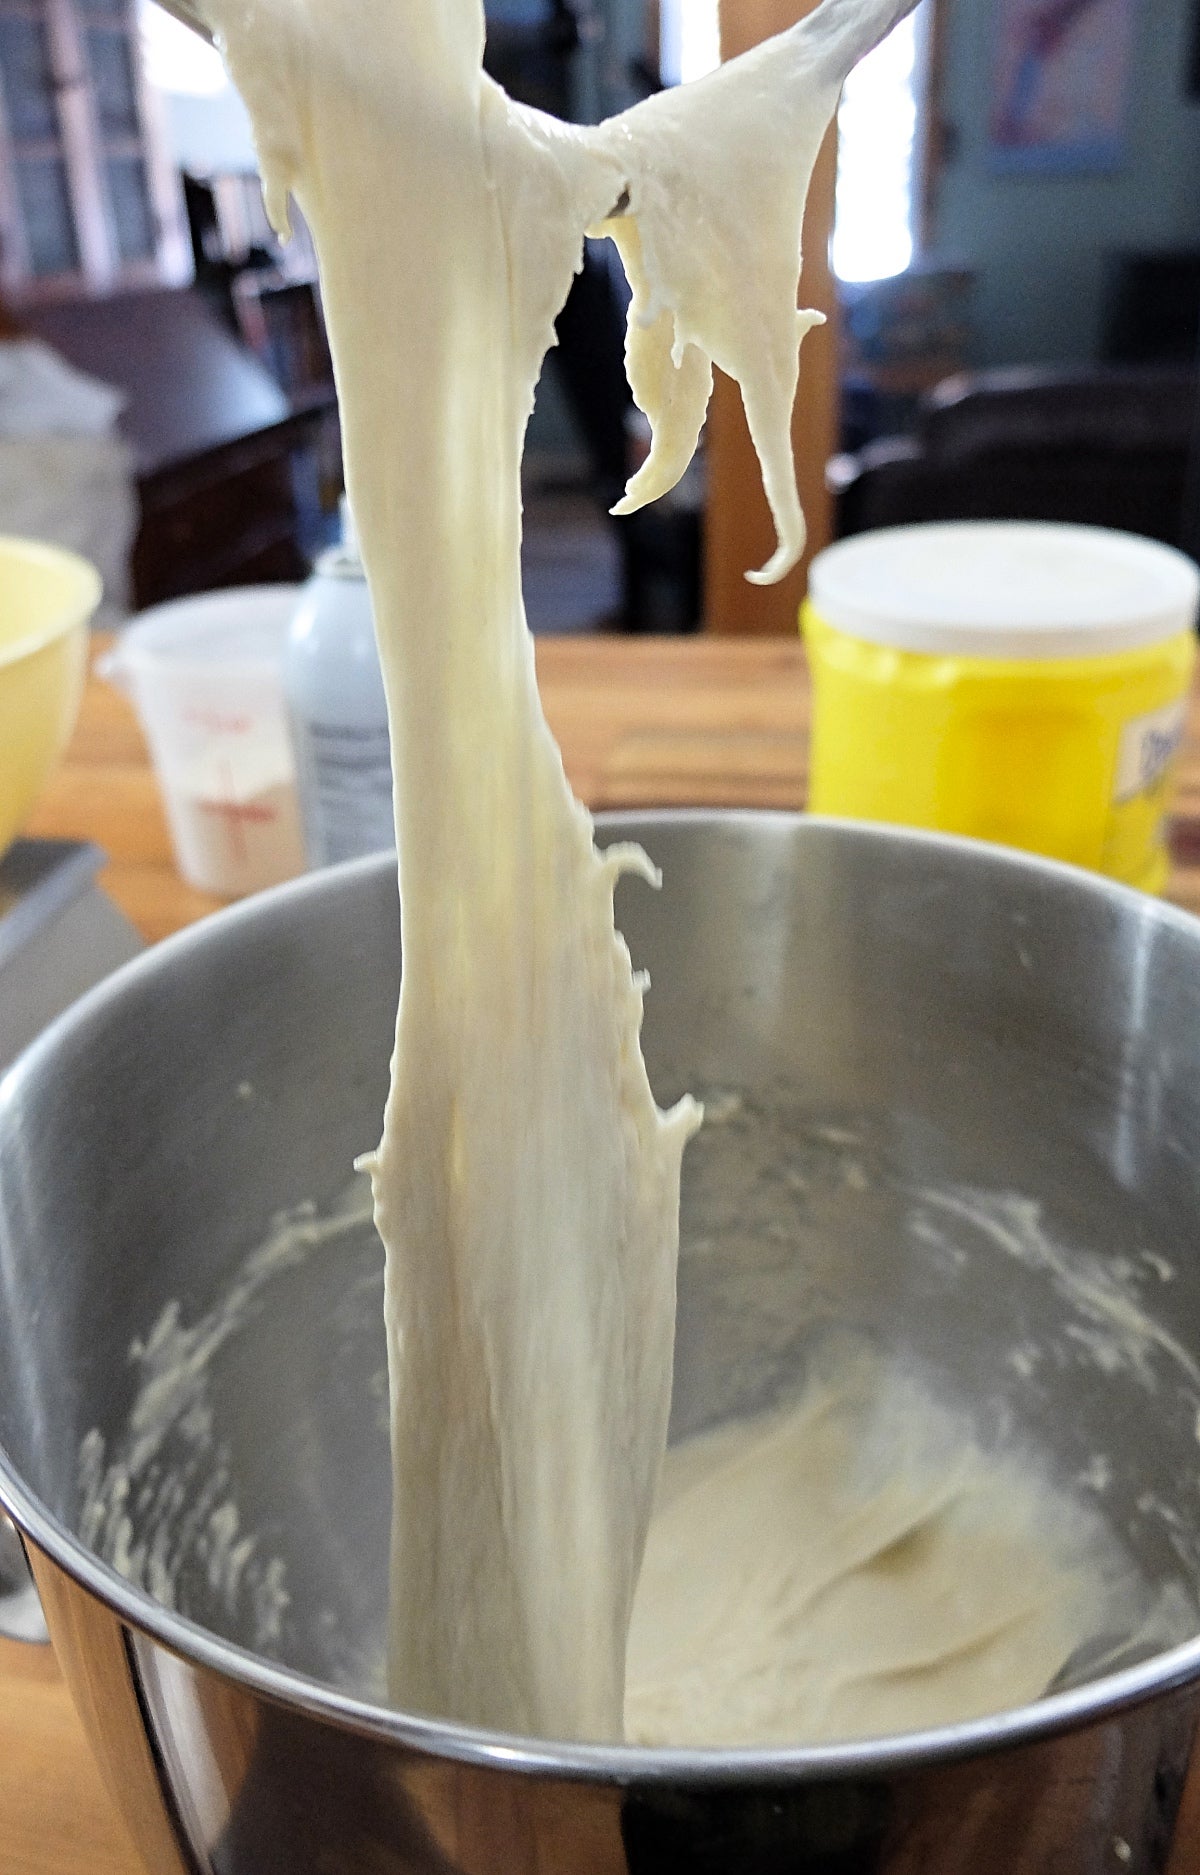
Look at how that dough stretches! See how the light shines through it in thin spots? This dough is passing the "window pane" test without even trying.
We'll cover this dough and let it rest for an hour while we tackle our hand-mixed and hand-kneaded batch of ciabatta dough.

I know what you're thinking. You expect us to knead that mess? Don't worry, I'm here to show you the way!
While not absolutely necessary, a brief rest after mixing the ingredients can be helpful, giving the flour time to absorb the water and make the dough more manageable. Step #1 (below) will accomplish many of the same things that a rest does, so skip the rest if you're eager to get your hands on the dough (though I still do recommend a 20-minute rest).
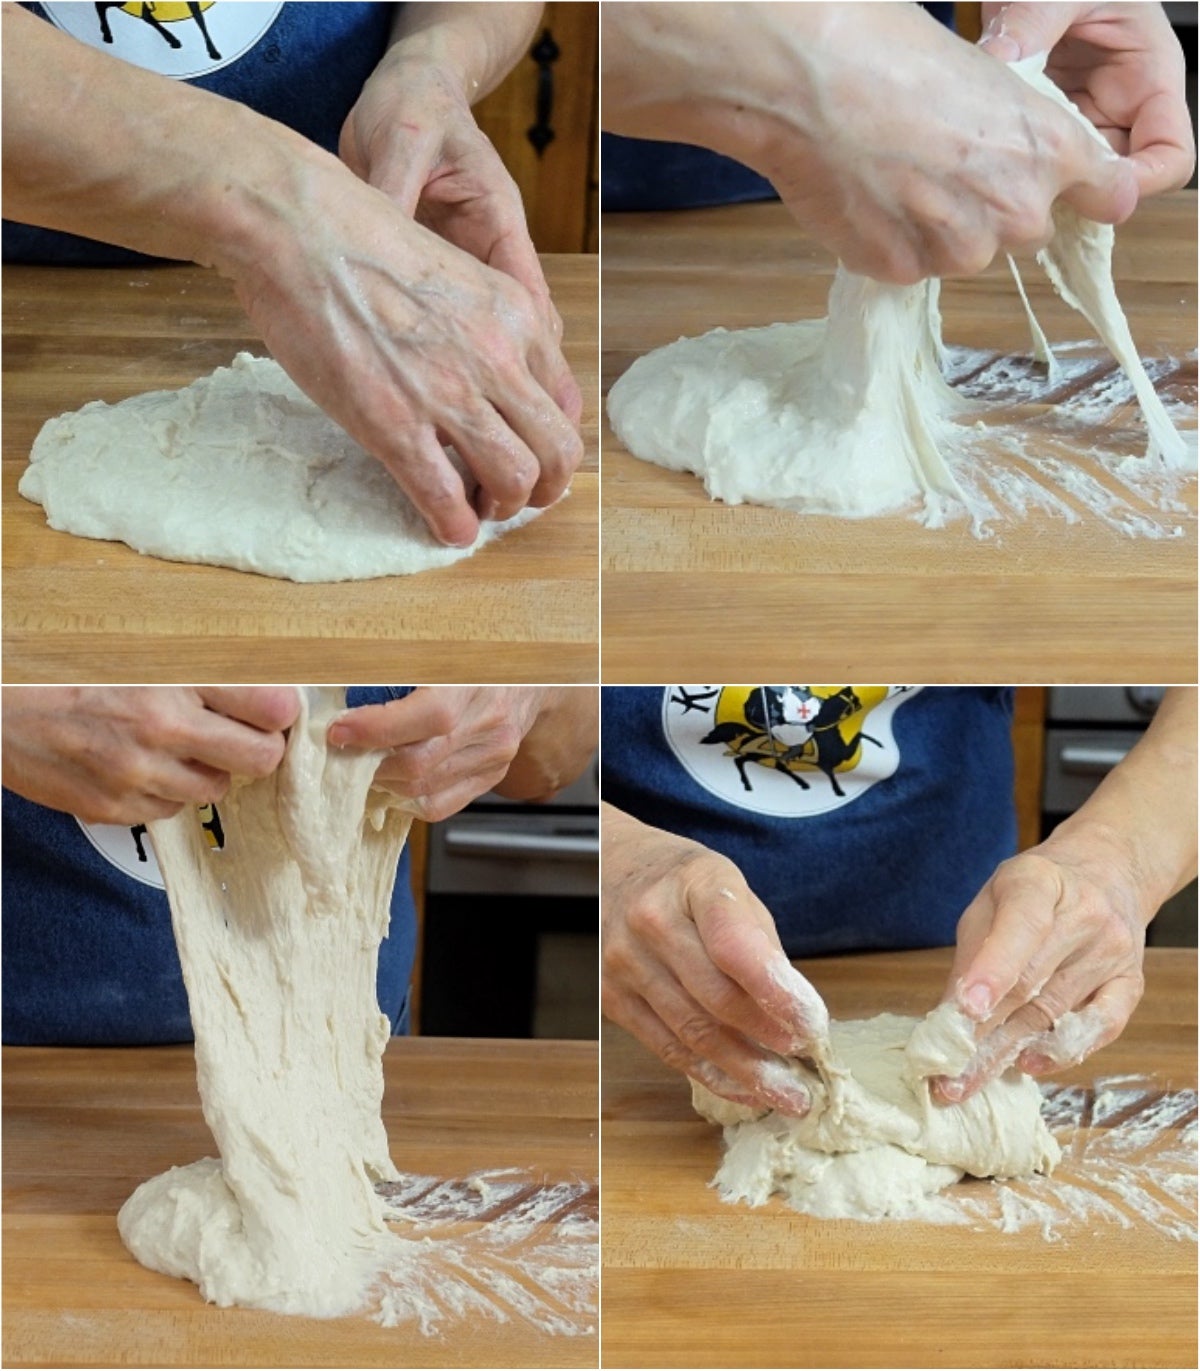
This step involves putting the dough on the work surface (without adding any flour to the table) and then simply cutting the dough into strips with a bench knife or dough scraper from one end of the dough to the other. Mound the dough up again and repeat for about 2 minutes.
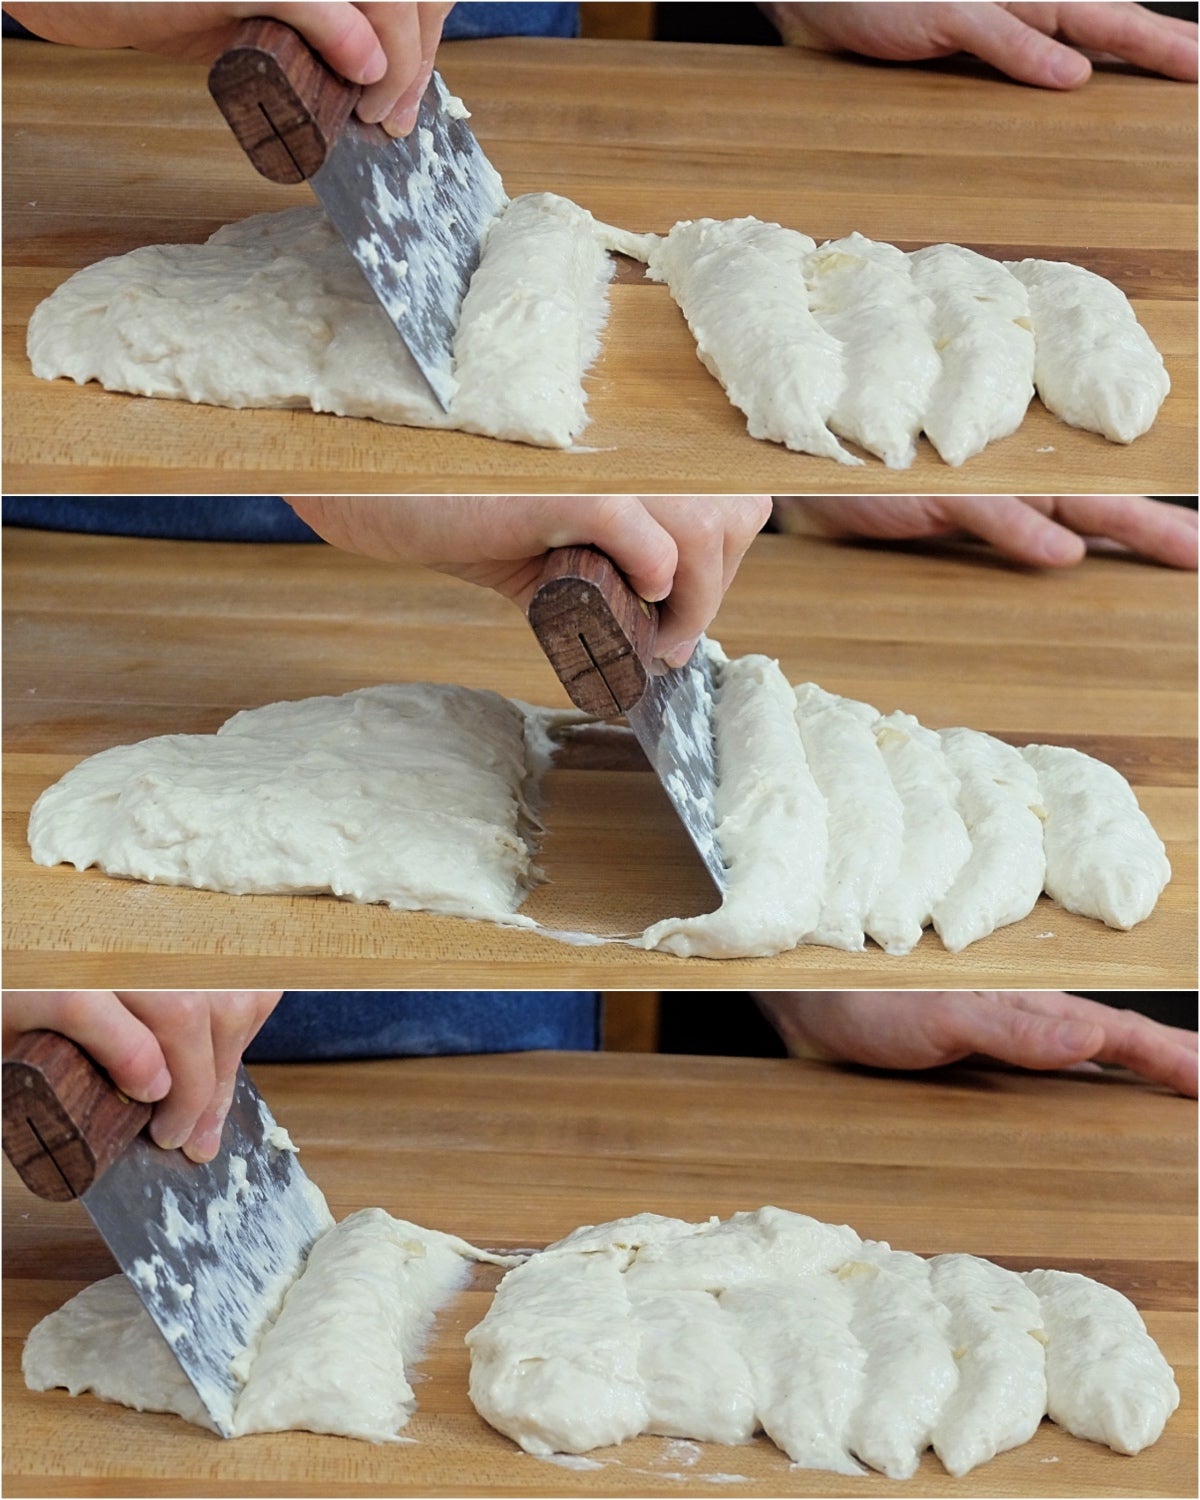
According to Sharon O’Leary, one of our seasoned Baking School instructors, this method is useful because it allows you to work with a high-hydration dough without adding additional flour. It gives time for the flour to fully hydrate and helps make sure that all the ingredients are fully blended. It also seems to help align and create the gluten matrix.
But how does cutting the dough help develop the gluten? Aren’t we just chopping it to bits?
While I haven’t been able to find a precise scientific explanation for what's going on here, cutting forces a productive restructuring of the gluten strands. Members of our King Arthur Flour Bakery team agree that simply trying to rip the dough apart, rather than providing a clean cut, doesn't yield the same positive effects.

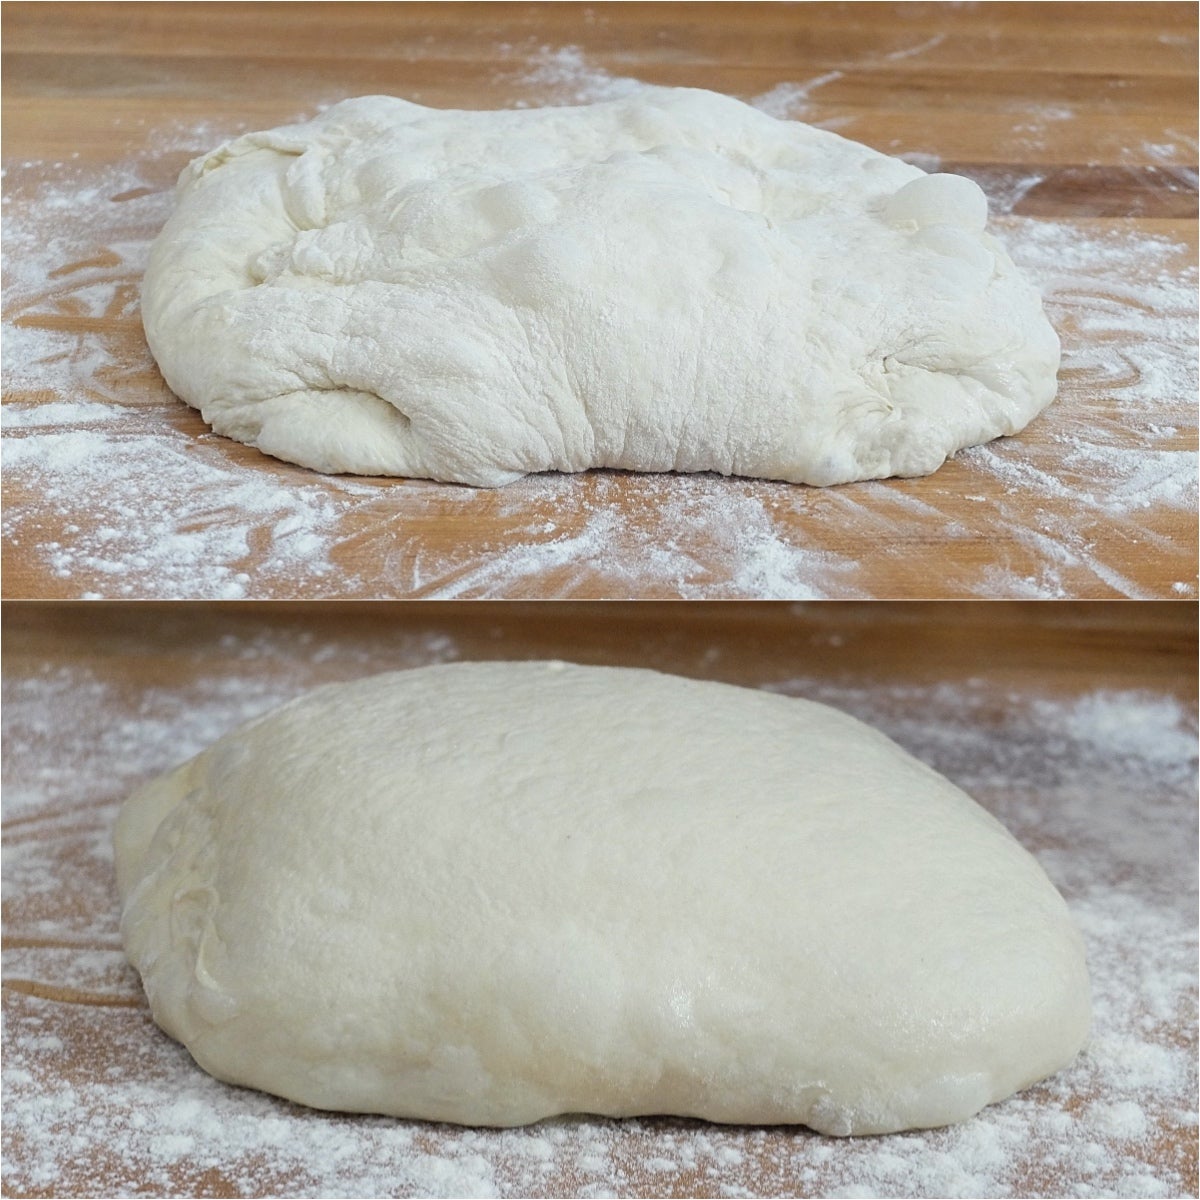
You can see as the process continues that the dough begins to gain strength and doesn't look quite so puddle-like in consistency. The cut pieces start to hold together better, showing signs that the internal structure is developing.
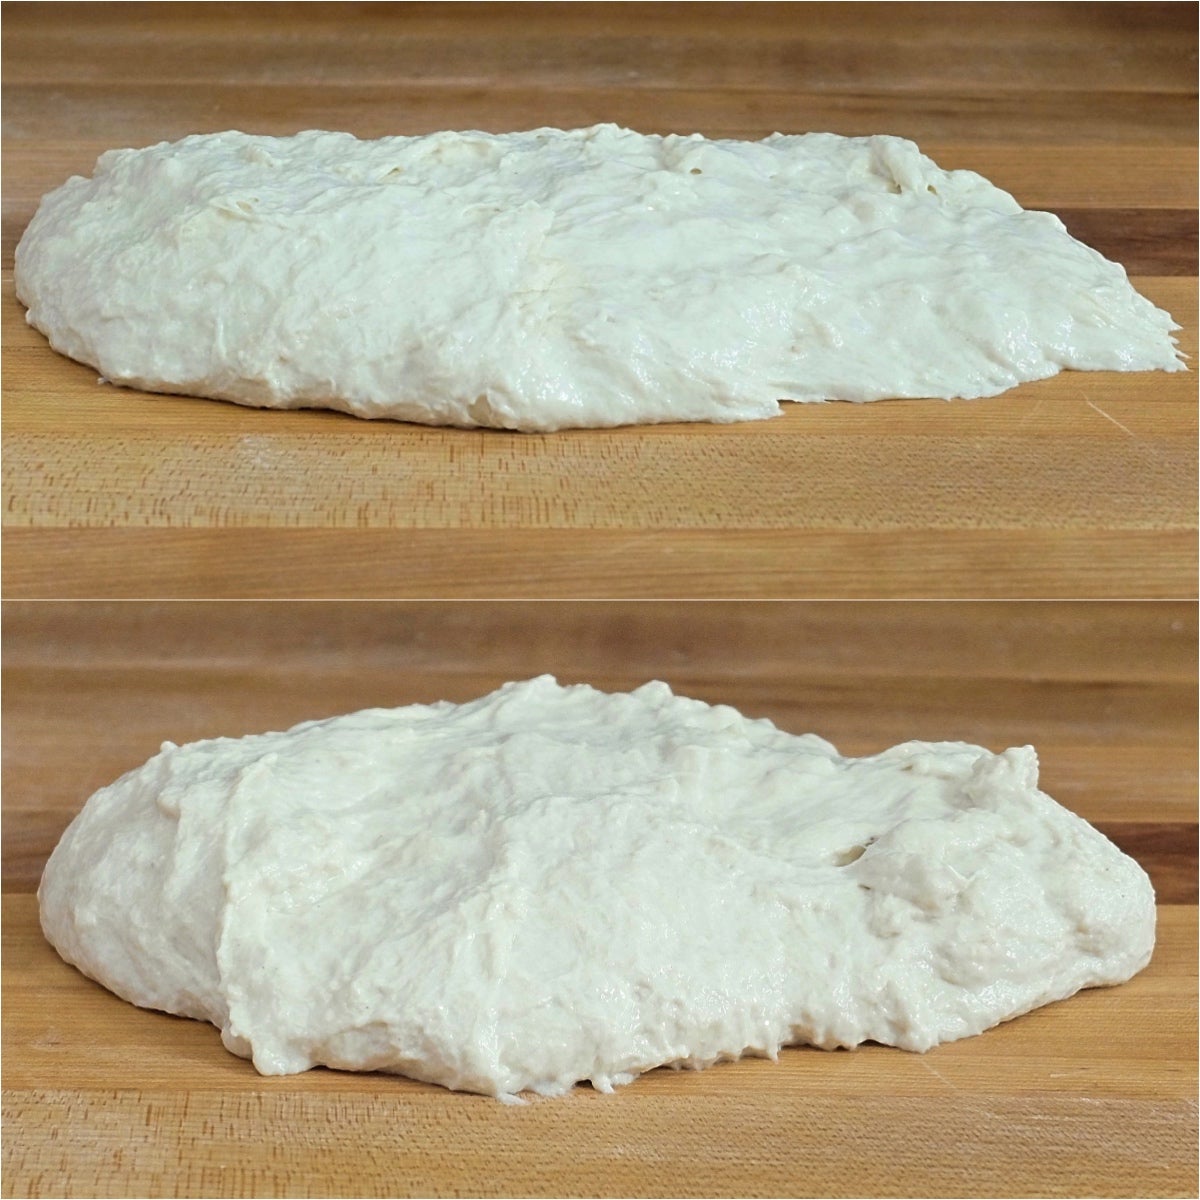
Here's the dough before and after the cutting process. It's not quite as wet and has a little more shape to it.
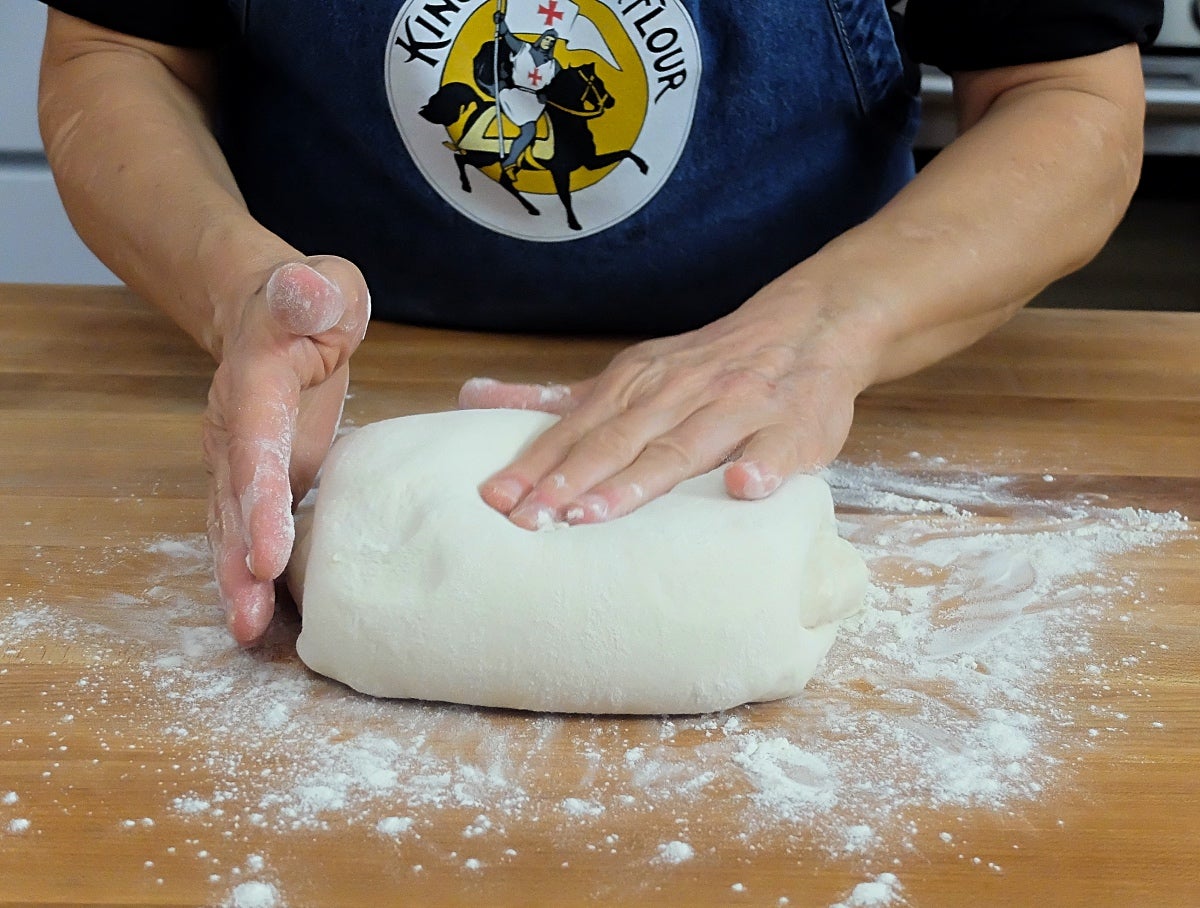
So, you've started the dough's development with this cutting process. What comes next? "Slap and fold."
This step is referred to by various names: sometimes the “French method” of kneading, sometimes “slap and fold.” One bakery I worked at called this the “beaver slap.” It involves picking up the dough on one end with both hands, then lifting it up and letting it hang a bit as you gently slap it on the table in front of you. You then fold it over and pick it up again, from the same side you first lifted it.
I use the word "gently" when describing the slap, because I've been in baking classes where the students' dough slapping became so enthusiastic that hunks of sticky dough splattered on the ceiling, floor, and fellow bakers. Keep in mind that the "slap" is really more about the dough hanging in mid-air and providing a stretch, and not so much about the way it hits the table.
The first few rounds will leave part of the dough on the table, but as the gluten develops, the dough will begin to adhere more and more to itself and less to you and the table.
Moving quickly helps, as does frequently scraping your work surface with a dough scraper or bench knife.
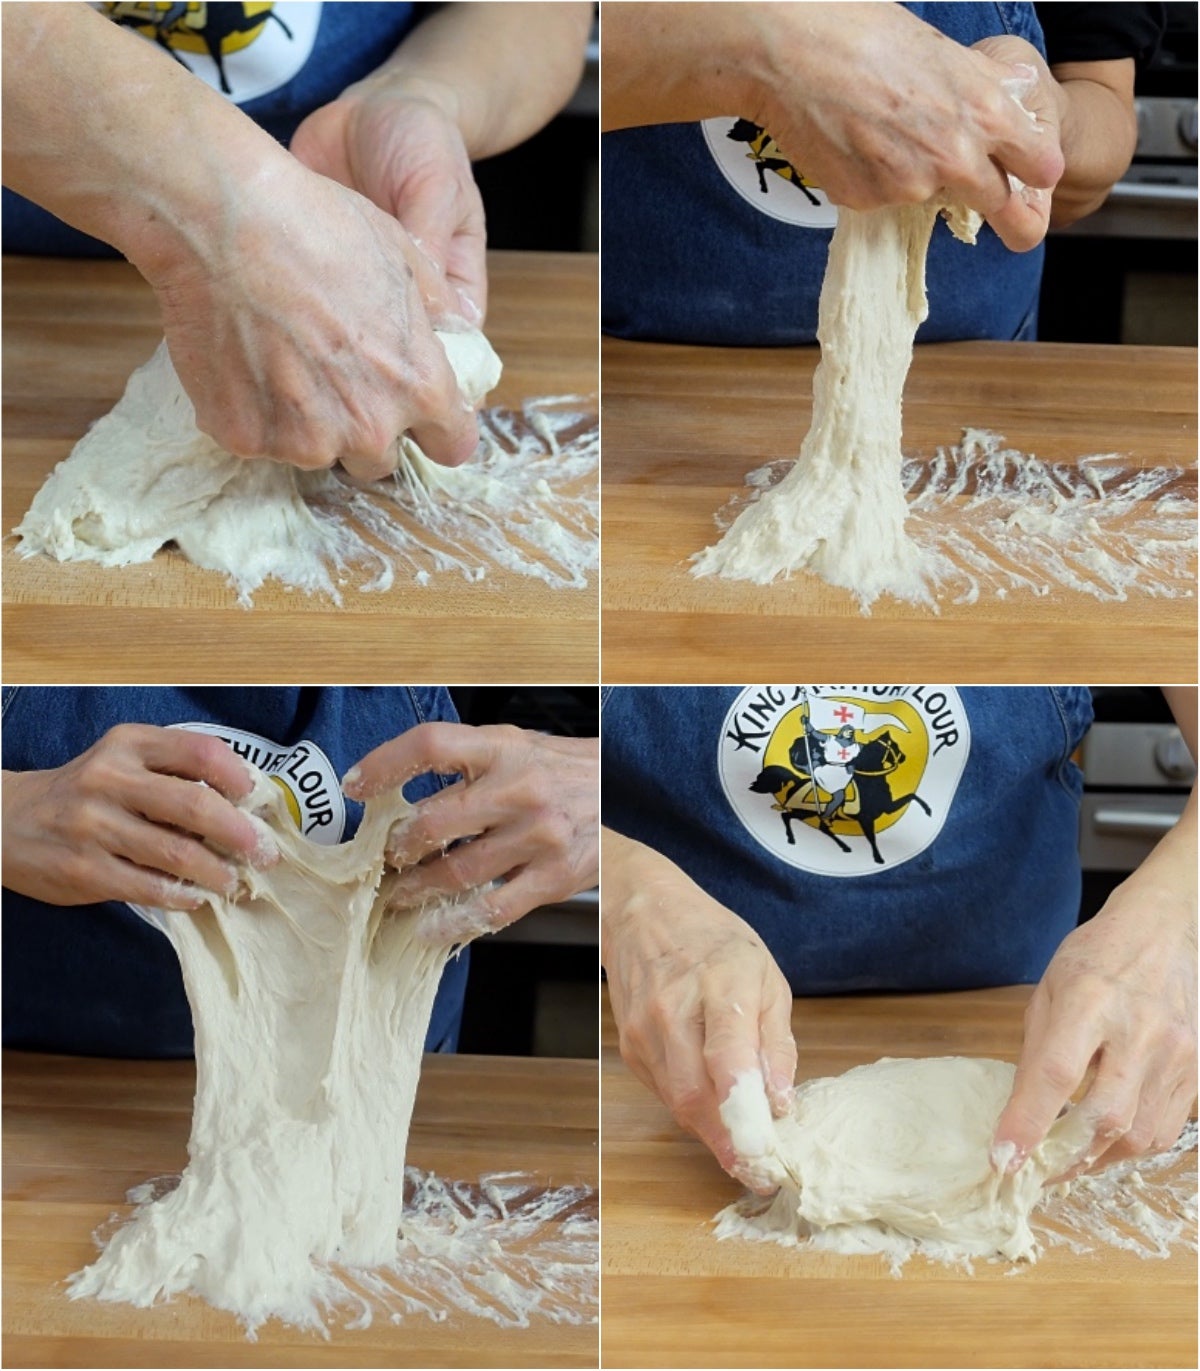
After a few minutes of slapping and folding the dough begins to act a little more like a cooperative "hunk" of dough and less like a defiant puddle.
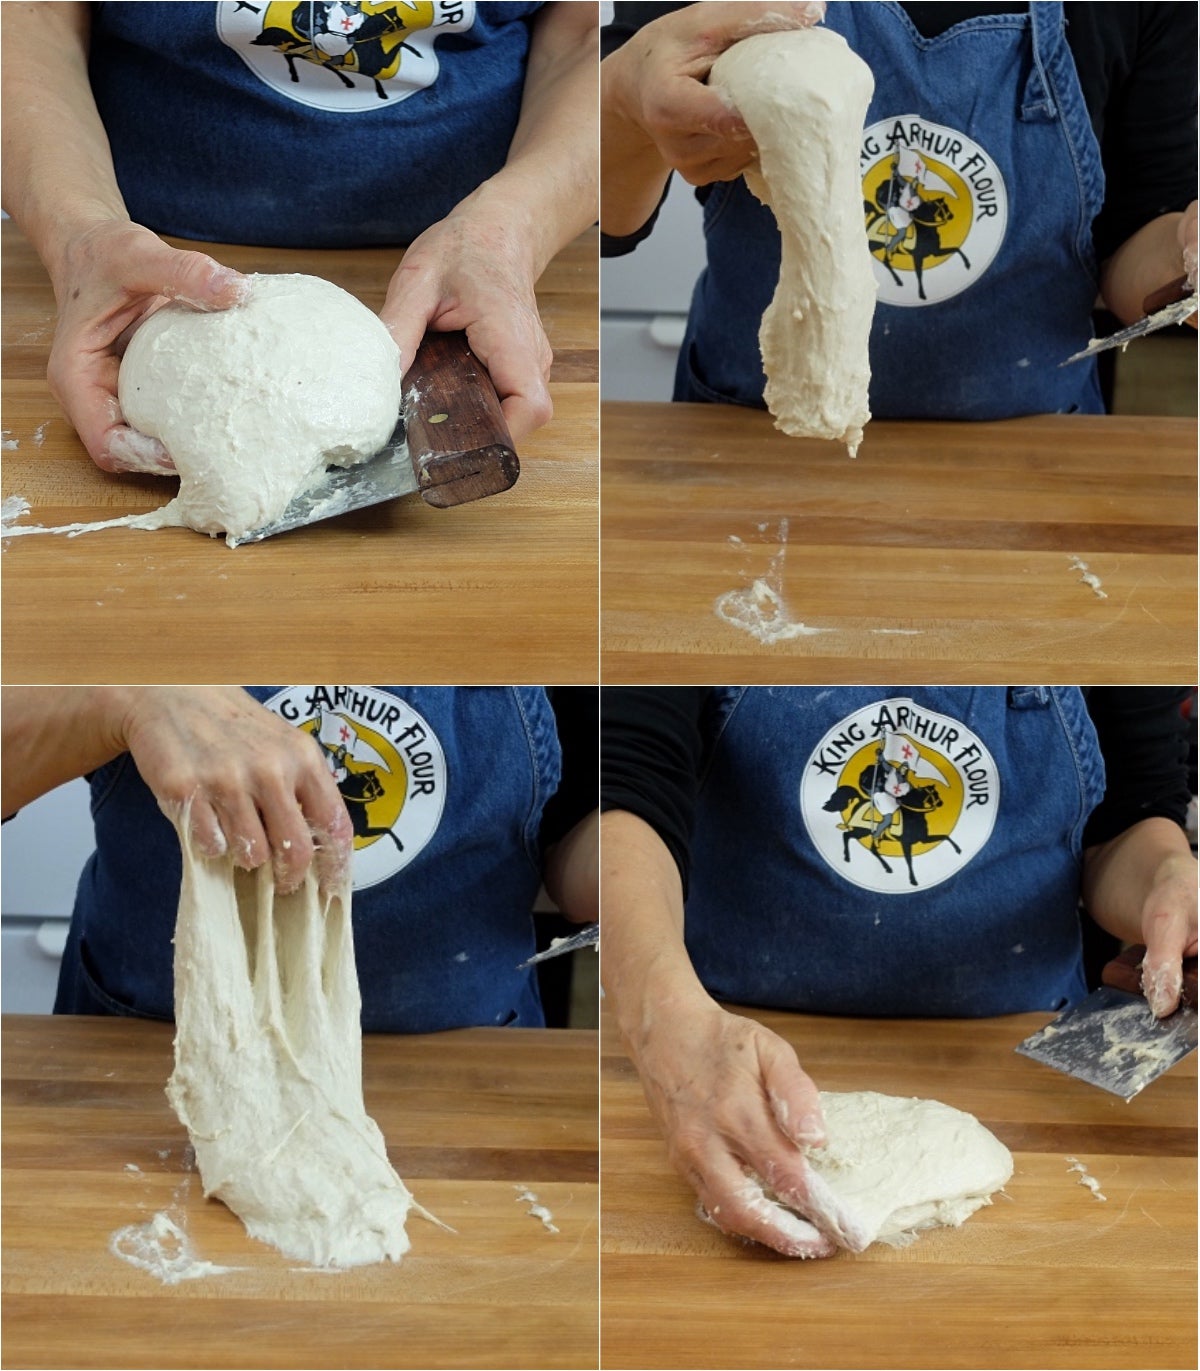
At this point, I like to switch to a one-handed method of slapping and folding. I hold the dough in one hand and the bench knife or dough scraper in the other. Each slap and fold is accompanied by a scoop and lift of the dough with the aid of my bench knife, so the work surface stays less sticky and the dough has less to adhere to. I find this method easier, but it can be tricky to hold the dough in one hand, so try both ways and see which way you prefer.
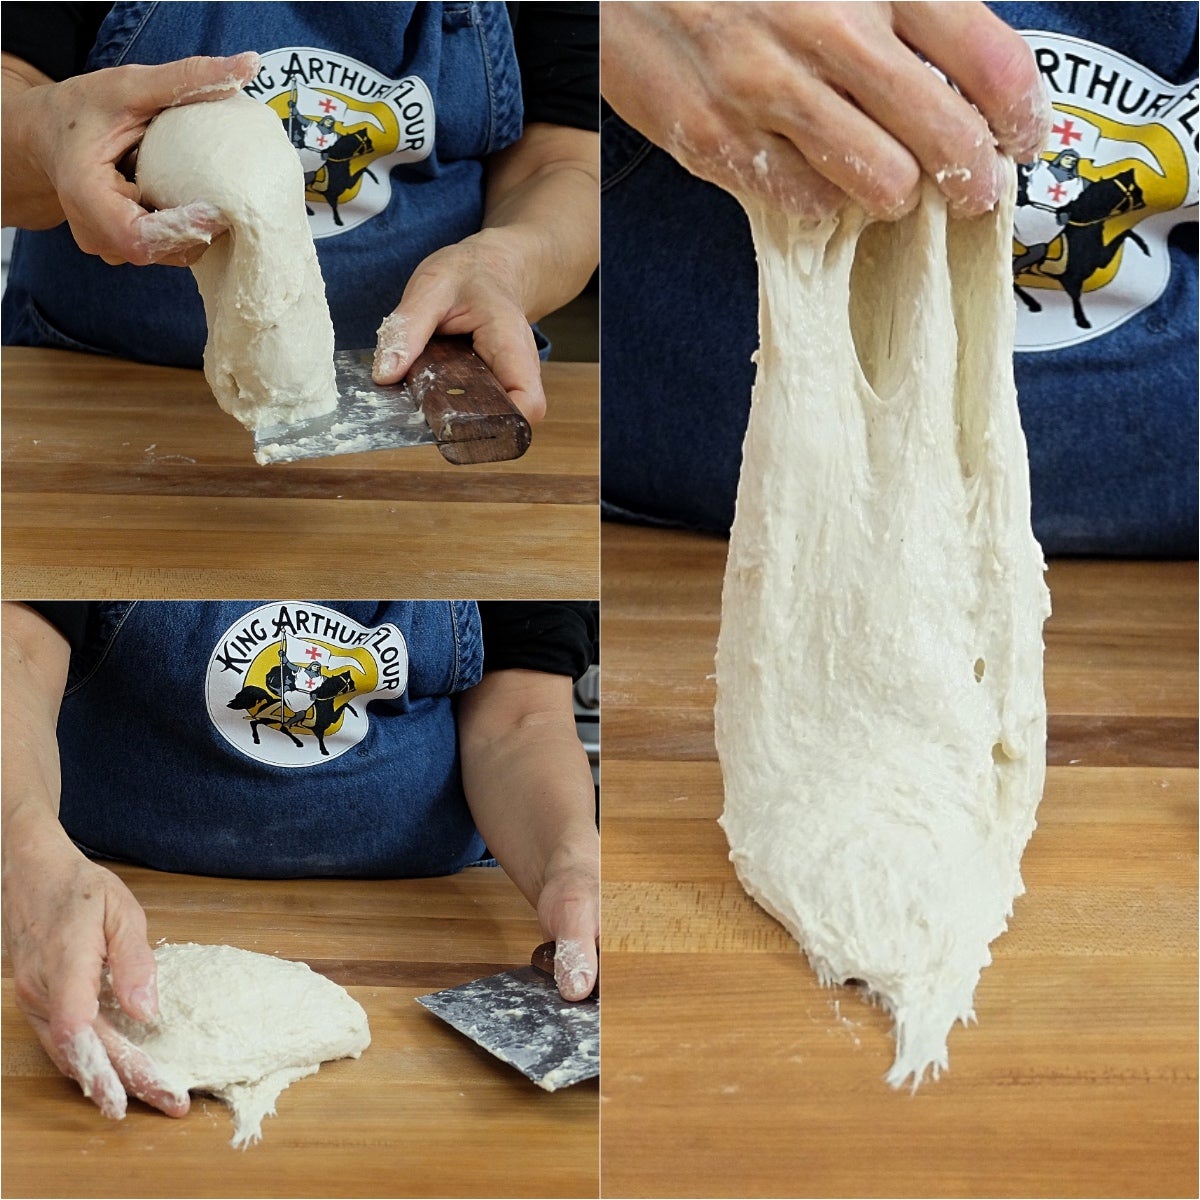
Scoop, slap, fold — repeat. This is where you begin to see a real transformation in the dough.
Even though this looks like a lengthy and labor-intense process, total kneading time from cutting to slapping only adds up to about 6 to 8 minutes.
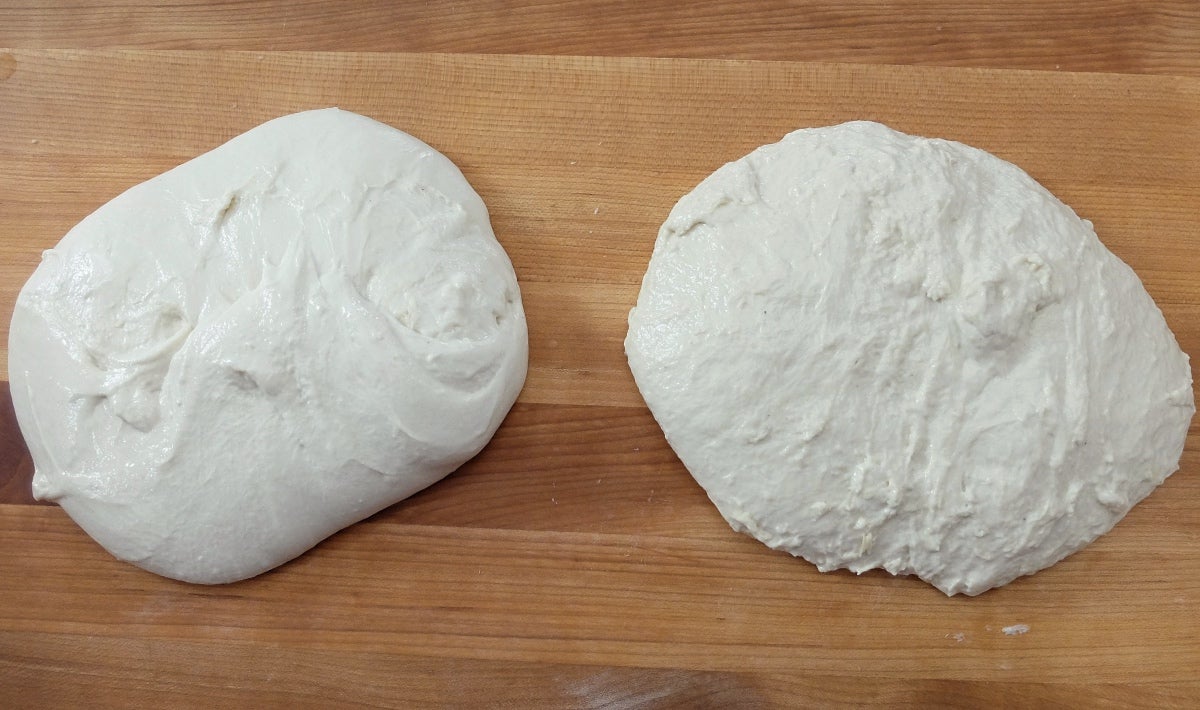
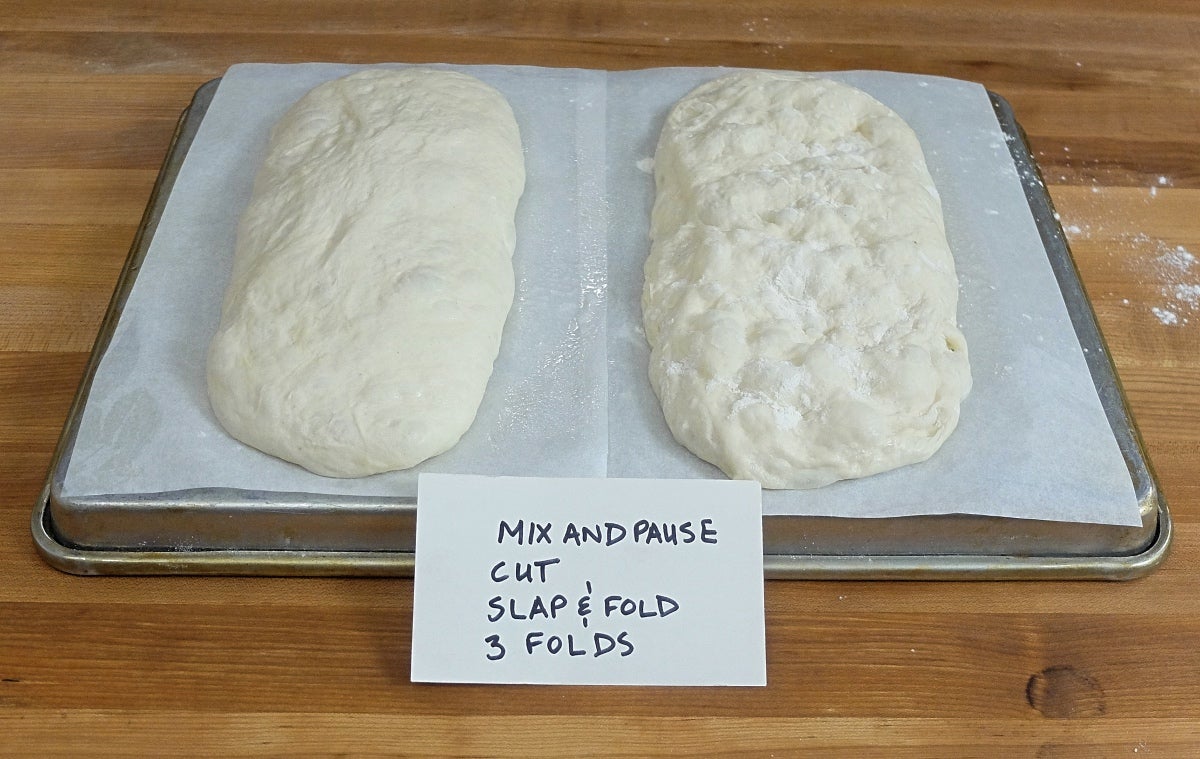
Here’s the dough kneaded in the stand mixer (left) compared to the hand-kneaded dough (right). Our dough has made real progress, but wait until you see the changes time and folding bring about!
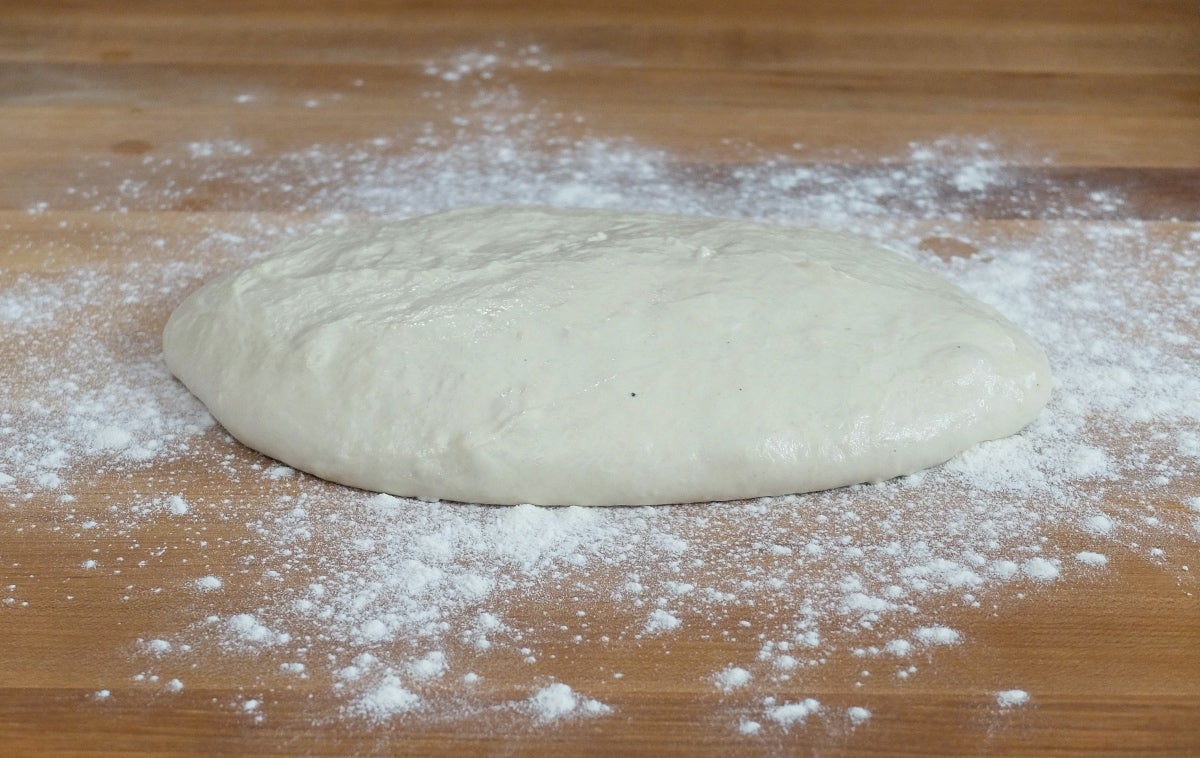
Here's our hand-kneaded dough after a 30-minute rise, and just prior to its first fold. Notice that it's already developed a smoother texture.
Folding is a tried and true method of gently continuing to develop dough strength, and is particularly useful when dealing with wet dough.
The number and frequency of folds can vary from one recipe to the next, but the underlying principle is the same: periodic folds, whether done with wet hands in the bowl or with flour on the table, can miraculously transform an extremely wet dough into something wonderfully airy and strong.
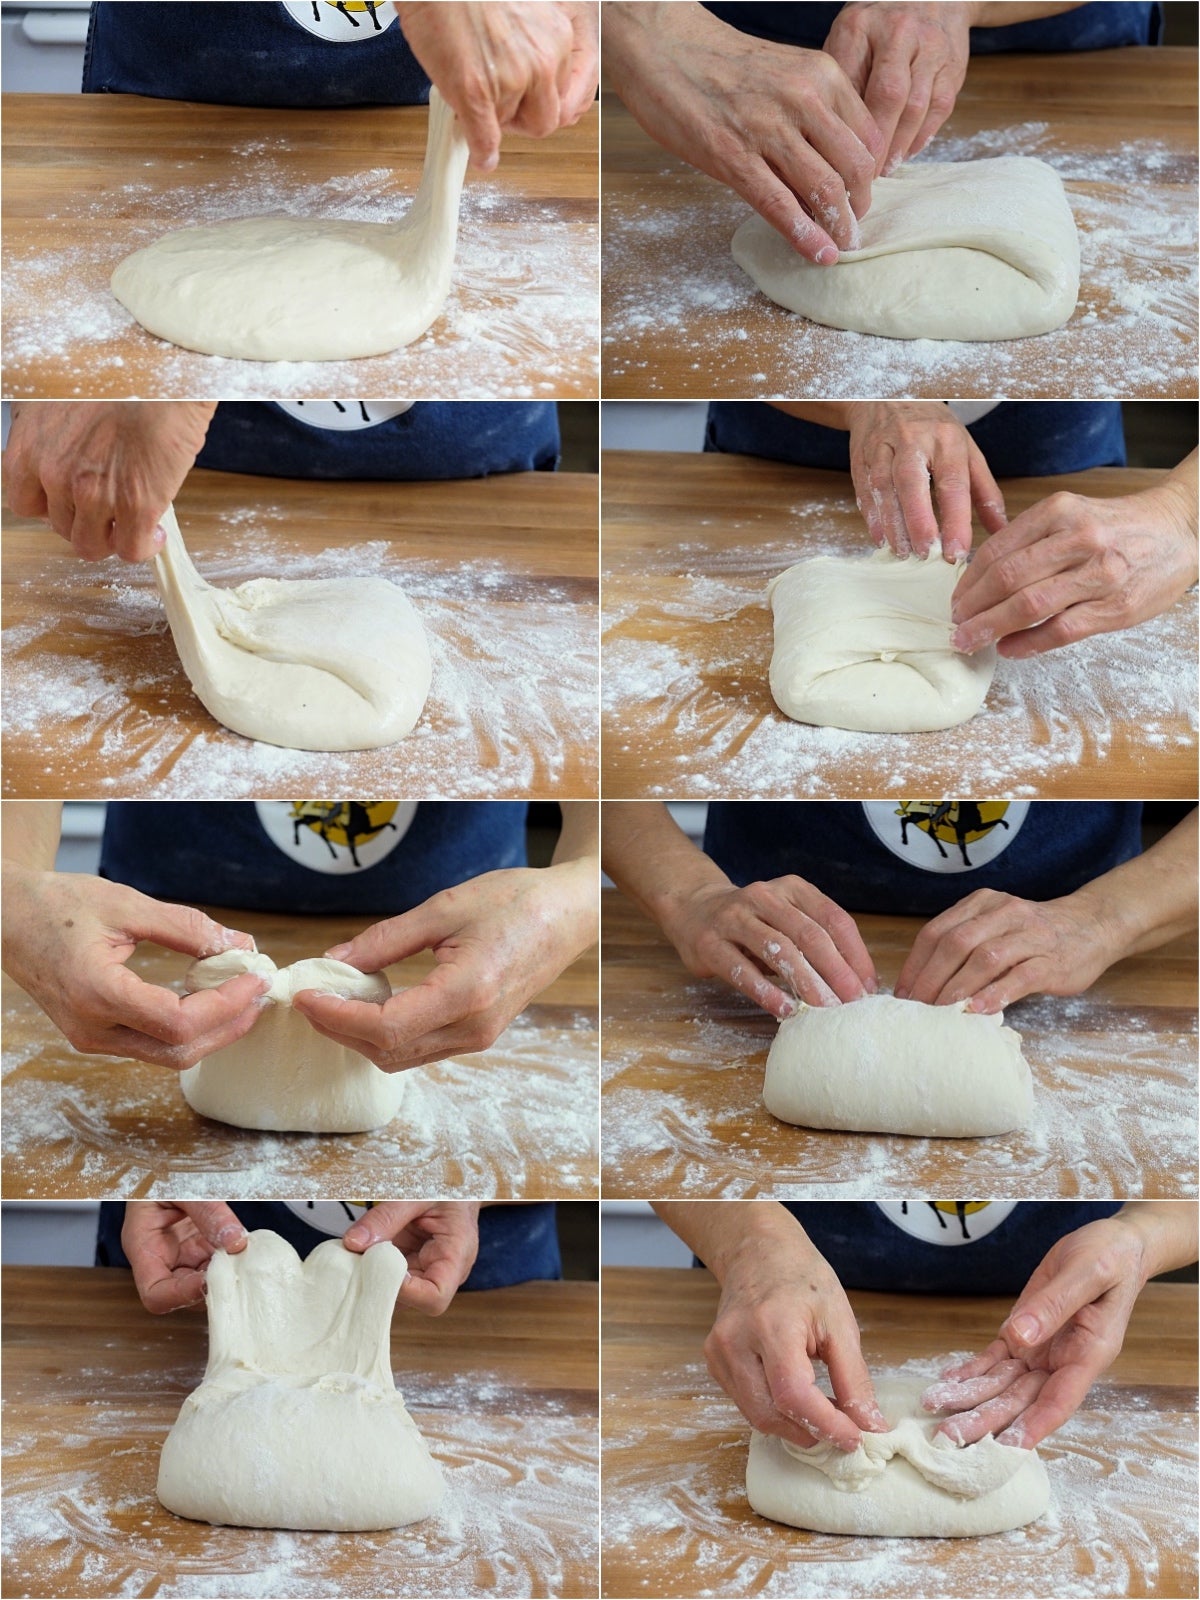
Imagine that your hunk of dough has four sides. Gently grasp one side with both hands and stretch it over the top of the dough. Grab the opposite side and stretch and fold it in the same manner. Repeat with the other two sides, and then pat off any excess flour. Each stretch and fold not only strengthens the dough, but also gently deflates it, allowing for further expansion.
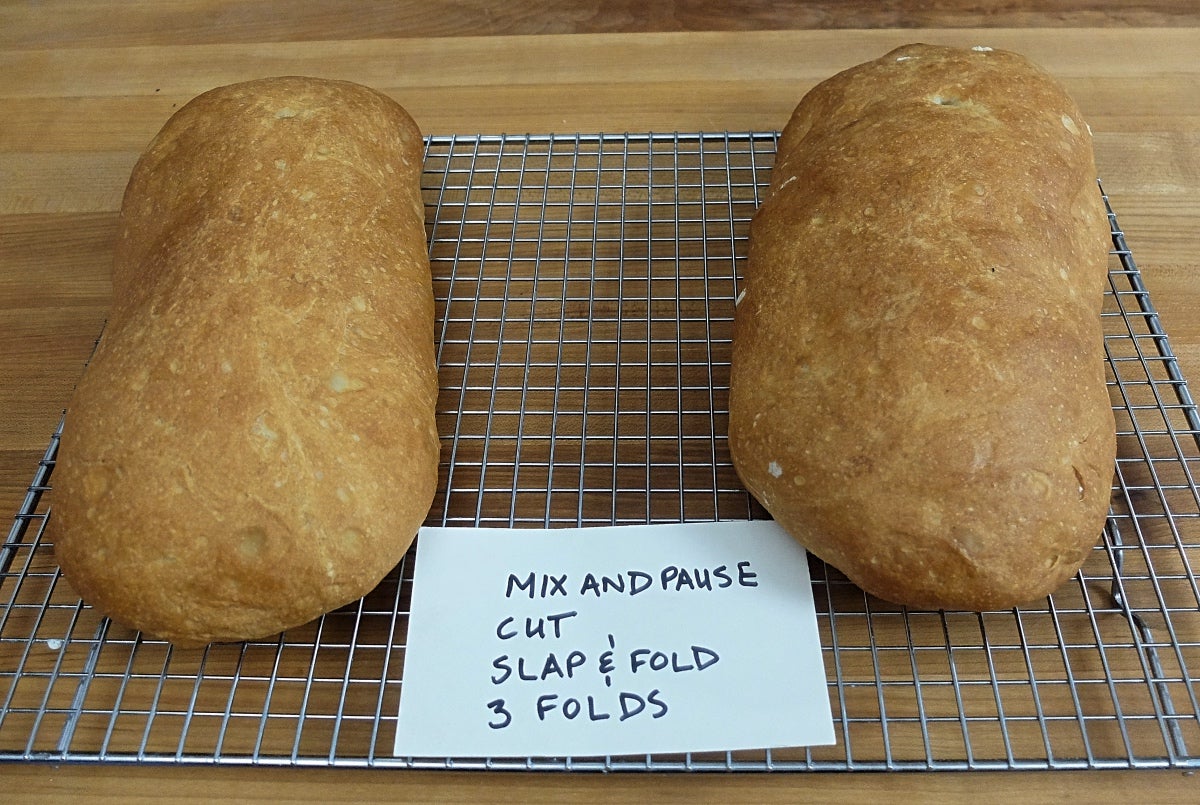
For the purposes of this experiment, I’m going to do three folds at 30-minute intervals, with shaping taking place after two hours.
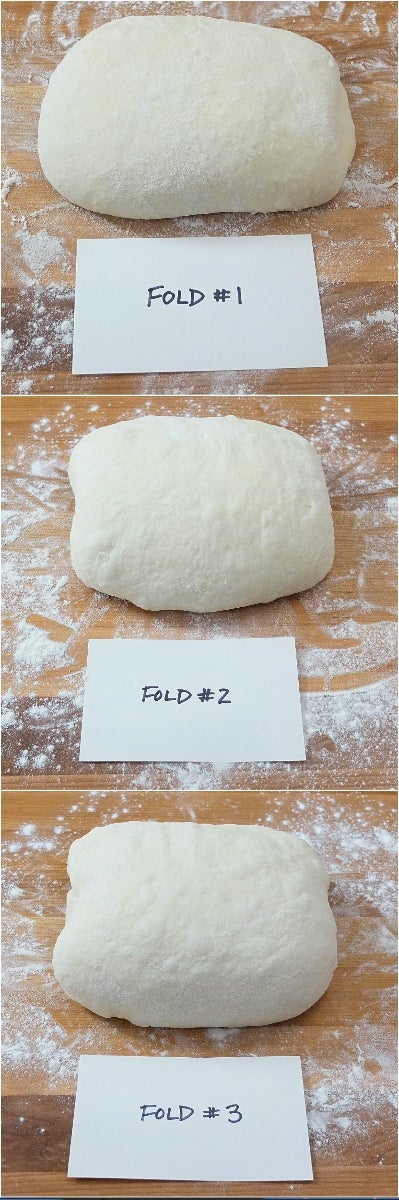
The dough isn’t just rising, but also becoming visibly stronger each time I fold it. Our little puddle has grown up to be a real dough!
Since the original recipe calls for deflating the dough after an hour, I also add a fold to the machine-mixed dough. It's a little bigger than the hand-kneaded dough at this point.
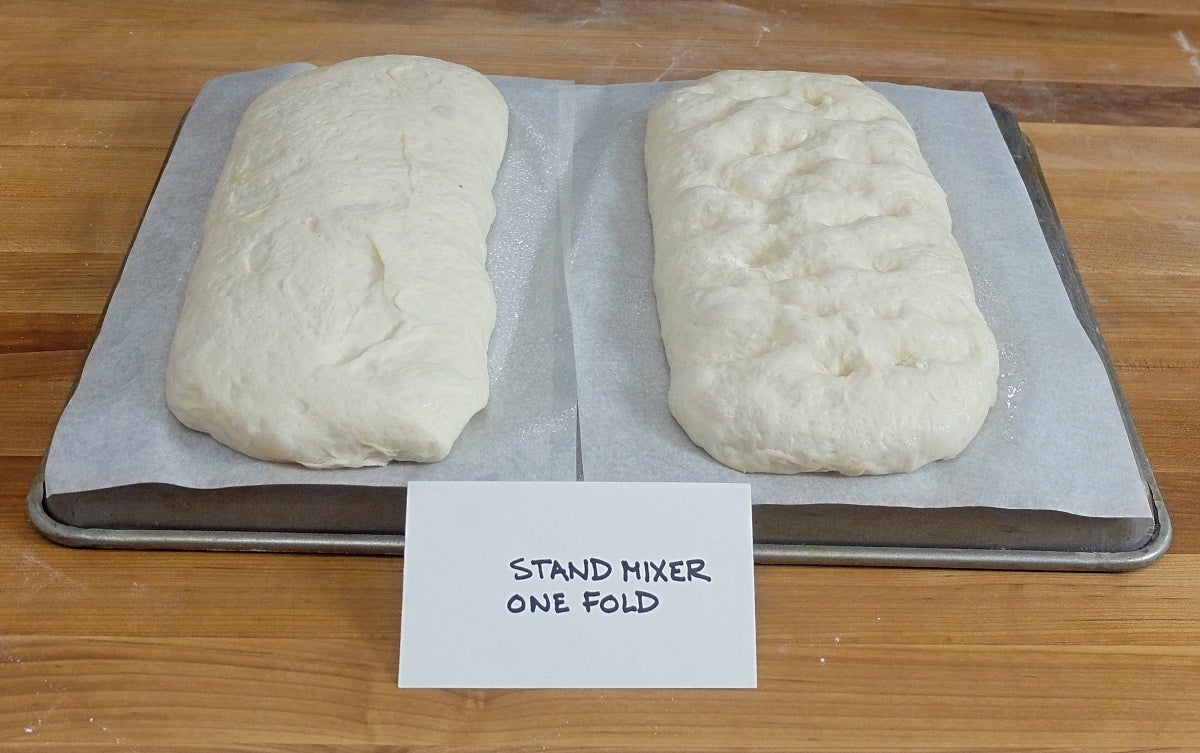
Both doughs have now completed their two-hour bulk rise. The machine-kneaded dough (top) received one fold midway, while the hand-kneaded dough (bottom) got three folds at 30-minute intervals. Both are easy to handle, with visible strength.
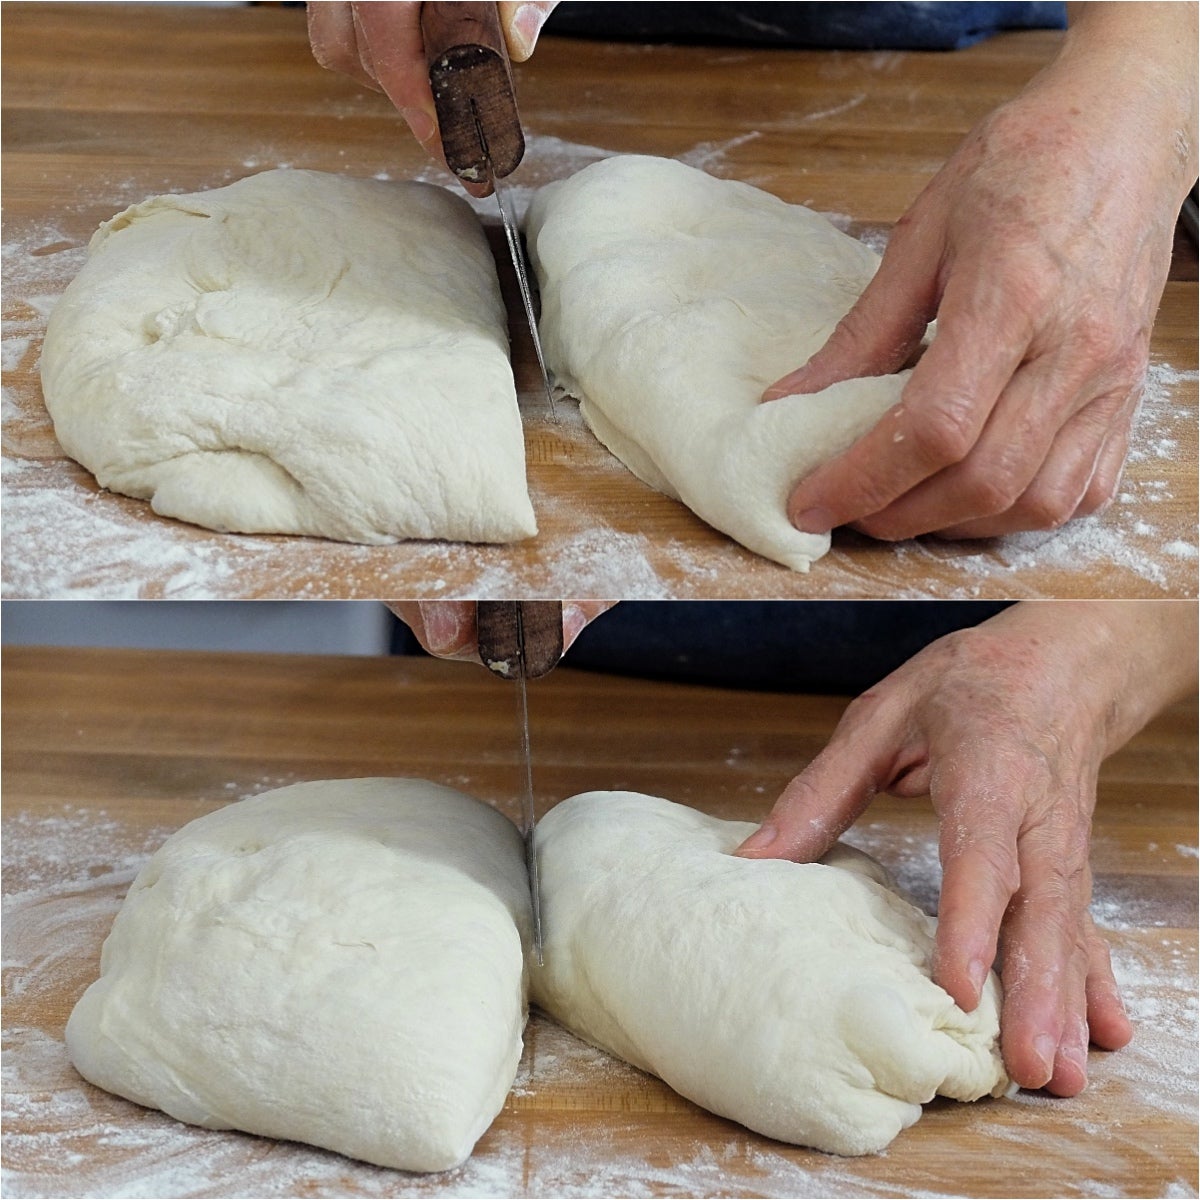
Now we're ready to divide and “shape.” I’m putting that word in quotes because this dough really doesn’t get any shaping. We’ll just gently divide the dough, trying not to deflate it. Again, the machine-kneaded dough is on top and the hand-kneaded dough below.
I find flour works better than oil or water to accomplish dividing the dough, as it helps prevent the surface of the dough from tearing or sticking. A very light sprinkling of flour won’t hurt anything, and any excess flour can be gently brushed off.
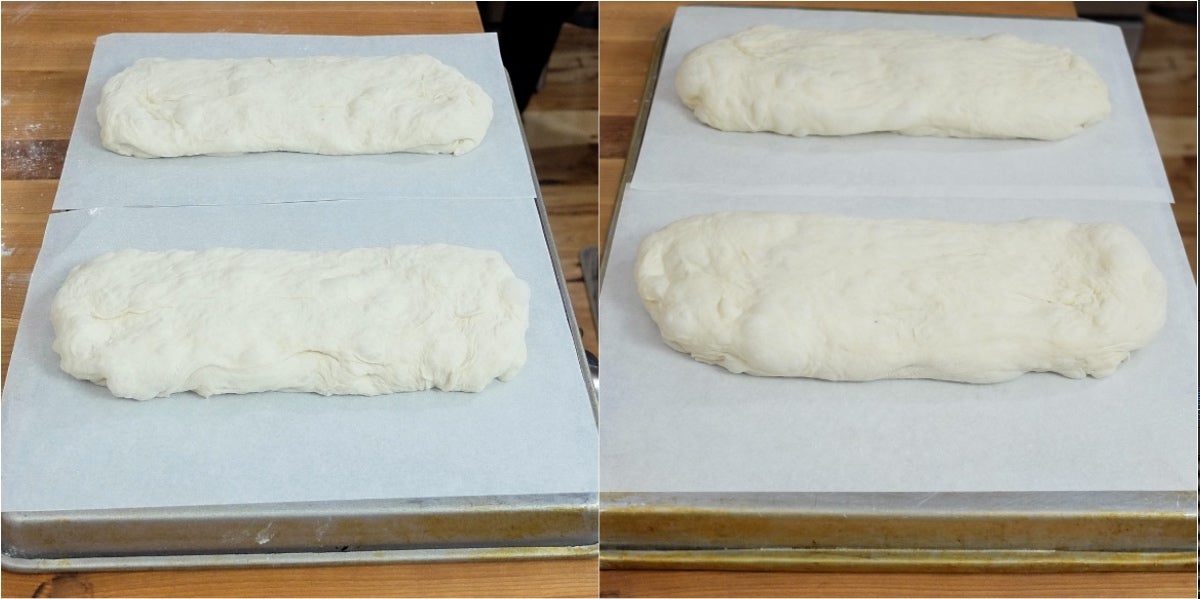
Here are two sets of dough, after dividing and placing the loaves on sprayed parchment to rise. The machine-kneaded dough is on the left, and the hand-kneaded on the right. Hard to tell them apart, isn't it?
Next we'll cover the loaves with sprayed plastic wrap and allow them to rise for 30 minutes.
The recipe calls for dimpling the dough halfway through the final one-hour rise. As an additional experiment, I decide to dimple only one loaf from each mix. I'm curious to see how dimpling affects the final crumb structure.
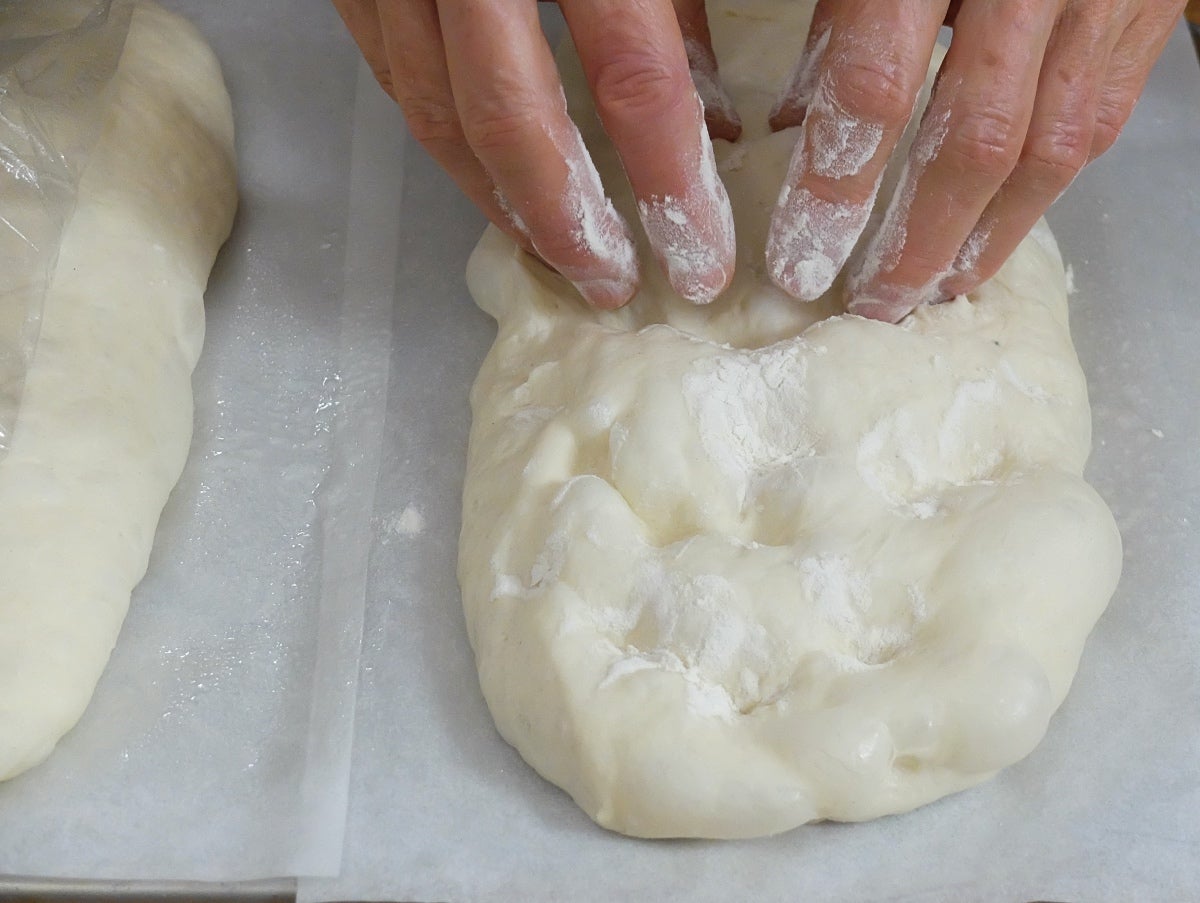
This is the hand-kneaded dough being dimpled. I'm a little too generous with the flour on my fingers during this step, but no harm done.
Here's the hand-kneaded dough, right after I finished dimpling it.
And here's the machine-kneaded dough, ready to go into the oven.
I spray the loaves with water and then bake them on a preheated stone, adding about 1 1/2 cups of boiling water to a preheated frying pan below the stone once the loaves are loaded. Our article on steam in bread baking offers step-by-step guidance for this method of adding steam to your baking.
Here are our two sets of baked loaves. The dimpled loaves are on the right.
Surprisingly, the dimpling experiment yields very mixed results. Dimpling does seem to help the machine-kneaded dough achieve a slightly more varied crumb structure. However, the hand-kneaded dough doesn't really seem to need or benefit from dimpling.
Dimpling does help yield a flatter loaf, which is traditional for ciabatta.
And which loaf wins the Academy Award for Best Crumb? The envelope, please!
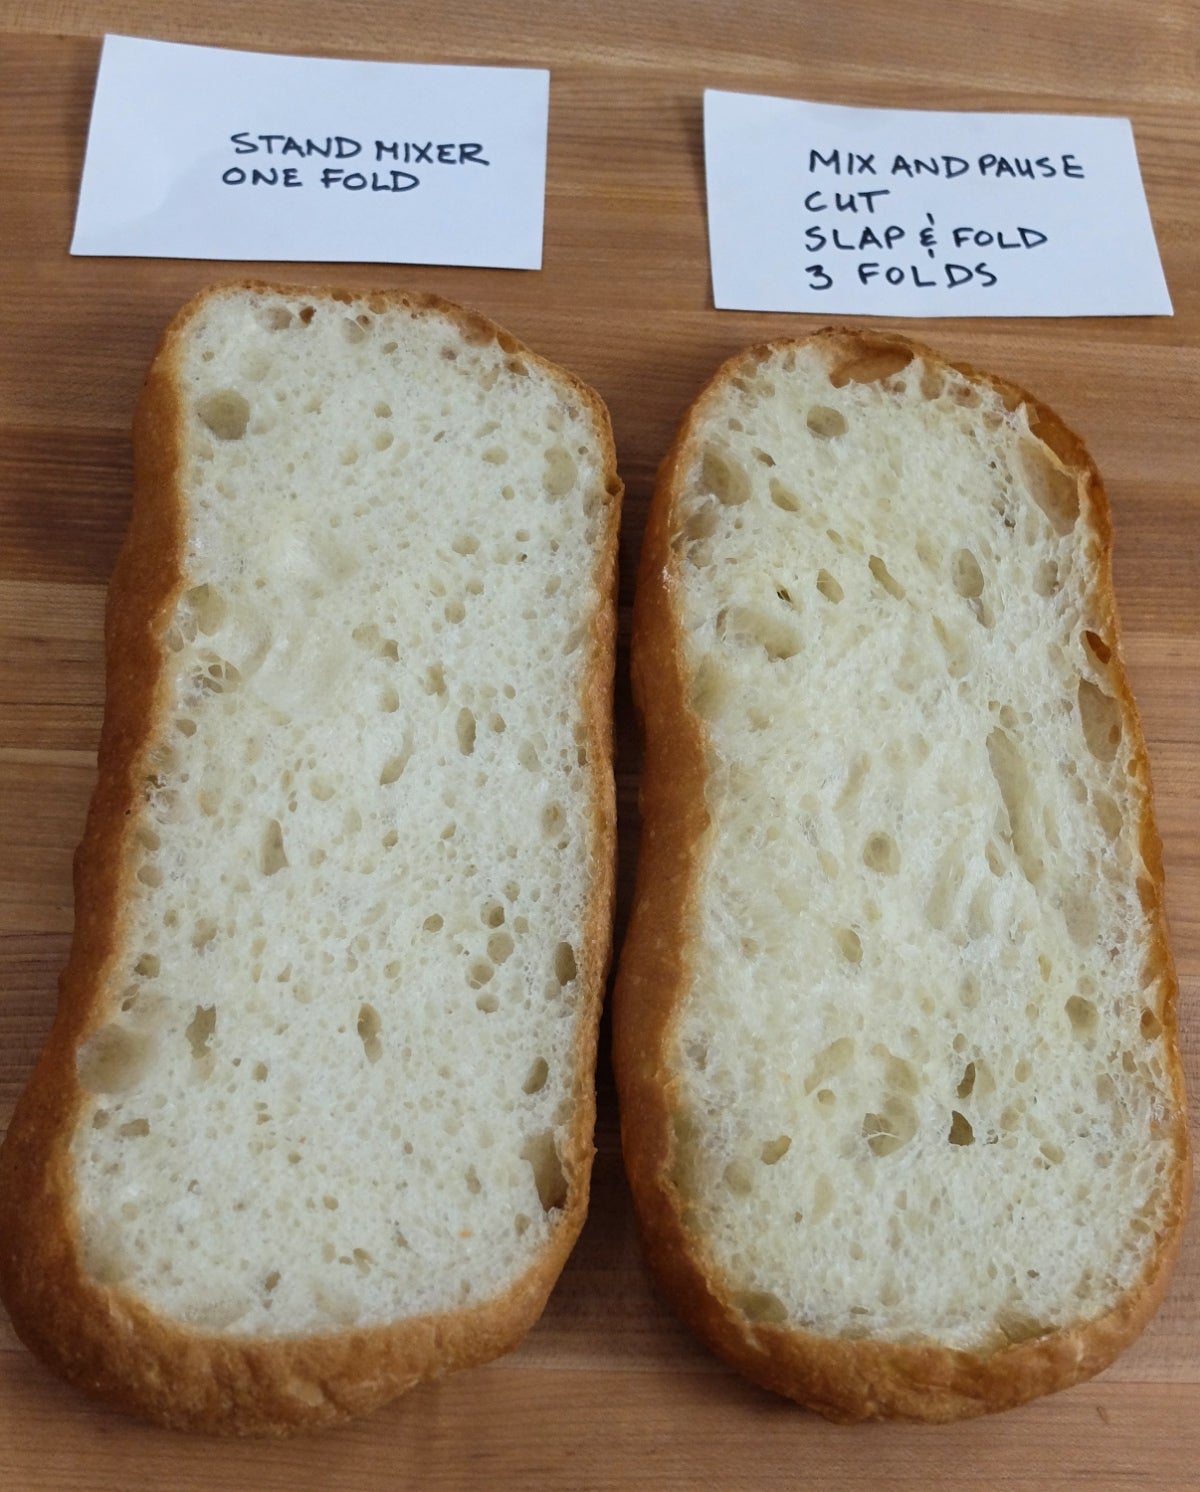
The ciabatta with the most open crumb structure is the hand-kneaded, undimpled loaf (on the right). That's the machine-kneaded dimpled loaf on the left.
We can now say without equivocation that not only is it possible to meet the "ciabatta challenge" — successfully kneading wet dough by hand — it's actually quite straightforward. Being willing to get your hands a little messy can reward you with spectacular results!
I hope you'll roll up your sleeves and give these hand-kneading techniques a try — and please check back here to let us know all about your wet-dough adventures!
Cover photo by Martin Philip.