If you think the flaky, buttery crust is the best part of a pie, listen up. You'll finally be able to satisfy those who seriously love pie crust, even when making custard or cream pie, which are usually made using only a bottom crust. The next time you make what would typically be a single-crust pie, break the rules: double it up and give your cream pie a top crust!
Add a top crust to custard or cream pies to maximize flaky, buttery goodness and create an outstanding presentation.
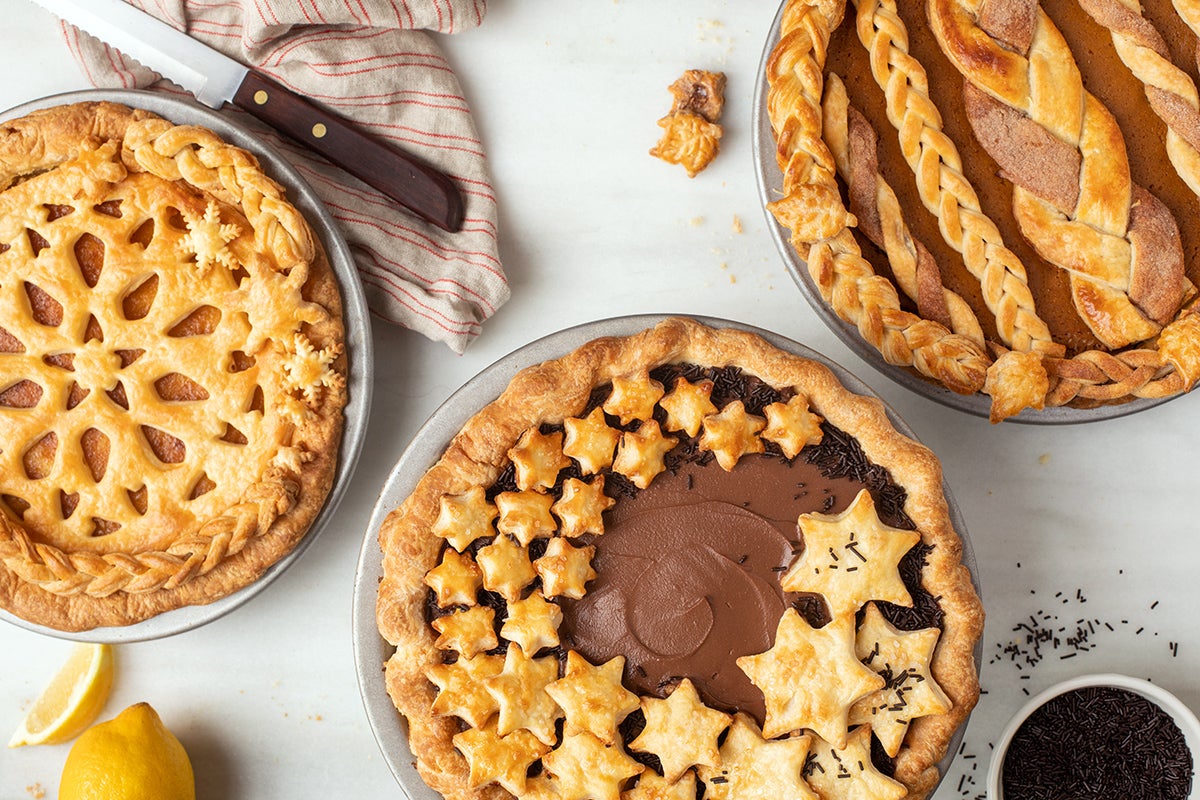
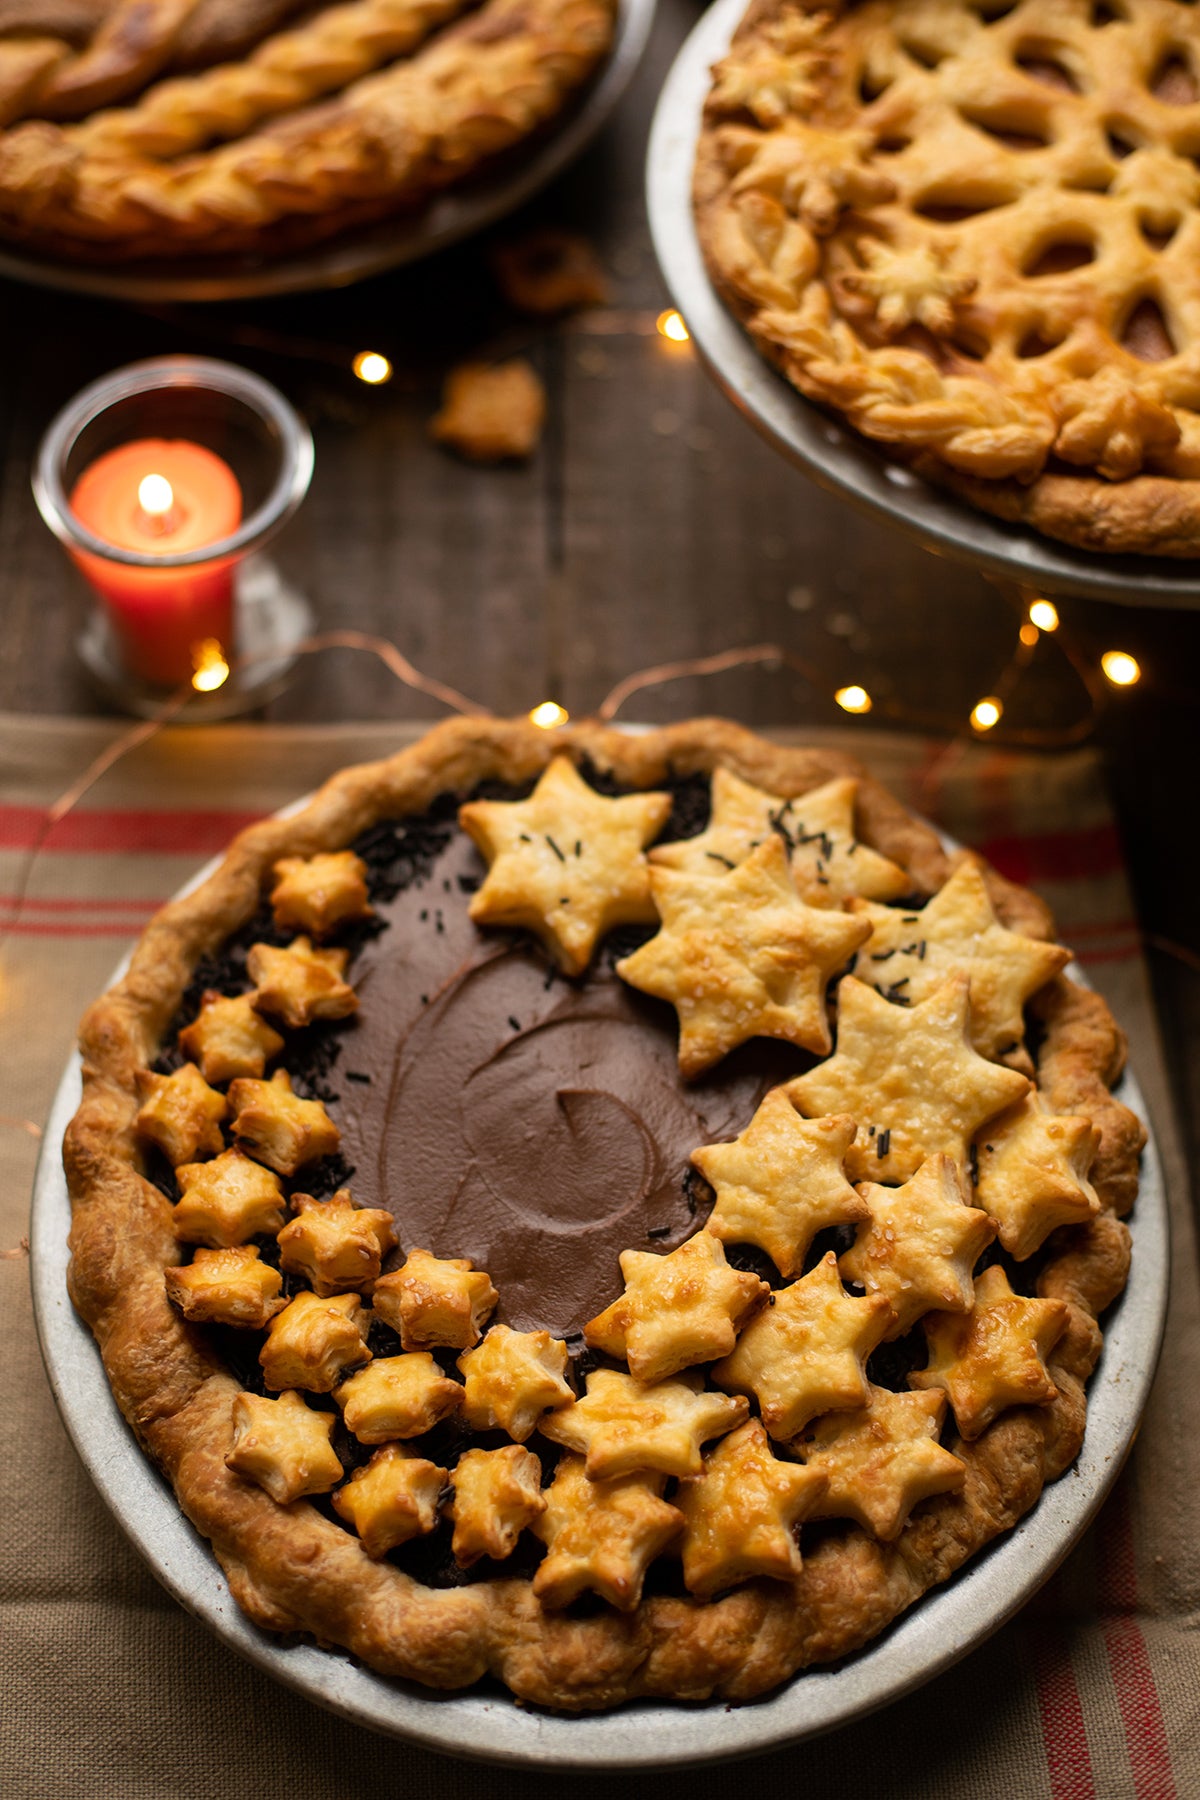
That’s right, we’re talking about things you’ve only seen in your pie dreams: pumpkin pie with a braided ombré edge and twisted topping, chocolate cream pie studded with pie crust stars, and chess pie topped off with an intricate stencil crust. You’ll can use your crust-loving imagination to make all of these pies and more.
If you’re not really a crust-lover but are totally into making Instagram-worthy pies, take note of this tutorial. Custard pies with a top crust are eye-catching, stunning creations that bring some personality to your baking.
Of course, any good pie recipe starts with a reliable base: buttery pie dough that’s easy to work with. Let's begin there.
There are millions of pie crust recipes available to home bakers. In this sea of choices, you may have found a perfect pie crust recipe. If so, go ahead and prep that pie crust!
Be aware that all-butter pie crusts lose their shape slightly during baking. Crusts that use shortening hold their shape more readily. Since you'll be putting extra effort towards the design of your pie crust, it’s worthwhile to ensure it bakes as envisioned.
With that in mind, I love using our Rustic Milk Pie Dough. It’s easy to work with, holds its shape, and has that quintessential homemade taste. If you’re unsure where to start, it's a reliable option. (Bonus: It also works when made with our Gluten-Free Measure for Measure Flour instead of all-purpose flour. Just be gentle with the dough.)
To give your cream pie a top crust, you’ll want to start with a double pie crust recipe, about 1 1/2 pounds of dough.
If you’re going to create a more elaborate top crust (for example, use pie crust cutouts to completely cover the filling) you might consider making a 1.5x batch of a double pie crust recipe.
Or, get ahead of the game and make two double pie crusts. Yes, you’ll end up with a hefty amount of pie dough, but you can always freeze any extra.
This additional amount of pie dough will give you flexibility with your design. The top of your custard or cream pie is a blank canvas — you want plenty of material to make your masterpiece.

If you use the Rustic Milk Pie Dough recipe, you’ll only need a single batch. The recipe makes enough dough for a bottom crust plus plenty of extra to make an elaborate top crust.
There are a handful of ways you can give custard pie or cream pie a top crust. You'll learn three basic approaches that offer a plethora of variations. You can mix and match, create, and bake until you have the double-crusted cream pie of your dreams!
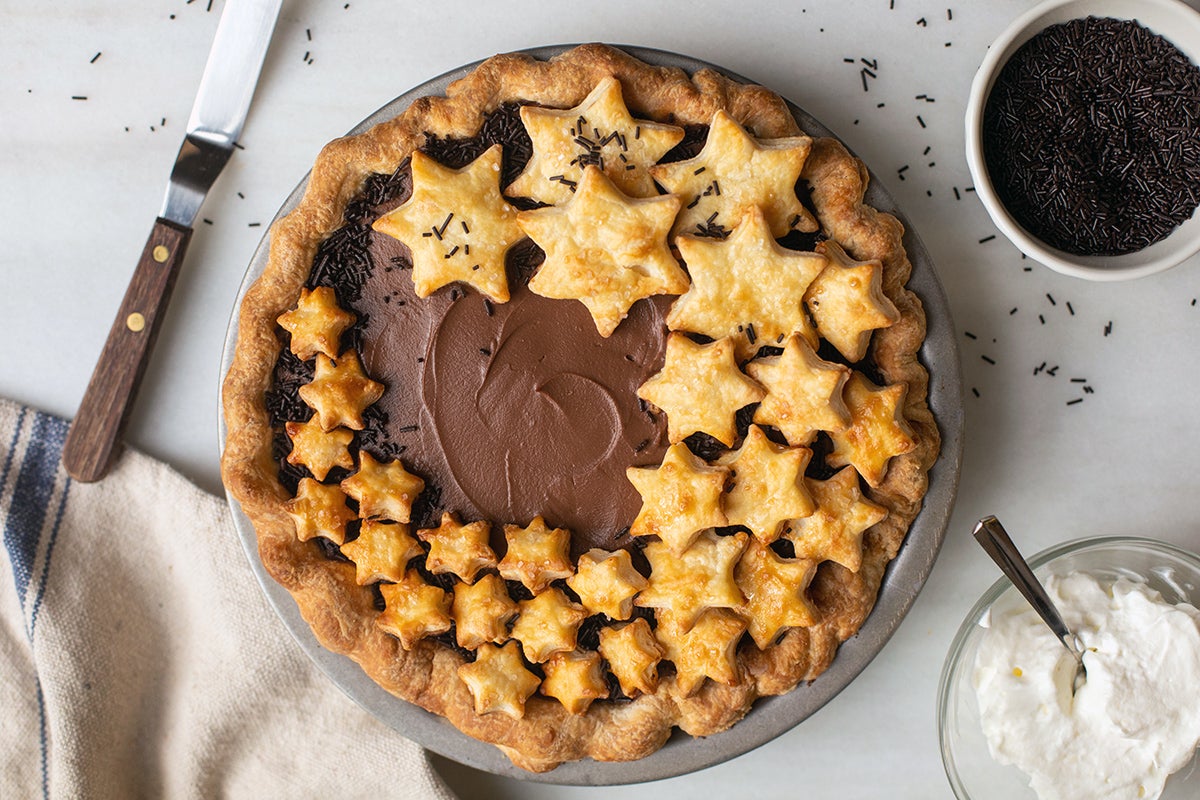
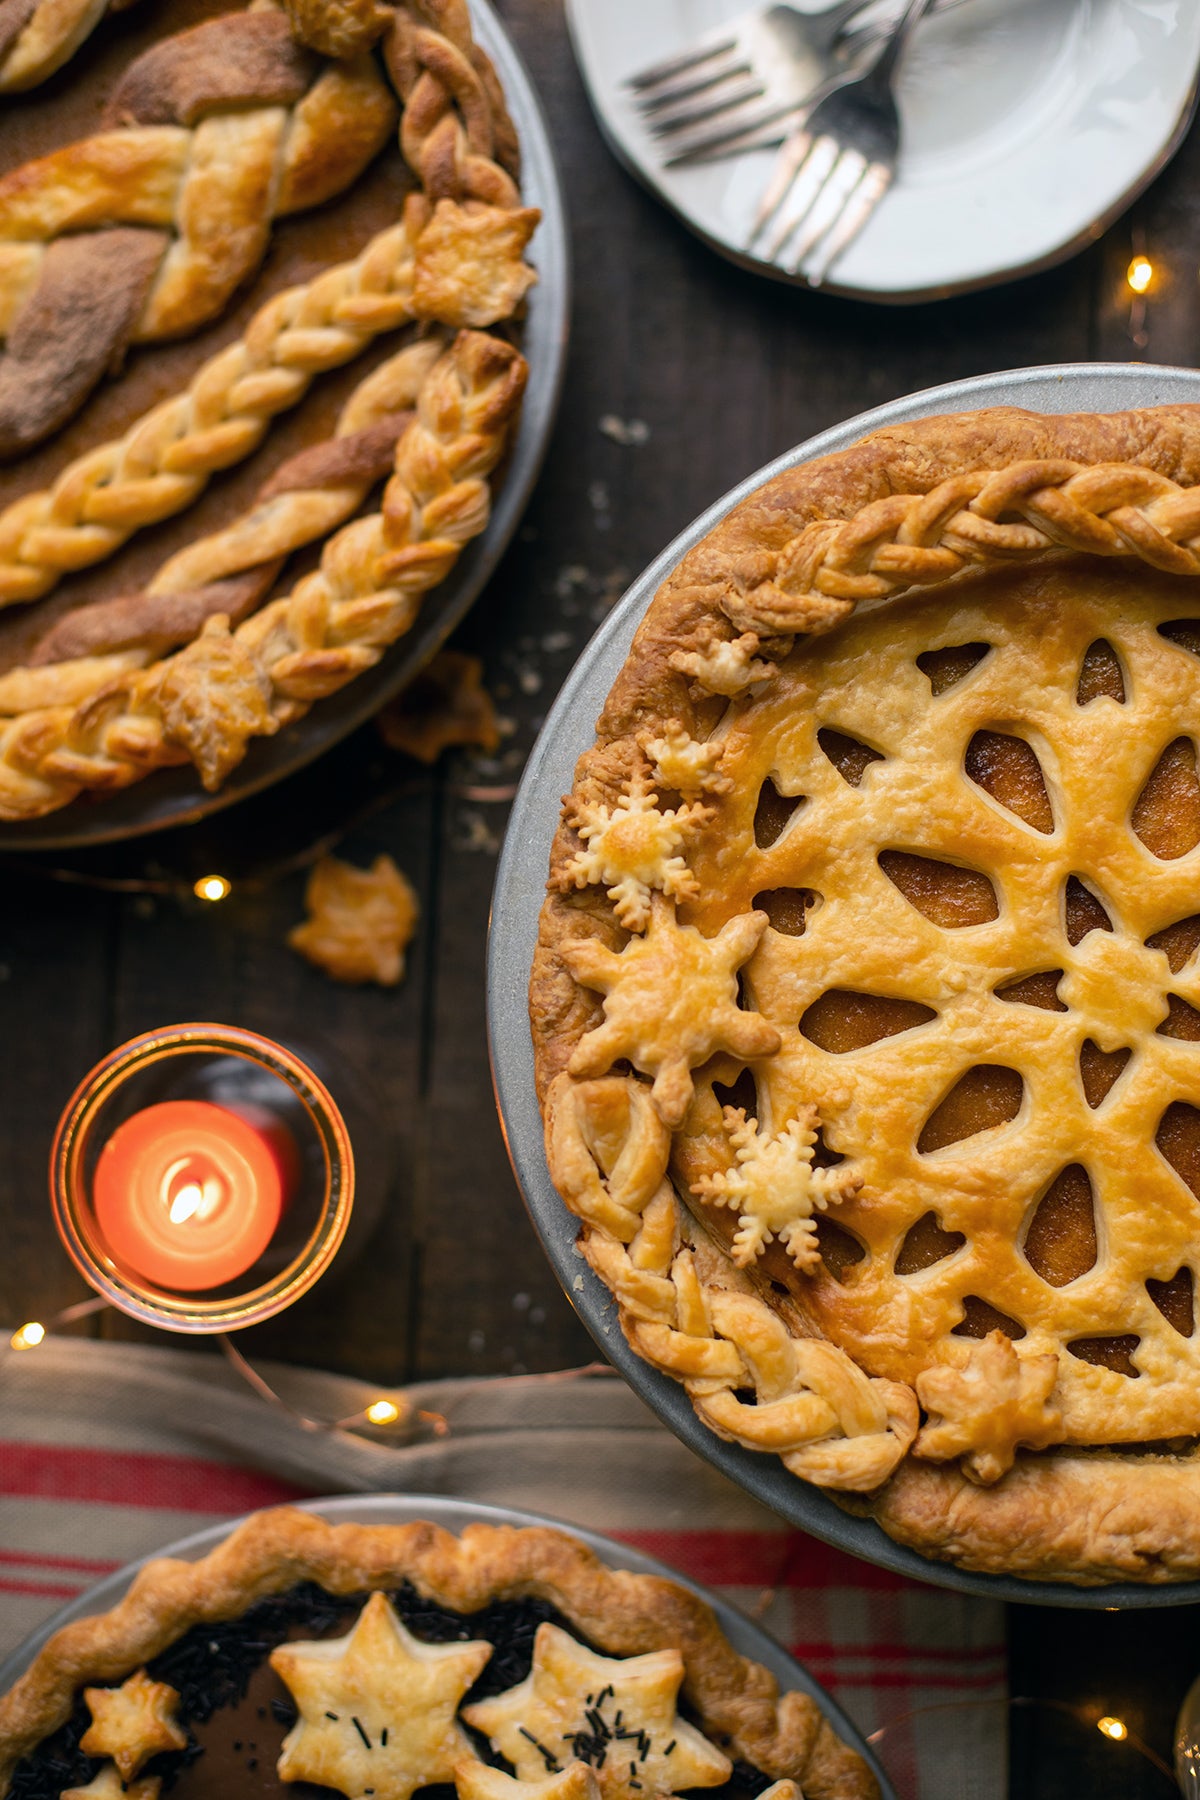
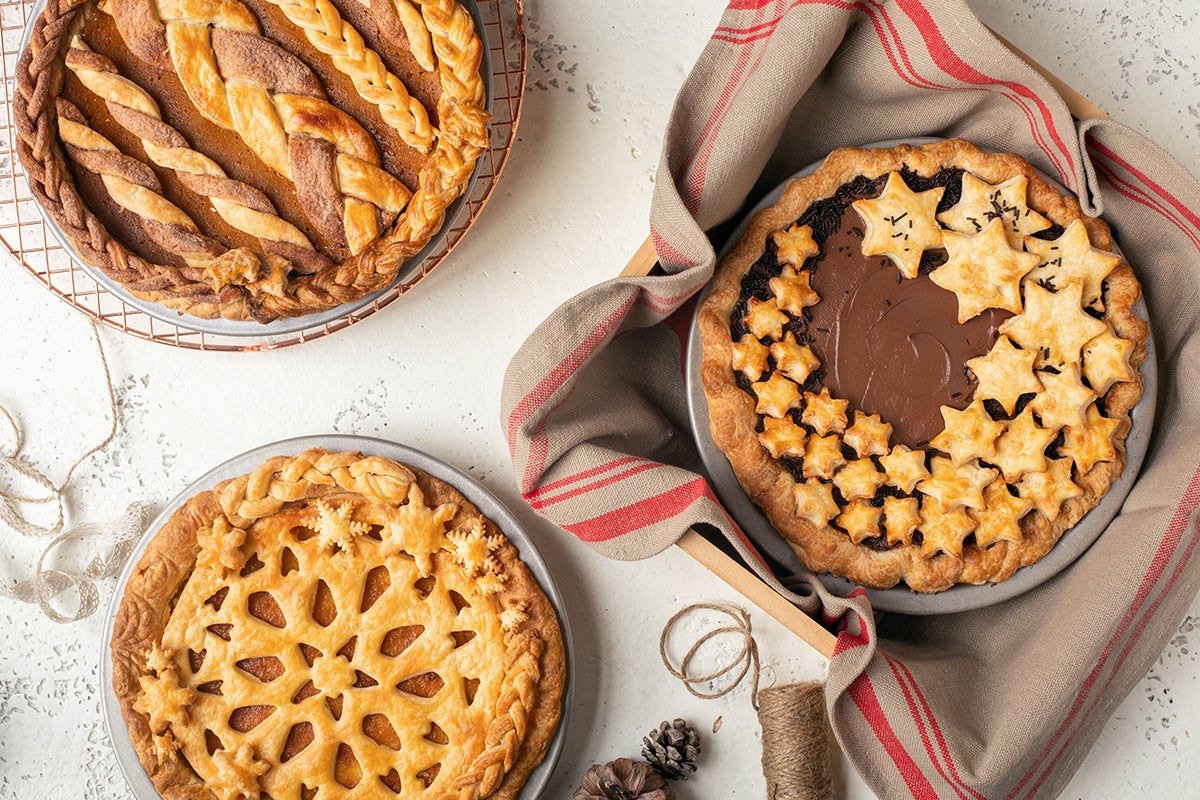
The most well-known method of giving cream pie a top crust is to use pie crust cutouts. Roll out the pie dough and cut out shapes, bake them separately from the pie, and then arrange them on top once they're baked and cooled. This method is easy to execute and results in an impressive presentation.
To make the shapes, use cookie cutters or pie crust cutters that have an embossed design for extra detail. If you don’t have either, make freehand shapes using a paring knife. Both geometric and organic shapes (think flowers, leaves, fruit, etc.) look appealing.
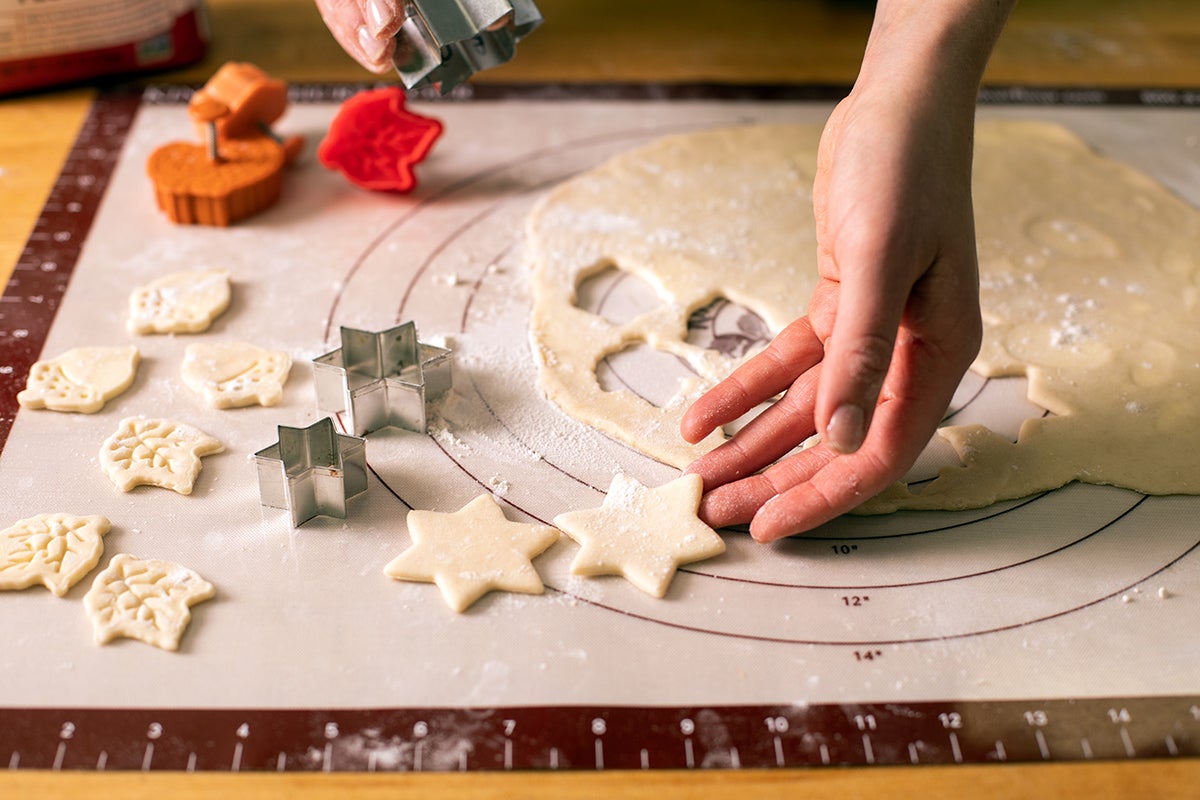
Use a variety of sizes or a single size shape to make your design — just be aware that smaller cutouts will bake faster. Most cutouts take about 10 to 15 minutes to bake at 375°F. As they start to turn golden brown, watch them closely; they can go from brown to burned in just a few minutes.
Once the pie is baked and the cutouts are cool, carefully arrange them on top of the pie. The filling of most cream and custard pies is slightly tacky on top after baking, so you don’t need to use anything to adhere the cutouts. Just press them gently into the filling to ensure they stay in place.
Here are a few ideas to get your pie baking brain spinning:
The inspiration for this technique is a classic lattice-topped pie. I tried giving a partially-baked custard pie a lattice top in the test kitchen, and it turned out to be a flop. (Sinking strips and burned fingertips were a result.)
One of our test kitchen bakers, Molly, suggested a slightly tweaked approach to create an equally elegant look: make braided or twisted strips of pie dough, bake them separately, and then place them on top of the fully baked pie. (Brilliant idea, Molly!)
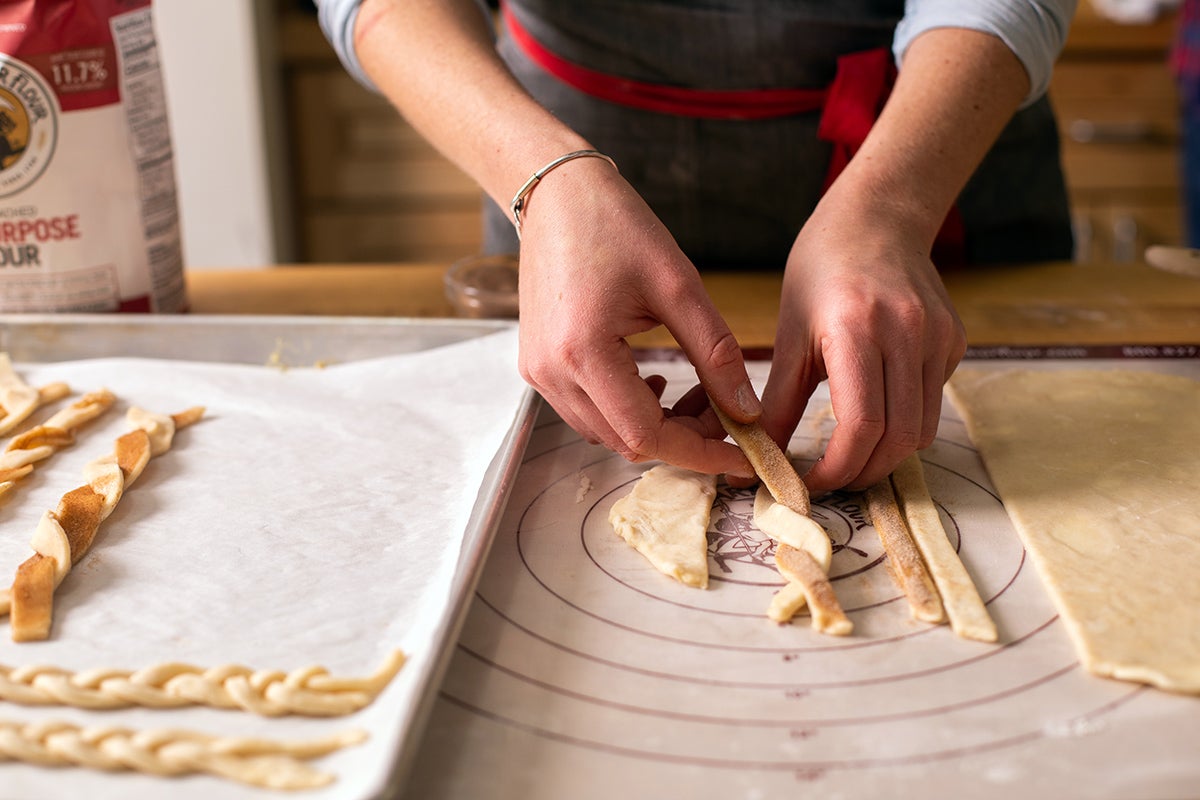
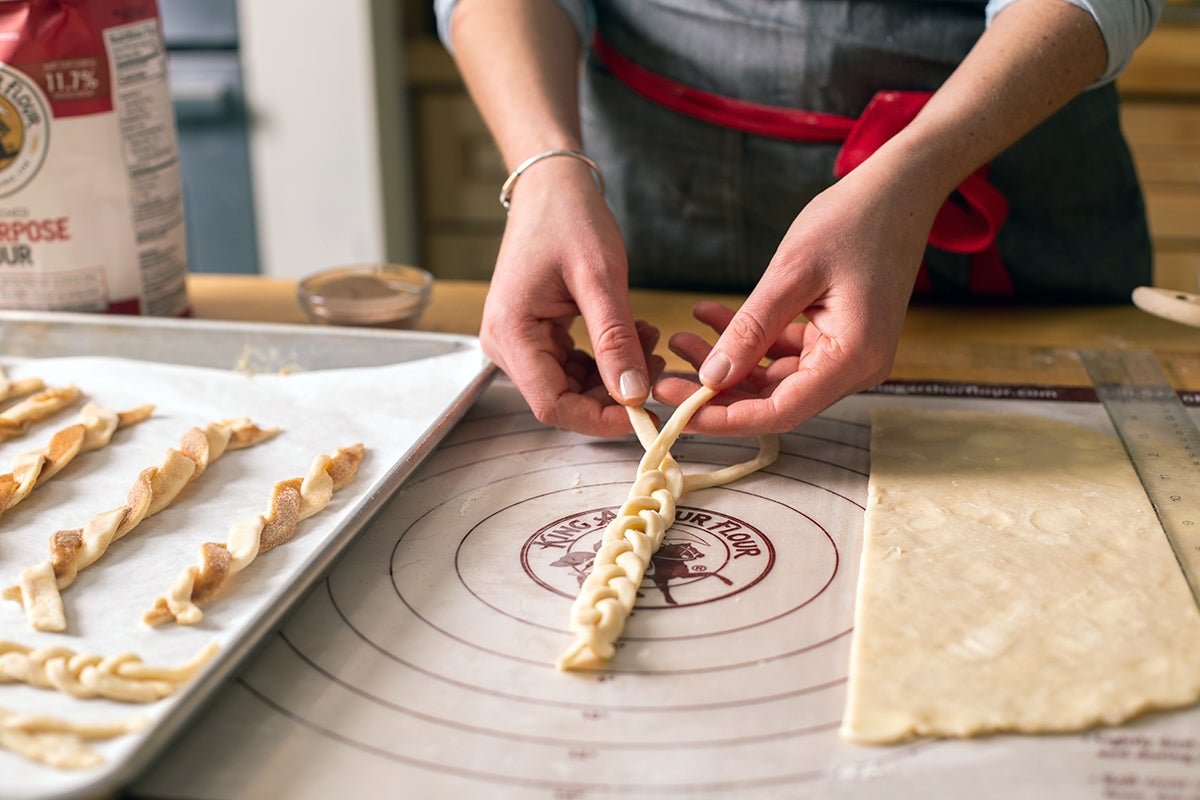
Bake the strips at 375°F until they’re golden brown and then let them cool completely. Arrange the strips on top of your cream pie parallel to each other or arrange them diagonally to one another — your choice.
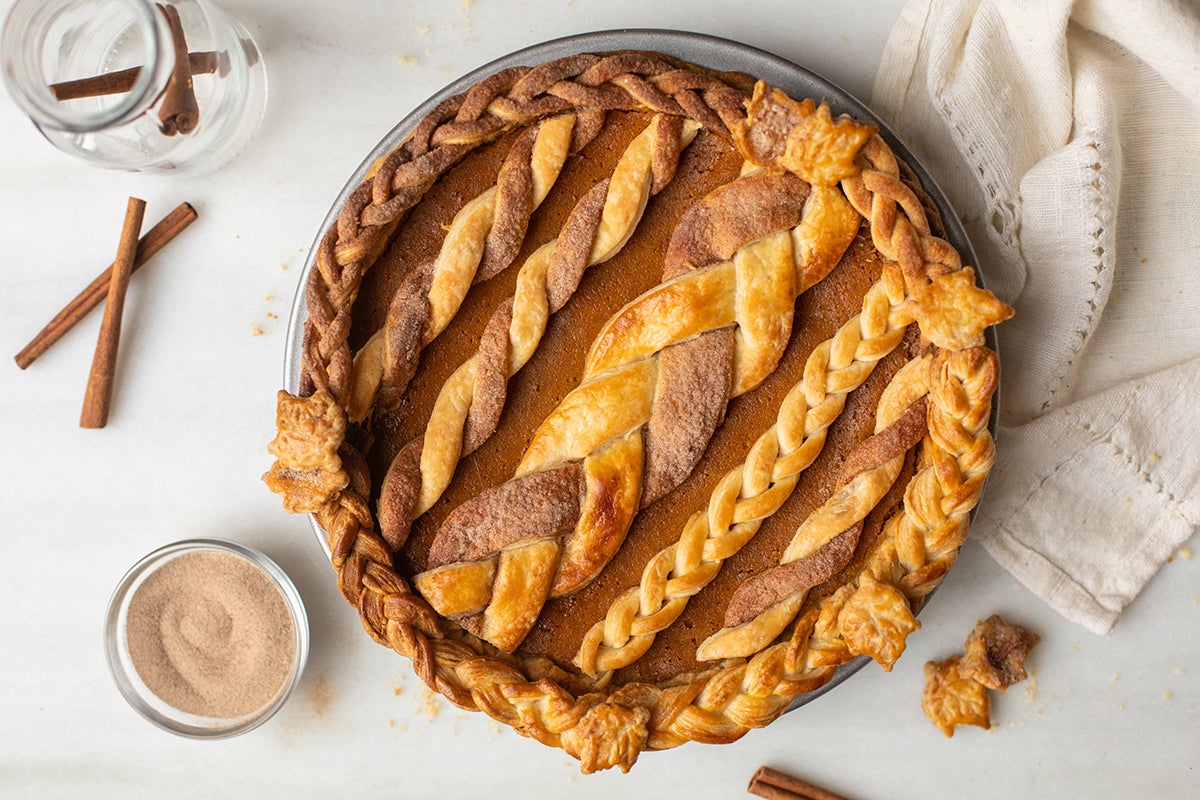
I love pairing this technique with pumpkin pie for a few reasons — first, it can hide any imperfections. If you end up with a crack down the middle, a hole from testing the temperature, or a condensation drip, simply cover it with delicious pie crust.
Plus, the added flavor that comes from the cinnamon-sugar twists is a natural complement to the spices in pumpkin pie.
A crust-topped pumpkin pie will certainly be on my Thanksgiving table this year!

If you want to turn heads, create a stencil for your cream pie. This method does have a hold-your-breath moment, but if you pull it off, you’ll let out a deep sigh of relief and awe once your pie is fully assembled.
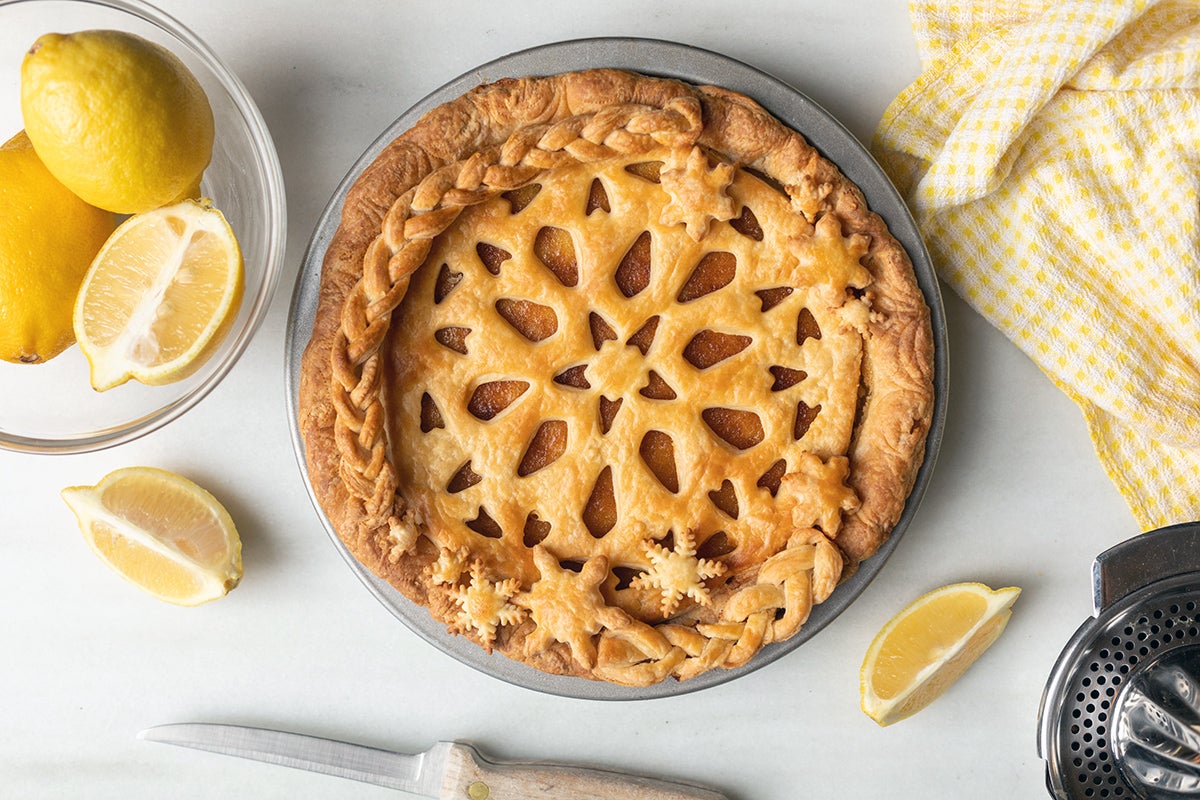
Start by measuring the diameter of your pie pan across the top, from one inside edge to the other. (It's 9” for most standard pie pans.) Roll out the dough so it’s at least this wide, and then cut a circle with the same diameter as your pan. (It’s tempting to flip the pan over onto the dough and use it as a guide, but this will give you a template that’s too large.)
Once you have a circle of dough that’s the right size, move it to a parchment-lined baking sheet.
Using a paring knife or cookie cutters, cut out shapes to make a pretty design. (Use gentle pressure to avoid marking your baking sheet.) Start at the center of the dough and work your way toward the edges if you’re unsure where to begin.
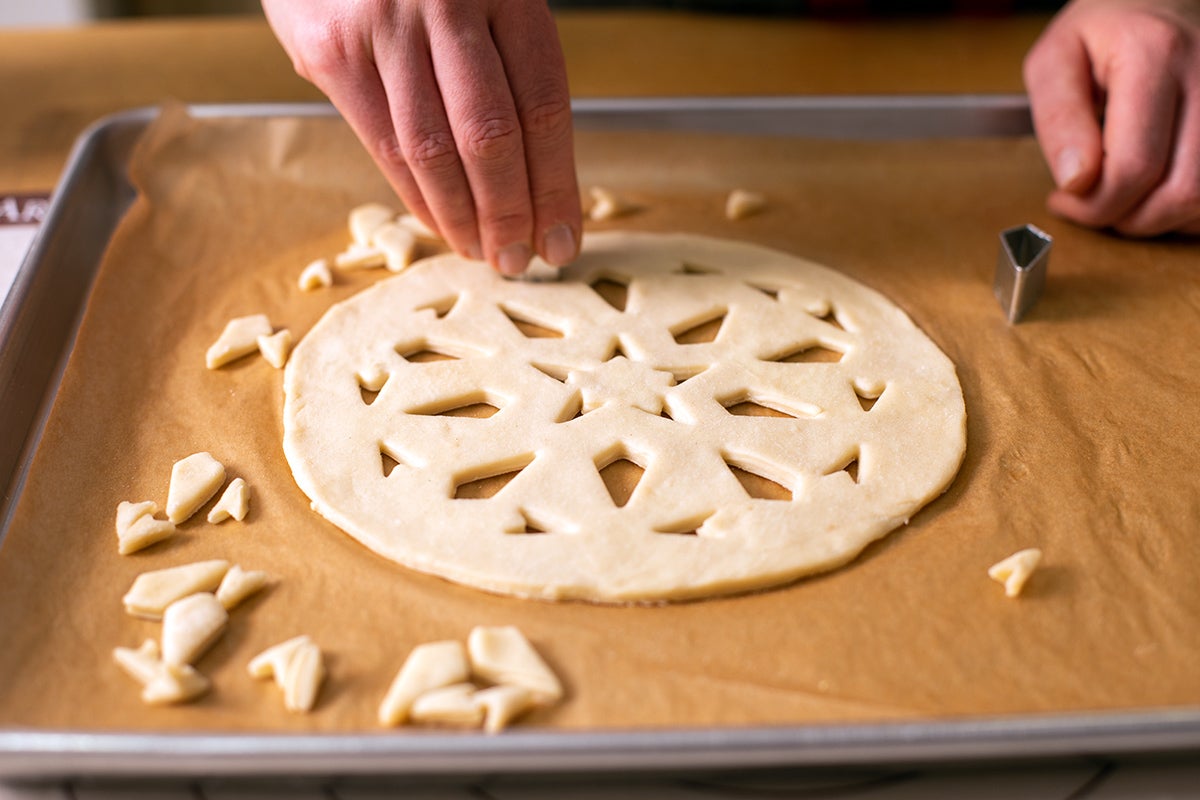
Once you've created the design you want, bake at 375°F for about 20 minutes, or until it’s golden on the top and bottom. (The more shapes you cut out from the dough, the faster it’ll bake through.)
Let both the stencil and pie cool before assembling.
Use a large spatula or the parchment paper to transfer the top crust to your custard pie. Your goal is to fit the stencil within the confines of the top crust; try not to overlap it with the outer edge. (If they’re overlapped, there’ll be a gap of space between the filling and top crust, which makes slicing difficult.)
Don’t trim your stencil with a knife or scissors after it’s baked; it’s likely to crumble and break. To avoid trimming it, err on the side of making your stencil smaller than the diameter of the pan. Pie crust usually shrinks about 1/8” to 1/4" of an inch during baking, so if you start with a stencil that matches the inside diameter, you should be just fine.
Bakers are artists — don’t feel confined to these three techniques when designing the top crust of your cream pie. Use a combination of approaches to make a pie that’s perfect for you.
If you’re making two pies at once, you might consider combining the stencil technique with the pie crust cutout approach — save the shapes that you remove from the first crust, bake them separately, and then arrange on top of a second pie.
Mix and match as you please, you pie artist!
Regardless of the technique you use to give your cream pie a top crust, here are a few things that will make the pie look spectacular:
Check out our freshly revamped Pie Baking Guide for more insider tips. We’ve got you covered each and every step of the way along your pie baking journey, from making pie crust from scratch to assembling and baking your pie. Now, no matter what kind of pie you're making, you can bake a truly beautiful pie that'll have pie crust lovers asking for a second slice.
Let us know how you’re going to make your pies extra-special this year in the comments, below.
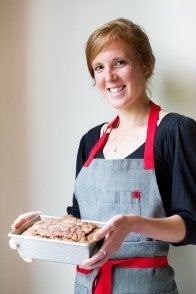
Thanks to Jenn Bakos for taking the photographs for this post.