Vanilla extract is an essential ingredient in baking. Without it, recipes seem flat and muted. Even when vanilla isn't the main attraction in baked goods, it helps elevate other flavors. If you want more control over the flavor and quality of this foundational ingredient, you need to know how to make vanilla extract.
Learning how to make vanilla extract is easier than you think, and you’ll end up with a unique blend that’s perfect for your baking.
You can purchase some amazing vanilla extracts. Find everything from classic Madagascar Bourbon Vanilla, to our own cold-pressed blend of Pure Vanilla Extract, to Vanilla Bean Paste on our website.
While these are all fantastic choices, there’s a handful of reasons why you might want to also learn how to make vanilla extract. If you make your own, you can:
Convinced? We’ll show you how to make vanilla extract!
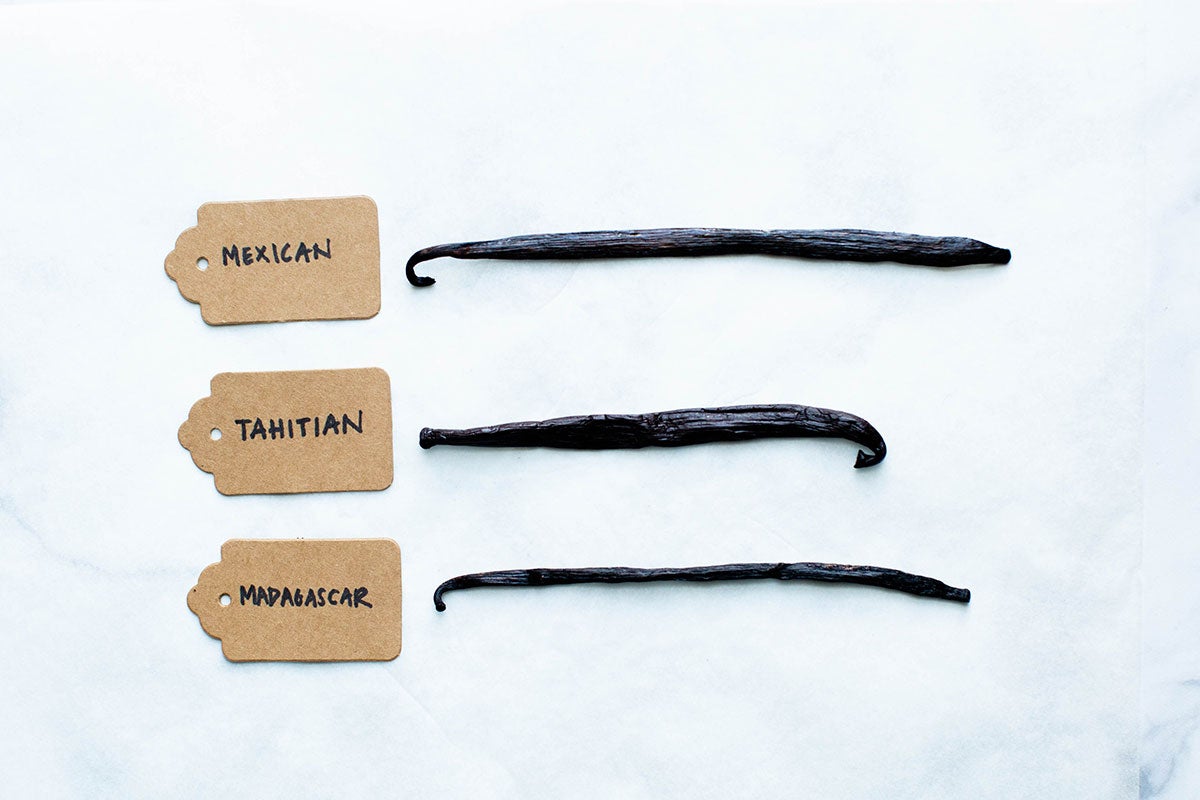
There are dozens of varieties of vanilla beans, all with their own distinctive appearance and flavor. We’re going to focus on three kinds that are readily available to home bakers. (But if you come across something else and you’d like to use it, we encourage you to experiment.)
Here's what you should know about the flavor profile of each kind of bean:
We generally recommend using 1 to 3 beans for every 6 ounces of vanilla extract. If you opt for small 4-ounce bottles, like the ones above, 1 fresh bean (cut into pieces) is typically sufficient.
Use more beans if you want a more robust flavor and a darker-colored extract.
Also opt for 3 vanilla beans for every 6 ounces if the beans you’re using feel slightly stiff or look dry. This means they’re likely more than a few months old. Older beans don’t have quite as much flavor potential as fresh beans, so err on the side of using more in these cases.
Note: To technically be classified as vanilla extract according to FDA standards, a slightly higher proportion of vanilla beans to liquid must be used. When preparing in our home kitchens we prefer the amounts listed here, but please feel free to experiment with the amount of vanilla beans used to your desired preference
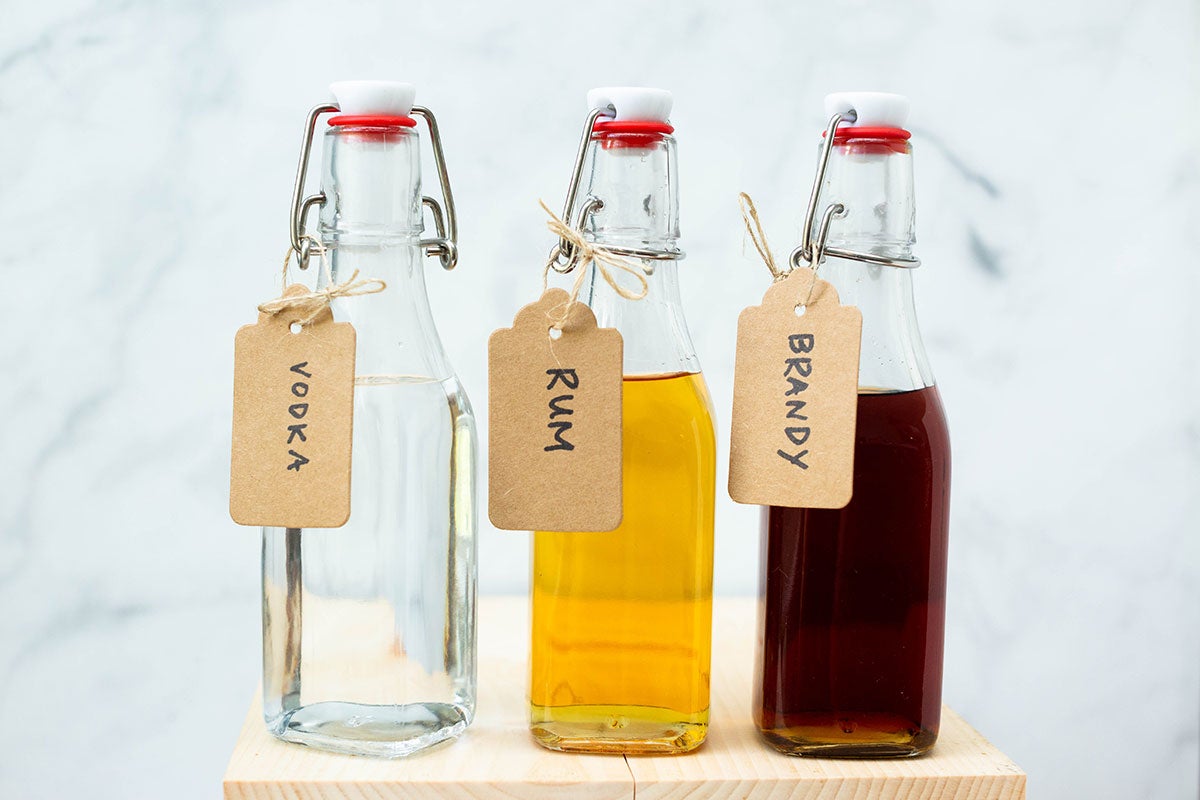
Now it’s time to decide which kind of liquor you’re going to use as a base for your homemade vanilla extract. You can use vodka, brandy, or another neutral-flavored liquor of your choice.
Rum can also be a good option, although you should stay away from spiced varieties. The flavor of the spices can overwhelm the vanilla beans. Same is true for bourbon — its sweet and smoky flavor can be overpowering so it's not often used to make vanilla extract.
(What's the deal with Madagascar Bourbon Vanilla if there's no bourbon involved? It comes from the Bourbon Island of Madagascar. Extracts are often named after the place where the vanilla beans are grown, not the alcohol used to infuse the beans.)
Lastly, avoid flavored liqueur like Grand Marnier — unless you want the flavor (in this case, orange) to come through in your vanilla extract.
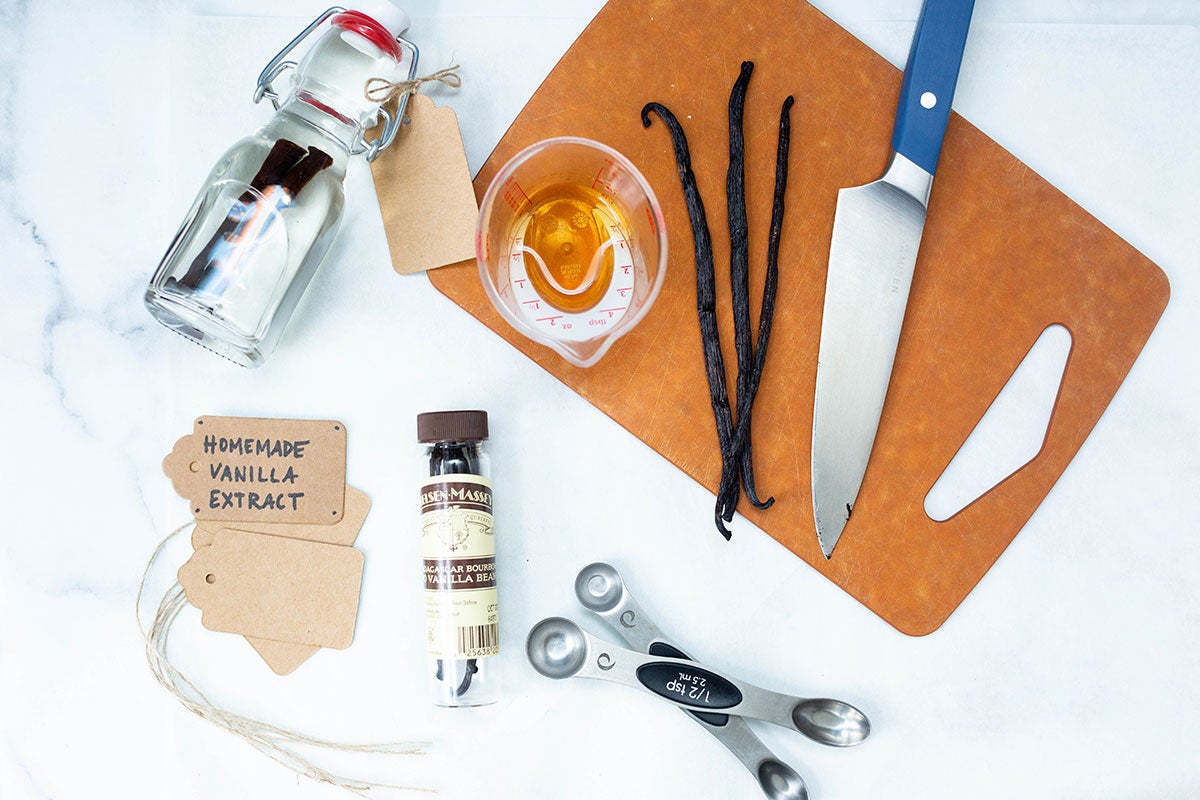
Once you’ve acquired your beans and alcohol, you’re ready to start assembling your vanilla extract. Follow these steps:
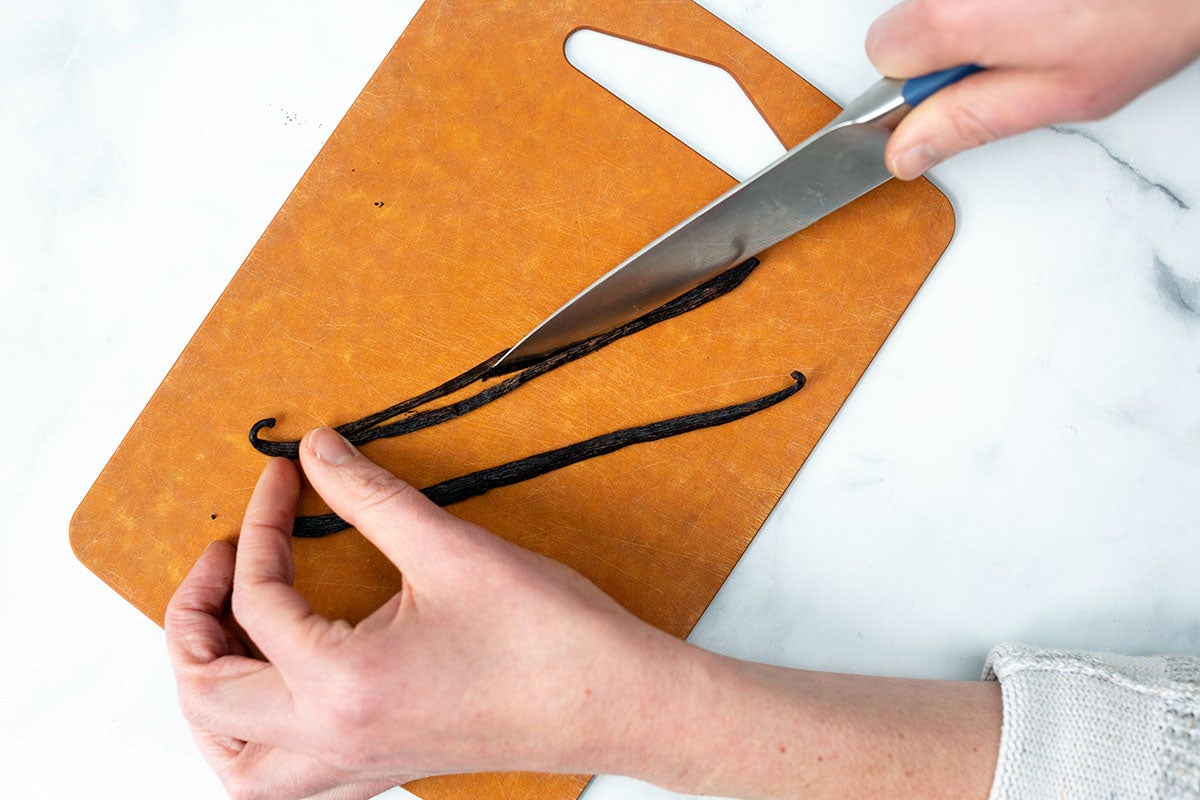
The first step to making vanilla extract is to prep your bean. Use the tip of a sharp knife to cut through the vanilla bean, exposing the tiny seeds inside. (This is sometimes called “vanilla caviar” because it’s the richest, most flavorful part of the bean.)
Leave the vanilla bean attached at the top. This will make it easier to remove later.
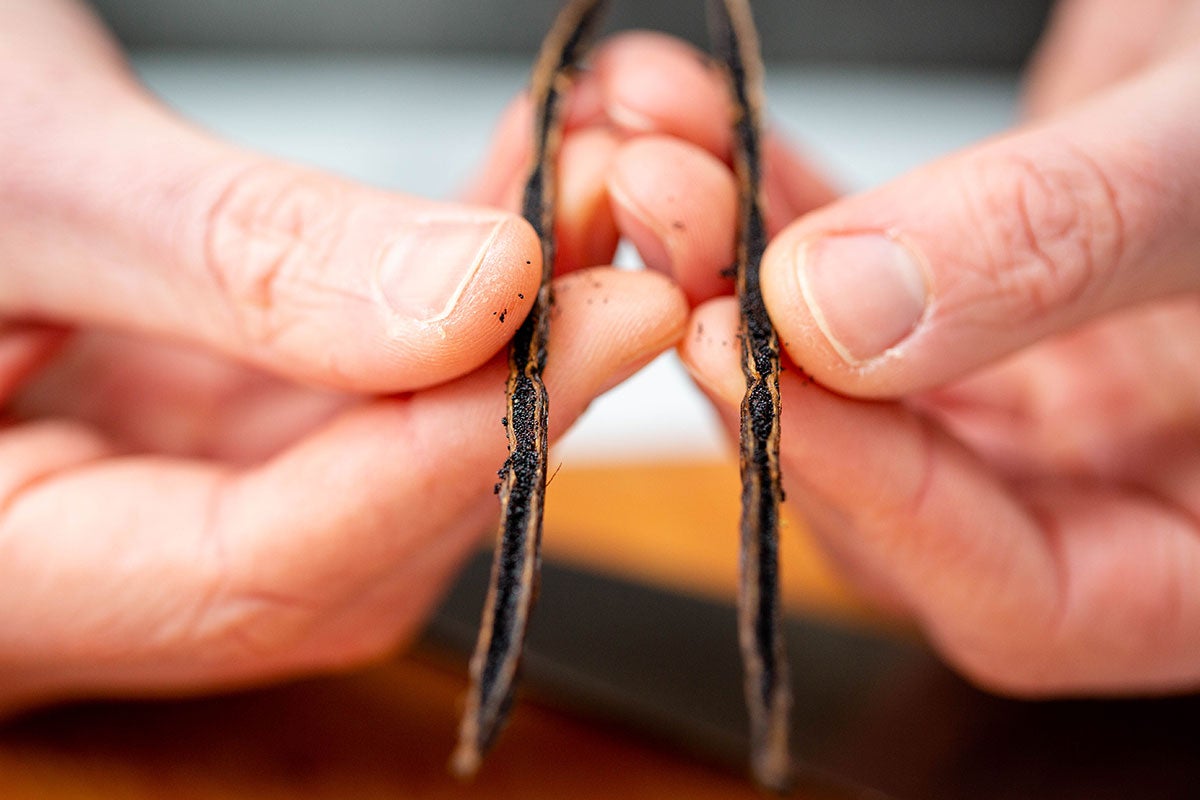
Part of learning how to make vanilla extract includes deciding what you want the final extract to look like. Do you want the extract to contain lots of little vanilla bean specks or not?
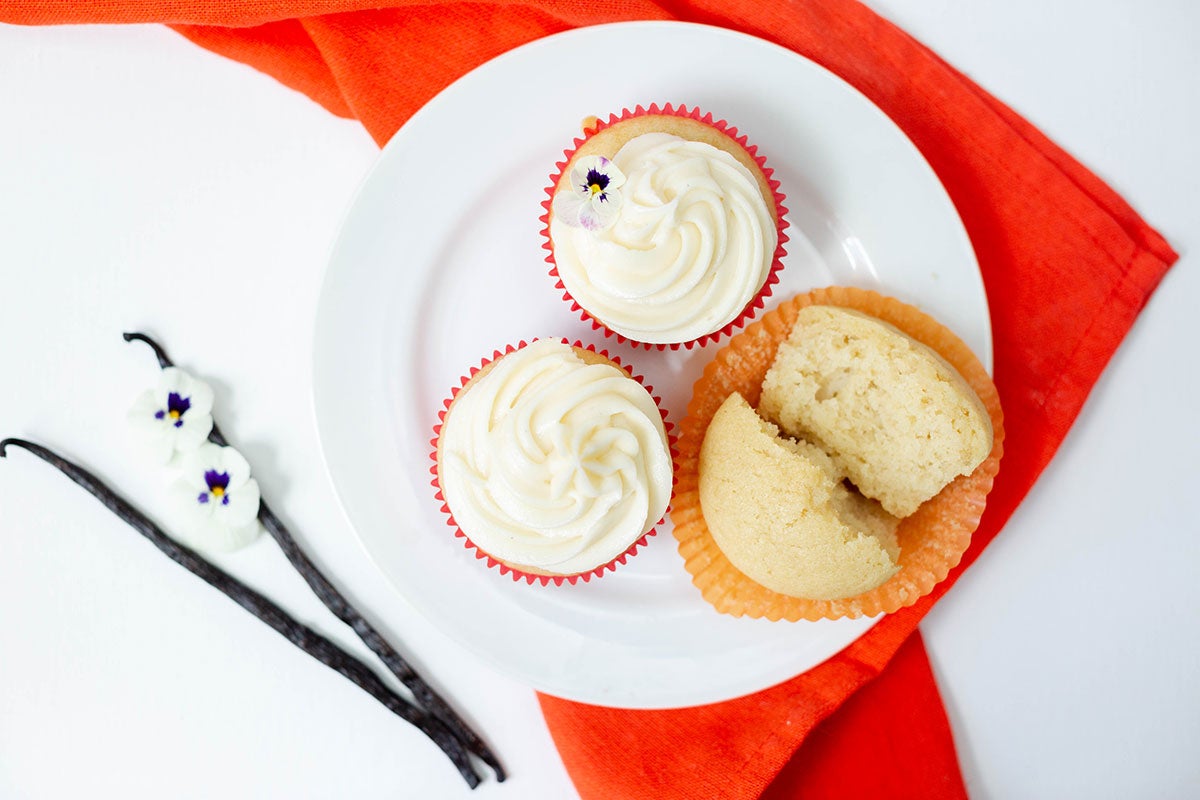
Personally, I love the way baked goods look when there are flecks of real vanilla beans baked right in. (It’s similar to the effect you get when vanilla bean paste is used in recipes.) Their delightful appearance hints at the rich vanilla bean flavor to come.
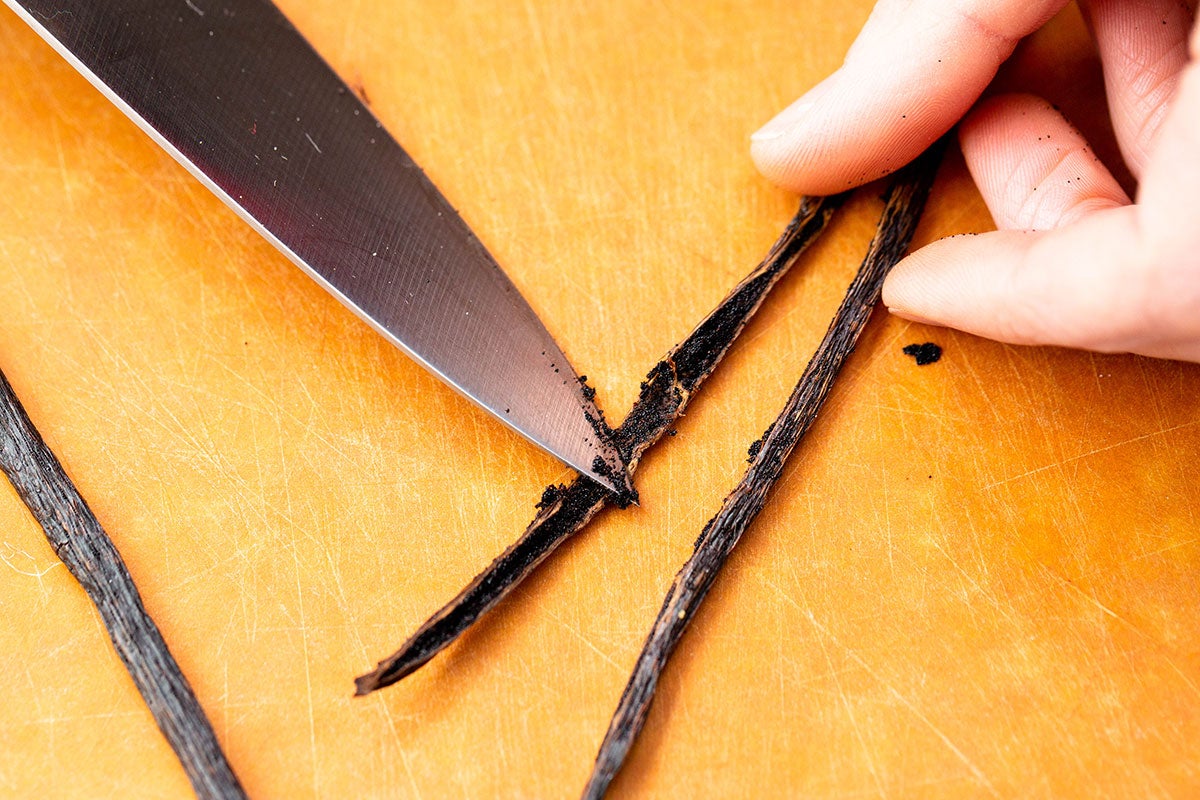
If you’d like to make your vanilla extract look purer, without any flecks, use the sharp edge of a knife to scrape out the tiny seeds after you’ve split the beans lengthwise. (Note that if you remove the seeds, the vanilla extract will take longer to infuse.)
Making vanilla extract is a perfect way to use up seedless beans if you've used the precious vanilla caviar for another use, like Vanilla Bean Ice Cream, Pastry Cream, or Ultra-Vanilla Cupcakes.
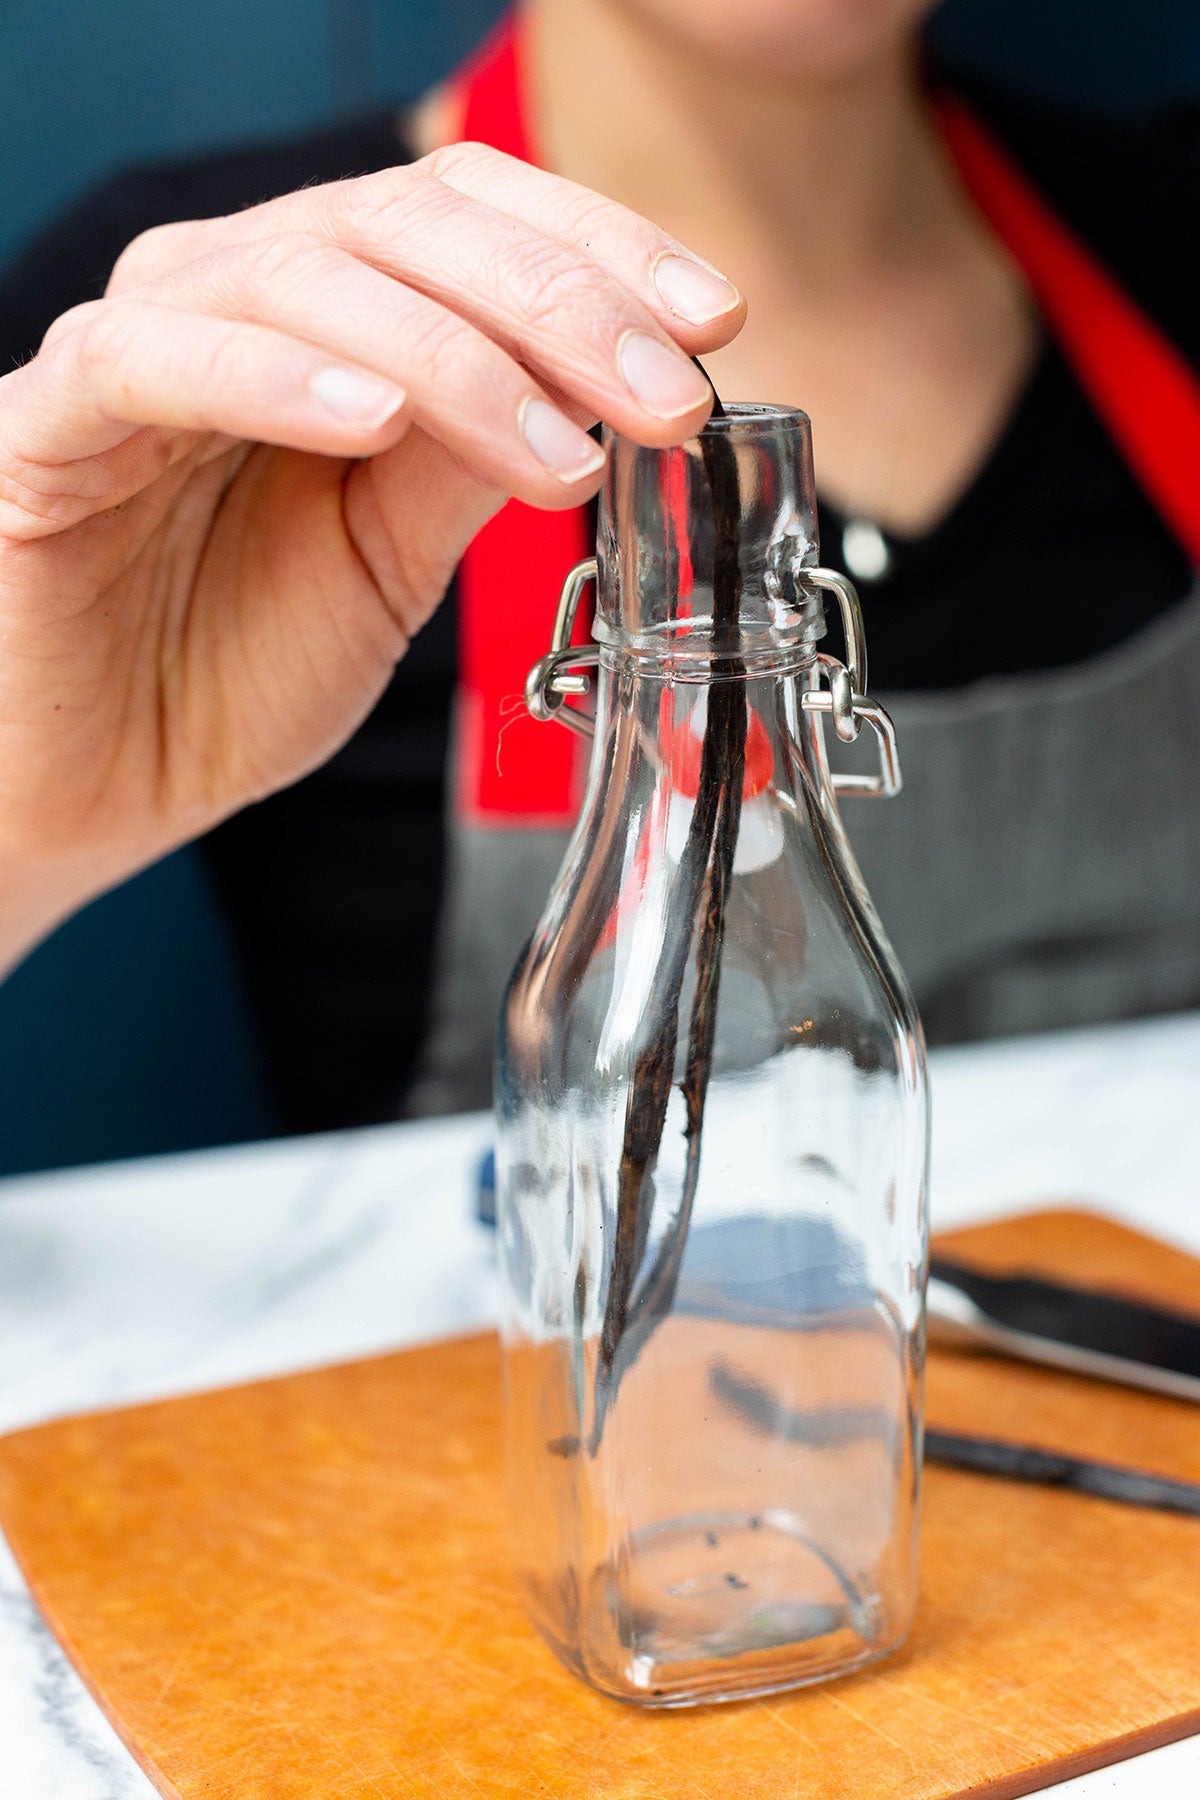
You can use any sized jar; just make sure it has a tight-fitting lid.
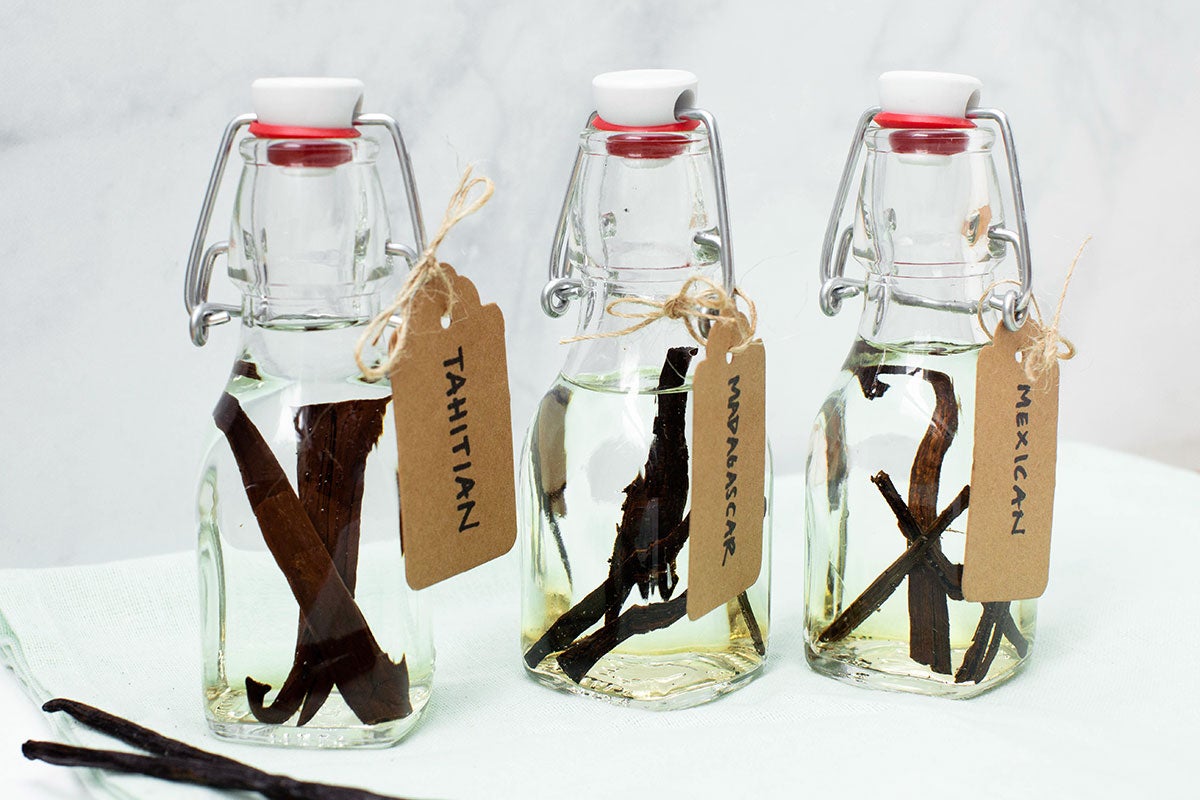
Six ounces of vanilla extract fits well in a large swing-top bottle, like the one above. I’ve also found that recycled maple syrup bottles make fantastic vessels for homemade vanilla extract.
Choose what catches your eye or what you have on hand. This is part of the fun!
Once you’ve cleaned the jar, measure out the alcohol. Pour the alcohol into the containers you’ve selected.
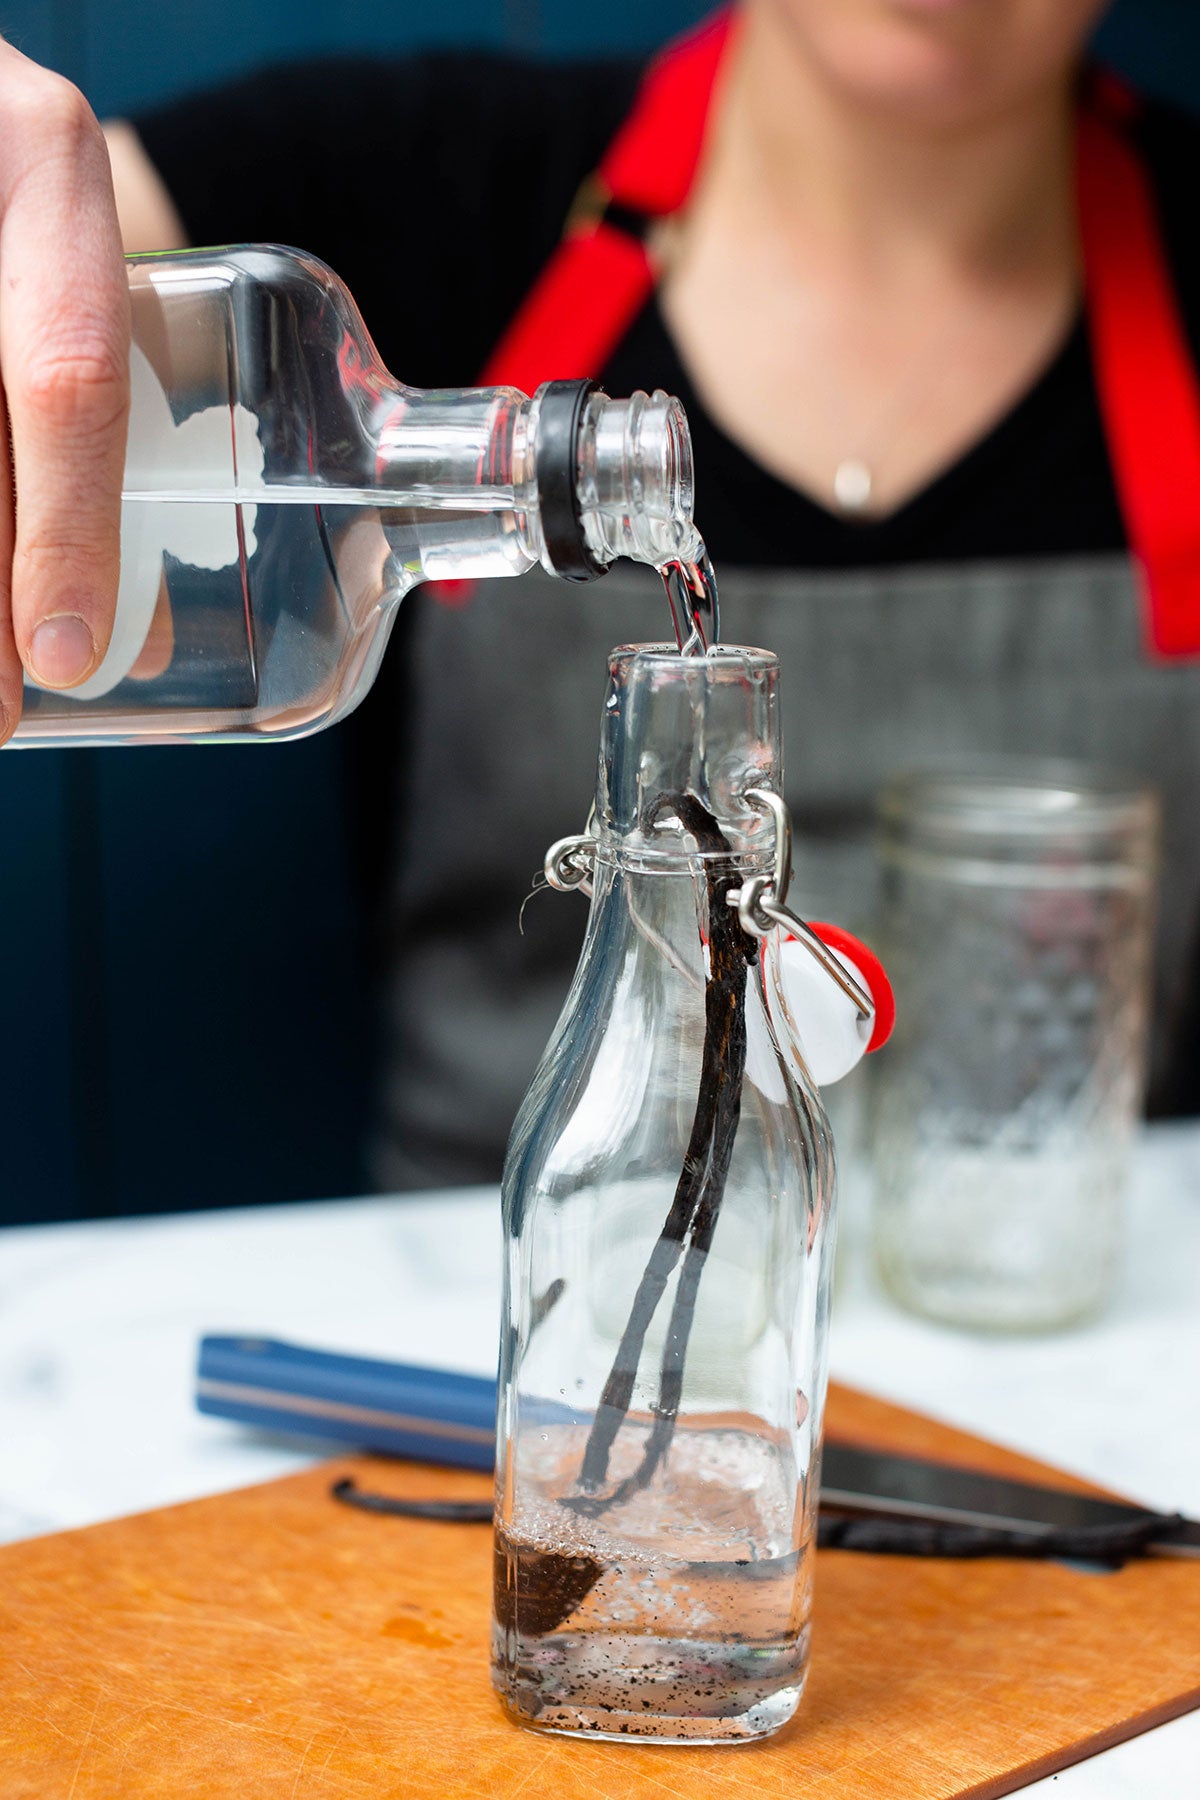
Once the bottle is full of alcohol, make sure the vanilla bean is fully submerged. If any parts of the bean are sticking out, remove the bean, cut it into pieces, and return it to the bottle. Seal the jar with its cap.
Take note of the bean to liquor ratio. This way you’ll know if you should change the number of beans you use to make your next batch.
For example, my perfect ratio is 1 bean to 6 ounces of vodka infused for three months. Finding out what works best for you may take a few batches.
Now comes the hard part: waiting.
Find a safe place for your vanilla extract to rest while the beans infuse the alcohol. It should be dark and relatively cool. The refrigerator is too cold; consider storing your homemade vanilla extract in your basement or someplace outside of the kitchen. (This is often one of the warmest places in the house, especially if you're a frequent baker.)
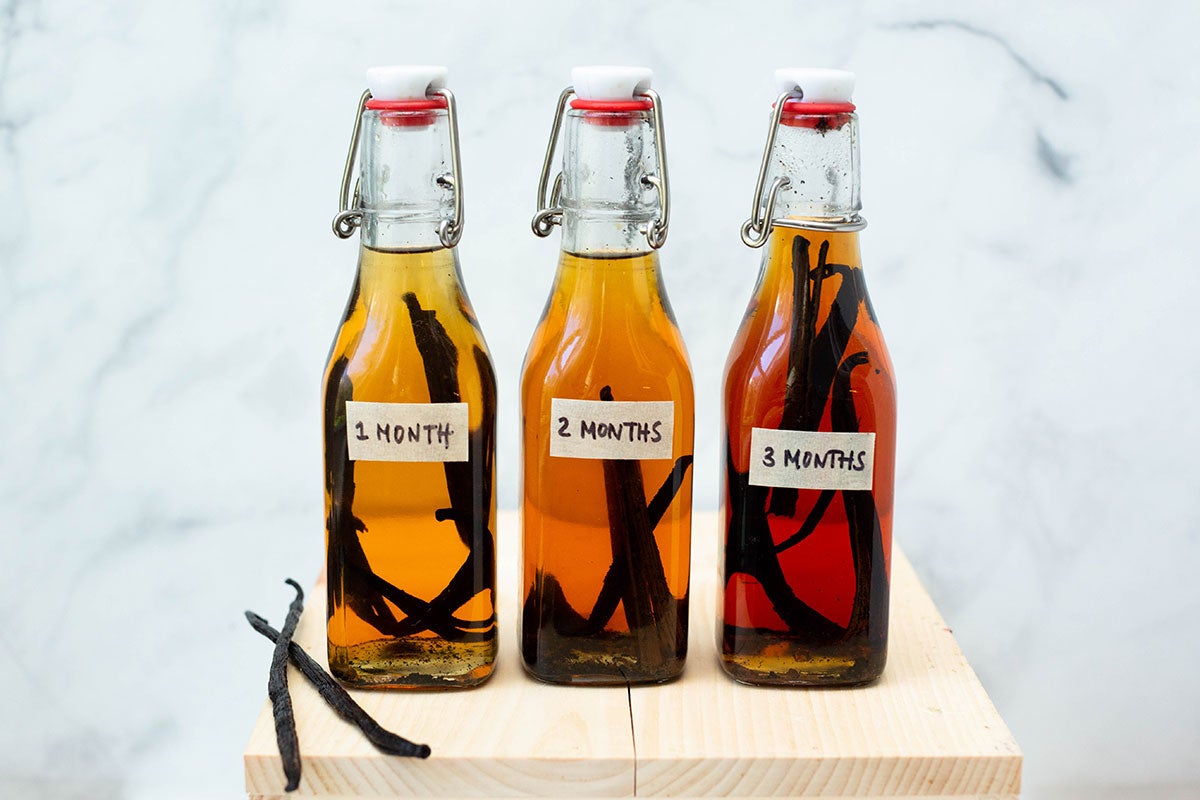
When is your extract done infusing? Extract made from vanilla beans with their seeds can be ready in as little as one month. If the seeds are removed, the extract will need at least three months to infuse.
Bottom line: There’s no exact science to determining when your vanilla extract is ready for baking. Instead, you’ll want to check out the color and smell. Look for these signs:
You can also try baking with your homemade vanilla to see if it's ready for action. If the flavor seems subtle, put your vanilla extract back in its resting place and check it again in a month.
Once you learn how to make vanilla extract and do it a few times, it’ll become easier to tell when it's at its prime.
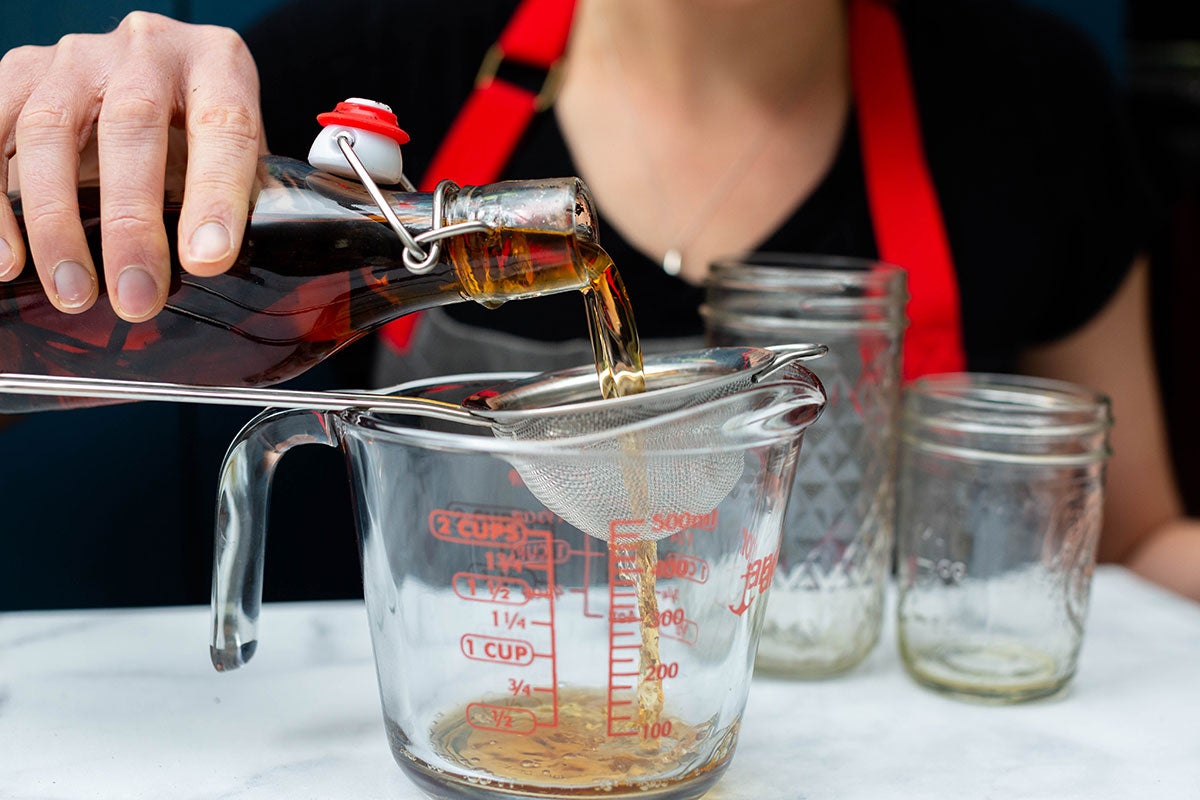
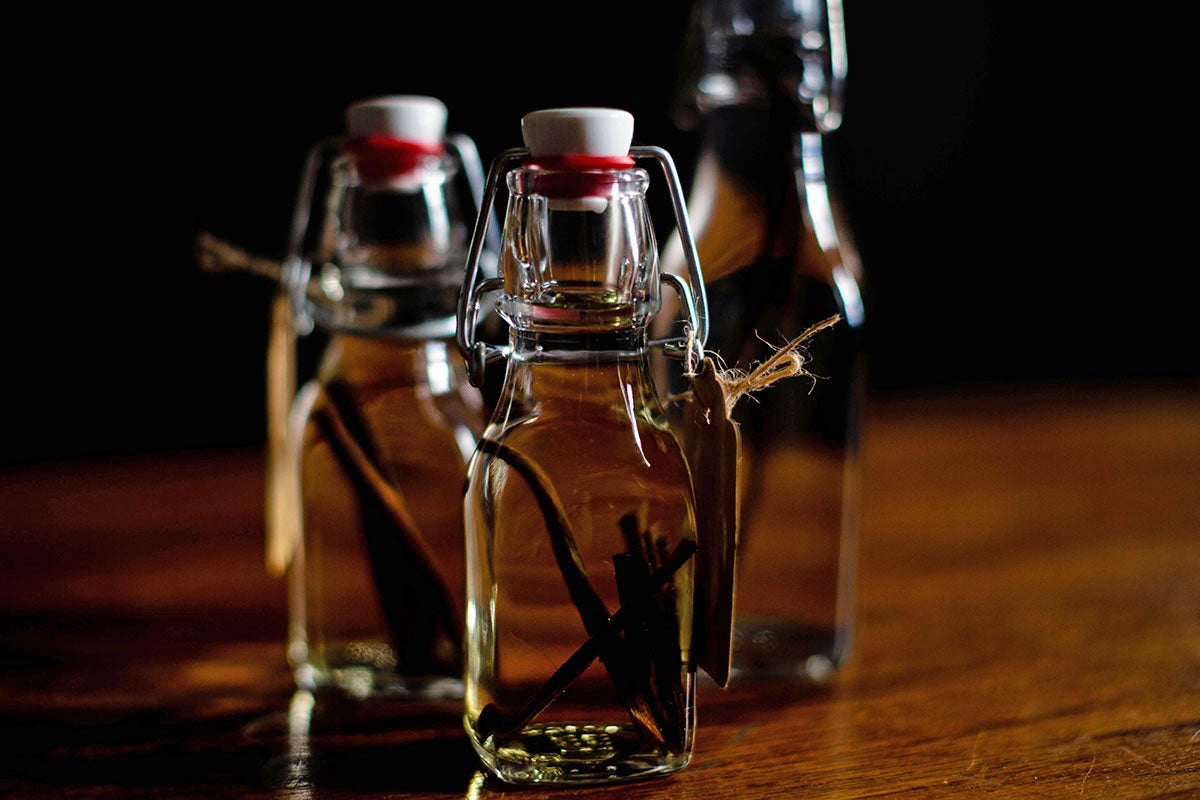
At this point, you’re almost ready to bake or give your homemade vanilla extract away as a gift. You can strain it to remove any bits of the bean that you don't want floating around in the jar.
If you’ve purposefully included the vanilla seeds in the hopes of creating a vanilla bean-flecked look, either skip the straining or use a relatively wide-meshed strainer. This will filter out any of the outer parts of the bean that have broken off, while still allowing the seeds to stream through.
If you'd like to skip straining altogether, you can simply remove the bean from the jar.
Don’t toss out that precious vanilla bean, though! Dry it off and save it for when you’re ready to make vanilla sugar, another enticing vanilla product you can make at home. We’ll show you how to make vanilla sugar (and other infused sugars) in an upcoming blog post.
The good news is that not much can go wrong when making homemade vanilla extract.
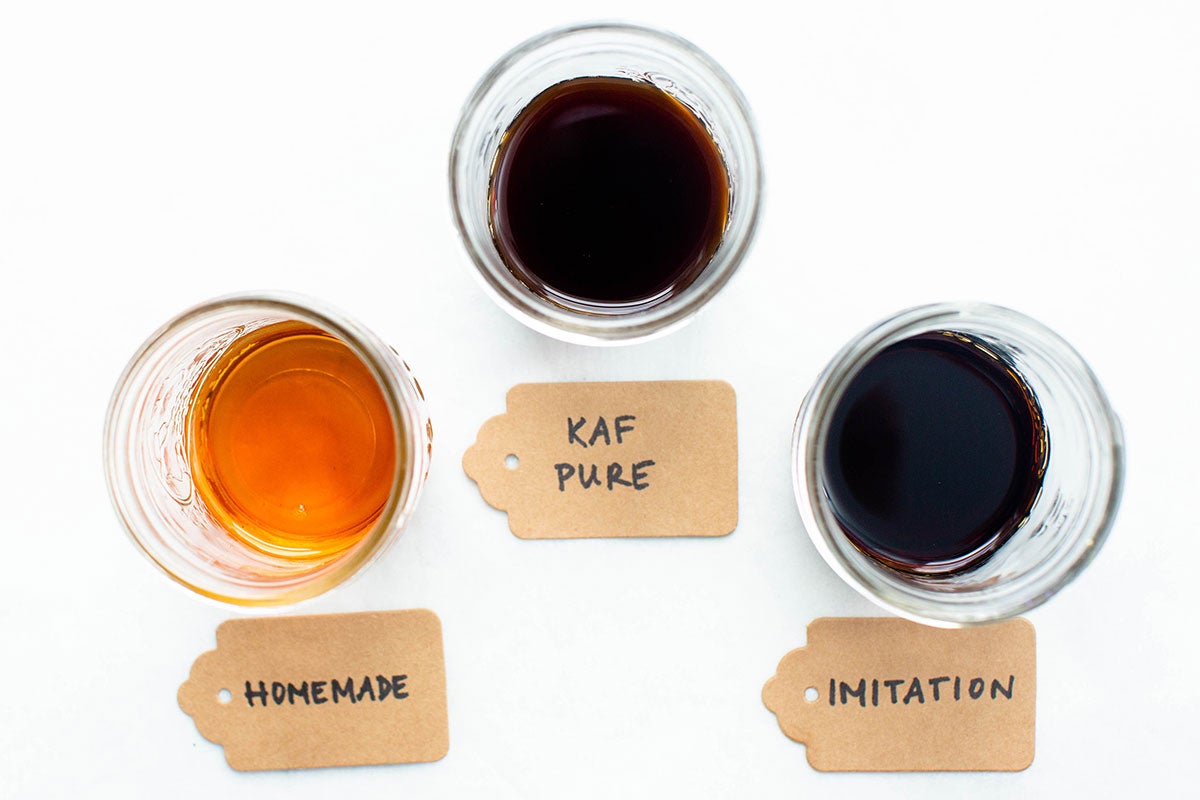
Sometimes bakers fret that their vanilla extract is lighter than store-bought varieties even after they’ve let it infuse for the proper amount of time.
Don’t worry; it’s common for homemade vanilla extract to be lighter and more transparent than what you might find in the store, especially if you’re used to imitation vanilla extract (gasp!).
Oftentimes homemade vanilla extract is just as flavorful (if not more!) than store-bought, even if the color isn’t as deep. Don’t let this deter you. Give it a try in your baking and see what you think!
Also, don’t worry if your vanilla beans develop a thin coating of whitish “fur.” It’s not mold — it’s simply some of the sugar in the bean that’s begun to crystallize. It won’t change the flavor or degrade your extract in any way.
On the contrary, it’s actually a sign that the beans are fresh and full of natural sugars. Applaud yourself for choosing a good source of vanilla beans if you see sugar starting to crystallize.
If you forget about your vanilla extract for many months (12 or more) while it's infusing, the vanilla bean will start to break down. This is easily remedied by straining the extract before using with a fine-meshed strainer.
Your extra-aged vanilla won't have an overwhelming taste — vanilla extract reaches a peak when all the flavor is extracted. After about six months, there's usually very little change in the strength of the extract, even if the bean is still in the bottle.
Once you've removed the vanilla bean, there's no rush to use your vanilla extract. If it's stored in a cool, dark place (again, not the fridge but a cabinet away from the oven), it will usually retain its flavor for at least a year. After that, it's still perfectly fine to use but you may want to add slightly more than recipes call for to make up for the slowly weakening flavor.
We think you'll be so excited to use your homemade vanilla extract, it won't be around for long!

Learning how to make vanilla extract is an enjoyable, fruitful journey. You’ll explore vanilla varieties, and discover the right alcohol to use based on your flavor preferences.
It'll also be an exercise in patience while you wait for the vanilla bean to infuse the liquor. But at the end of the process, you’ll magically be left with an aromatic extract. Give it away to the bakers in your life, and watch their faces light up. Plus keep some homemade vanilla extract for yourself!
Check out our favorite vanilla recipes and watch how your homemade vanilla extract shines through.
What other ingredients do you want to learn how to make at home? Brown sugar? Cake flour? Yogurt? Baking powder? Let us know in the comments, below.
Thanks to Anne Mientka for taking the photographs for this post.