


"Why didn't my bread rise?"
Here at King Arthur Flour, we field hundreds of questions each week from people all over the world. A steady stream of puzzled, challenged, and sometimes frustrated bakers call our telephone baker's hotline, access our online chat, email us (customercare@kingarthurflour.com), and connect with us via social media and our blog – all with problems that need solving.
Most common question? Anything to do with sourdough. Feeding it ("Why do I have to throw some away? Seems wasteful...); baking with it ("How can I make my bread taste more sour?"), and resuscitating it ("Help, I think I killed my starter!").
Most common area of concern? Yeast baking. And beyond sourdough, the most frequently asked question is this:
"Why didn't my bread rise?"
Talk about loaded...
There are soooo many reasons for bread rising poorly, it's impossible to address every one of them here. But let's just look at a few of the more common causes.
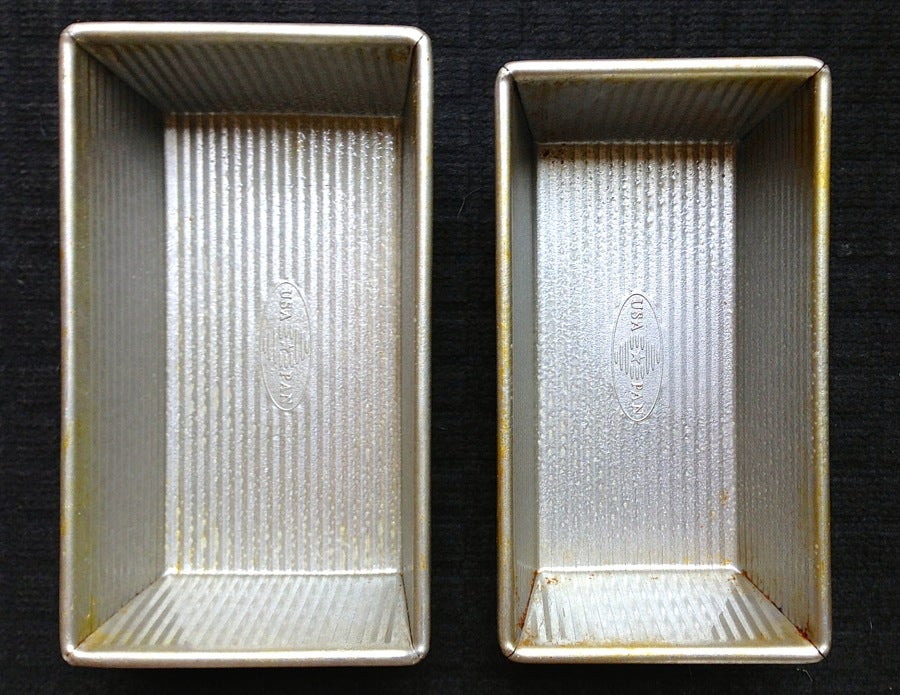
See these two pans? The one on the left is a 9" x 5" loaf pan, most commonly used for "quick" breads: batter breads that rely on baking powder or baking soda for leavening. Think banana bread, zucchini, pumpkin... you get the picture.
The loaf pan on the right measures 8 1/2" x 4 1/2". It's most commonly used for yeast breads. Think sandwich loaves.
So, what's a mere 1/2" difference among friends, right?
Believe it or not, that 9" x 5" pan has a 30% greater capacity than the 8 1/2" x 4 1/2" pan.
So what happens when your sandwich bread recipe calls for an 8 1/2" x 4 1/2" pan, and you decide, "Ah, the 9" x 5" is close enough"?
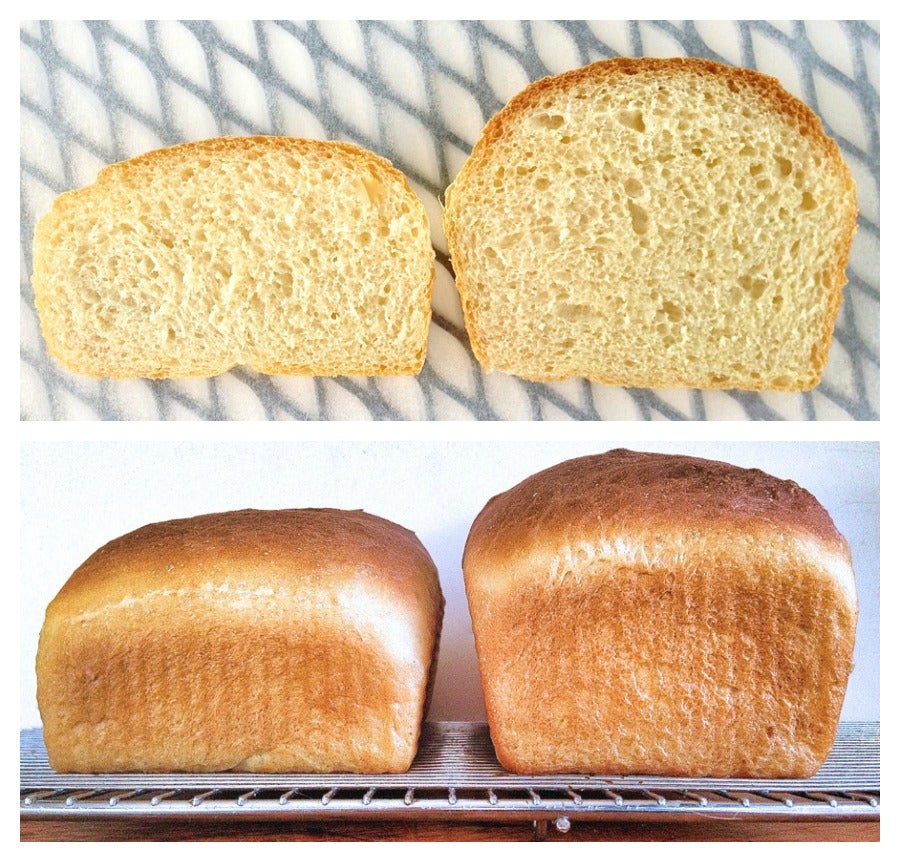
Same recipe; same rise; same oven; same everything – except the pan.
That's a 9" x 5" loaf on the left; an 8 1/2" x 4 1/2" loaf on the right. Both rose just fine; it's simply that the loaf on the left rose sideways, rather than up.
Lesson learned: when the recipe calls for an 8 1/2" x 4 1/2" pan, use it.
And what if your recipe simply calls for a "loaf pan," without specifying size?
The basic rule is, if the recipe uses 3 cups of flour, choose the smaller pan. If it uses 4 cups of flour, choose the larger pan. For any amount in between 3 and 4 cups, use either pan – understanding that you'll get a taller (though possibly mushroom-shaped) loaf in the smaller pan.
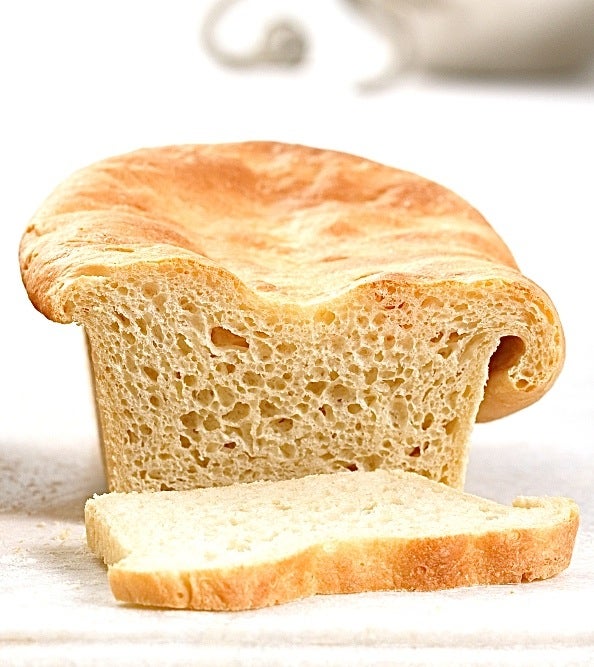
My fellow blogger MaryJane recently posted a great guide on determining when your rising loaf has reached its optimal level (which is NOT "as high as possible"), and is ready to go into the oven. Read The Bread Also Rises for some nifty tips.
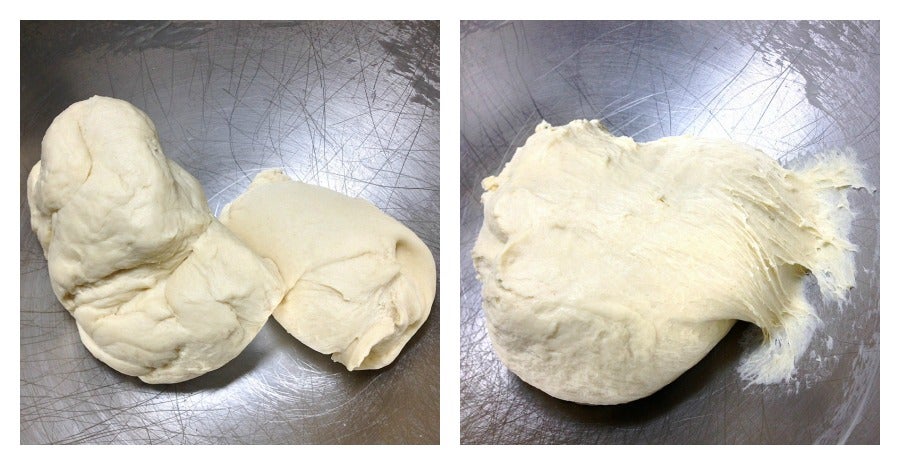
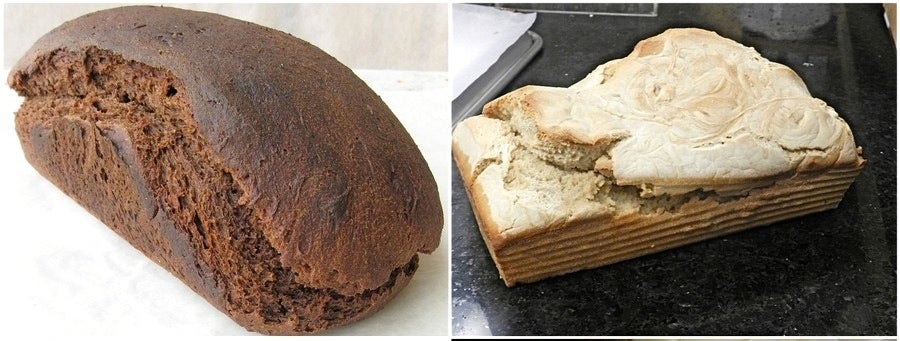
See that dough on the left? Here in the King Arthur Flour test kitchen, we'd call that dough "gnarly." It's fairly soft, and doesn't feel particularly dry, but during kneading it doesn't come together in a ball. Instead, it twists and turns itself into a bunch of separate pieces that keep slapping against one another; it's gnarly.
See that dough on the right? It's soft, but not overly sticky; e.g., it doesn't cling to your hands when you pick it up. Instead, it just barely "kisses" the side of the bowl, if you're kneading in a stand mixer. If you're kneading by hand, it will stick to your kneading surface in a "tacky" way, rather than viscously, like glue.
This degree of stickiness shows that the dough's flour/liquid balance is right on.
So does it really matter that much?
Sure does. A loaf made with too much flour (or not enough liquid – same thing) will be dry, dense, and heavy. Yeast is happiest in a moist environment, feeding happily when it's got enough to drink. Likewise, gluten (the network of protein strands that allows your loaf to expand and hold its shape) stretches more readily when there's more liquid present.
Think of trying to blow bubbles out of thick, viscous soap. Now think of the ultra-thin soap/water you dip your wand in to make those backyard bubbles. Get the picture?
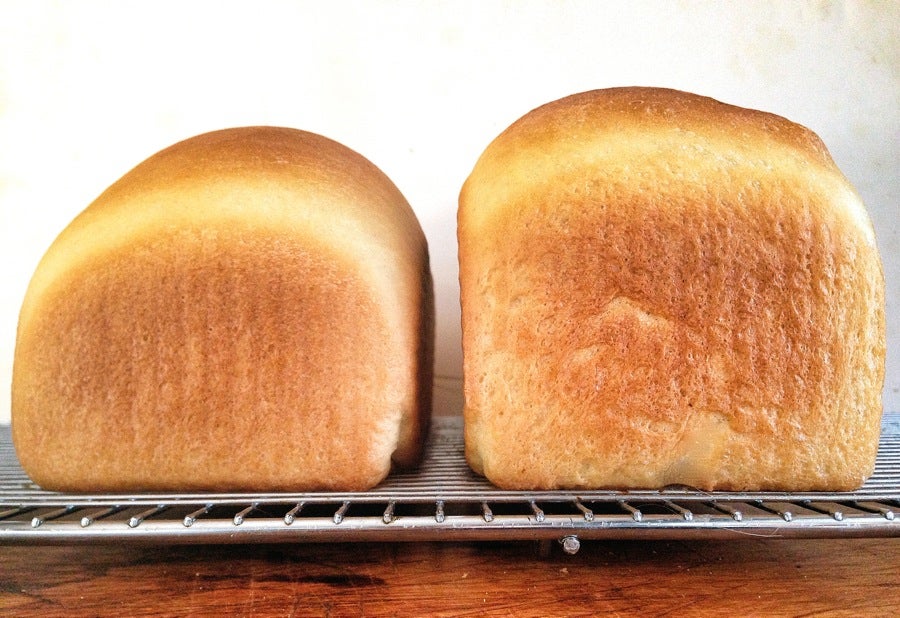
Two loaves. Same recipe, same pan, same rise time, same oven, same bake time.
The loaf on the left was made with 2 tablespoons less water than the loaf on the right. That translates to a 12% difference.
Not a lot, right? But look not only at the rise, but the shape. You can see that the loaf on the left struggled to rise, crowning only at the top, while the sides sluggishly resisted. The loaf on the right rose more evenly, side to side.
Takeaway: yes, measuring your ingredients carefully is important (which is why I always use a scale).
Also, if you're kneading dough by hand, resist the urge to add more flour as you knead; if the dough is perfectly balanced (flour/liquid) to begin with, every extra tablespoon of flour you throw down on your kneading surface and pick up with your dough is upsetting that balance.
Hint: Knead on a lightly greased surface, rather than one that's floured. A silicone kneading mat is very handy.
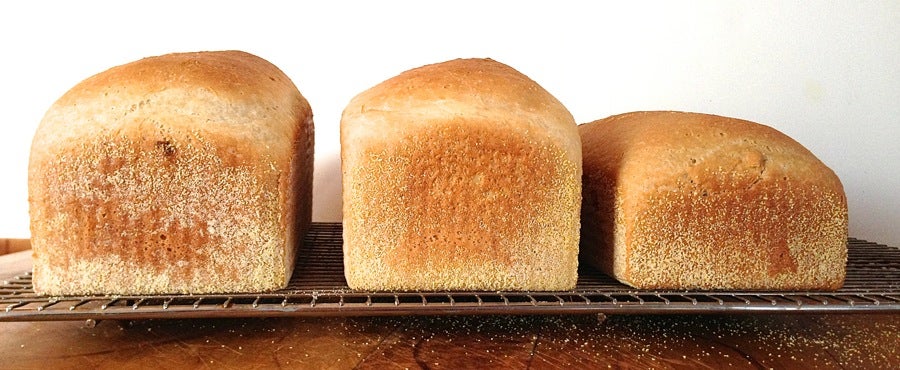
Loaves, left to right: 100% all-purpose flour; 50% all purpose/50% whole wheat; 100% whole wheat flour.
Look at the difference between the white flour loaf on the left, and the whole wheat loaf on the right. Pretty significant, eh?
Don't get me wrong; it's possible to make a lovely, high-rising 100% whole wheat loaf. But you need to follow a recipe written for especially for whole wheat flour.
Many of you love to take a favorite yeast bread recipe and make it more nutritious by adding whole wheat (or rye, or oats, or bran, or...) That's fine; but those flours and grains don't provide the stretchy network of gluten all-purpose flour does, and thus these whole grain loaves won't rise as well.
Still, adding whole wheat to a favorite white bread recipe is a laudable goal, health-wise. Want to learn more about converting your favorite yeast recipes from white flour to whole wheat? Read Yeast Bread: From White to Wheat, a Baker's Guide.
A little thing like that can make a difference? You bet.
Maestro, the metaphor, please!
Think about blowing up a balloon. Usually it's pretty easy, right?
But what would happen if you painted that balloon with a thick layer of hard-drying paint, and then tried to blow it up?
You'd huff, and you'd puff, and... well, you wouldn't blow the balloon up very easily, would you? You'd have to crack that layer of paint first.
Same with yeast bread. If its top surface has dried out and hardened while rising, it'll struggle in the oven.
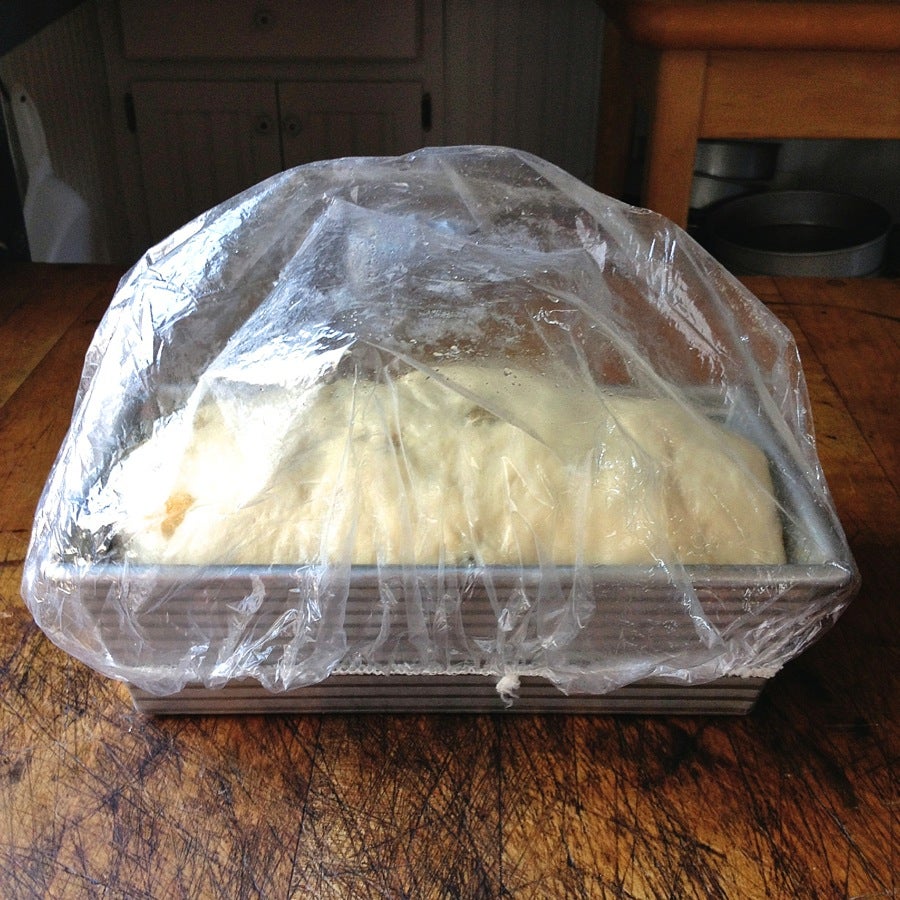
Covering your rising loaf with a dish towel protects it from dust and flying insects, it's true; but it doesn't keep it moist. Plastic wrap keeps it moist – but it can stick, too, even when it's greased. How many of you have tried to remove sticky plastic from your risen loaf, only to see it tear and deflate? I sure have.
The solution? An inexpensive shower cap (pictured above).
Use a clear plastic cap, if you can; you get a better view of what's going on inside. The elastic keeps the cap firmly anchored to the pan, while the plastic on top "poofs" nicely, sheltering your rising loaf without actually touching it.
Where do you find these clear shower caps? Well, every time one of my co-workers goes on a trip, I ask him or her to bring me back a souvenir: a shower cap from the motel room.
Don't have any traveling pals? The dollar store usually stocks packs of these inexpensive caps.
OK, I know I've covered the promised five reasons for low-rising bread, but here's a bonus I can't resist, one of the most common reasons for poorly risen bread –
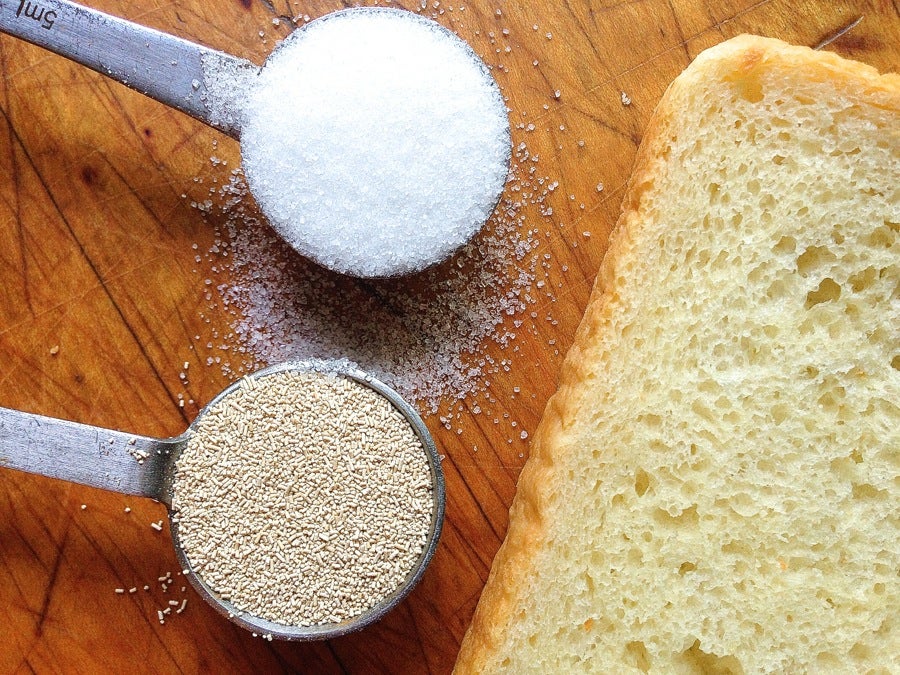
Any loaf where the weight of the sugar is 10% or more of the flour weight* is going to rise sloooowly. Add too much sugar, and your bread will stop rising entirely.
*Example: Make a loaf with 3 cups (12 3/4 ounces) flour and 1/4 cup (1 3/4 ounces) granulated sugar, and the weight of the sugar will be 14% (1 3/4 divided by 12 3/4) of the weight of the flour.
Why the problem? It's that liquid balance again. Sugar is hygroscopic; it absorbs as much liquid as it can. The result? Thirsty yeast is left high and dry, and simply goes dormant.
The solution? "Osmotolerant" yeast, a type developed especially for high-sugar doughs, e.g., SAF Gold. This yeast is like a camel; it simply doesn't need as much water as normal yeast, and thus performs better under dry (read: high-sugar) conditions.
Well, class, have you learned something today? I hope so. Our goal here at King Arthur Flour is to teach the world to bake – and share. We're happy to do both regularly, here in our blog.
Happy baking!
For additional bread tips and troubleshooting, check out even more of our yeast bread blog posts.
