In our earlier blog post on Desired Dough Temperature, we introduced a formula that professional bread bakers use to achieve consistently great results.
We learned that aiming for a desired dough temperature (DDT) in the 75-78°F range will lead to the best flavor and rise in wheat-based yeast breads.
The DDT formula takes into account the principal factors that affect dough temperature — room, flour, preferment (if any), and the friction factor — in order to calculate the one factor the baker can easily adjust: water temperature.
The DDT formula is easy — all it takes is plugging in a few temperature readings, and doing a little multiplication and subtraction.
Even if you avoid math like the plague, I encourage you to give it a try. You'll be amazed at how much more predictable and consistent your bread baking becomes!
However, there remains one piece of the DDT formula that we didn’t tackle in our previous blog post. What about that pesky friction factor?
While it's easy enough to check your thermostat or stick a thermometer into your ingredients, determining the friction factor isn't quite so straightforward.
The friction factor (FF) in baking represents the amount of heat transferred to bread dough during mixing and kneading.
Friction can raise the temperature of your dough significantly, so it needs to be taken into account when making dough-temperature calculations.
The tricky part is that the friction factor can change considerably from one mix to the next. This is because so many variables go into mixing and kneading bread dough. Factors like the type of mixer, duration and speed of mixing, and the quantity of dough in the bowl all impact the amount of heat generated.
This can throw unwanted uncertainty into the whole DDT formula. After all, we need a fairly accurate predetermined friction factor in order to calculate the correct water temperature.
Unfortunately, I can’t give you a magical friction factor that will be accurate each and every time you make bread. I can, however, offer some tips on using estimated figures, and also show you how to determine the friction factor for yourself.
This is where I recommend you stop and consider how much of a bread geek you are.
Many bakers will be perfectly happy to stick with the friction factor figures I offered in my earlier blog post, and delve no further.
Here are those figures:
And here are a few comparison figures:
In his book Bread, Jeffrey Hamelman suggests a friction factor of 24-28°F for most mixers (mixing for 3 minutes on speed 1, and 4 minutes on speed 2).

For hand kneading many bakers go with a friction factor in the 0-4°F range. I do have warm hands and tend to knead quite vigorously, which may explain my higher hand kneading figures.
Given the inherent variability of the friction factor, it makes perfect sense to work with an educated guess. In most cases this will get you close enough to your desired dough temperature, with no further ciphering required.
While these figures will work just fine when using a similar kneading process, they won't be reliable if you change the duration or speed of the mix, or use a different type of machine — like a bread machine or food processor.
This is all the more reason to continue reading so that you can learn to determine the friction factor for yourself.
That being said, bread machines aren't really set up for use with the DDT formula. This is because they not only create friction, but also intentionally add warmth to the dough production process. Unless you're willing to eliminate the preheat cycle and use your bread machine only for mixing and kneading your dough, it doesn't make much sense to worry about the friction factor when using a bread machine.
If you’re a bread geek like me, you’re probably curious about how to go about determining the friction factor for yourself. Maybe you just want to know how it all works, or want to be as precise as possible when it comes to your bread-baking routine.
If this sounds interesting to you, read on, fellow bread geeks!
You basically have two options for determining the friction factor.
The first option is to adopt an estimated friction factor, and then "tweak" it for your particular mixing and kneading method.
A more precise option for determining the friction factor involves using the DDT formula with a chosen water temperature. In this case, the friction factor becomes the unknown variable.
At this point, even the most diehard bread geeks among you may be wondering how on earth to incorporate such calculations into your baking routine.
Let me show you how I use the DDT formula and the friction factor when I make baguettes.
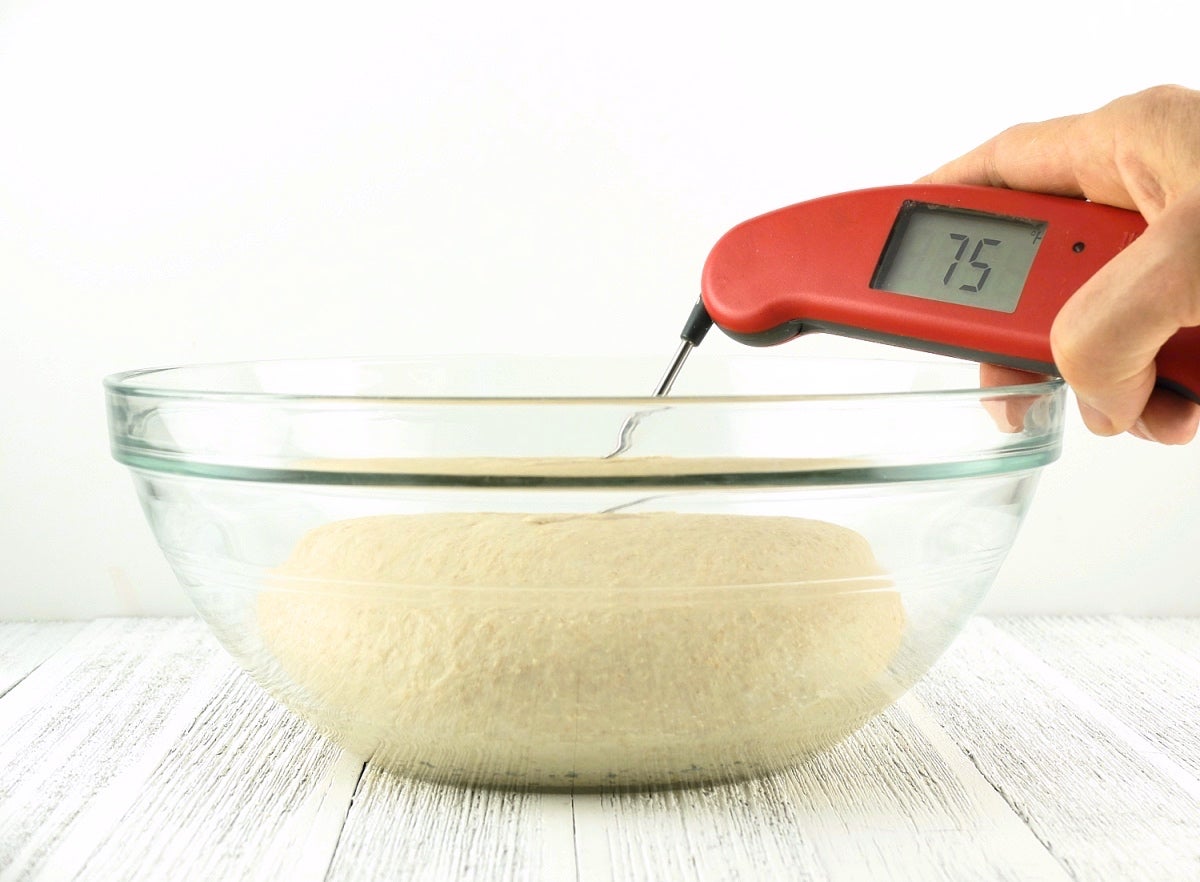
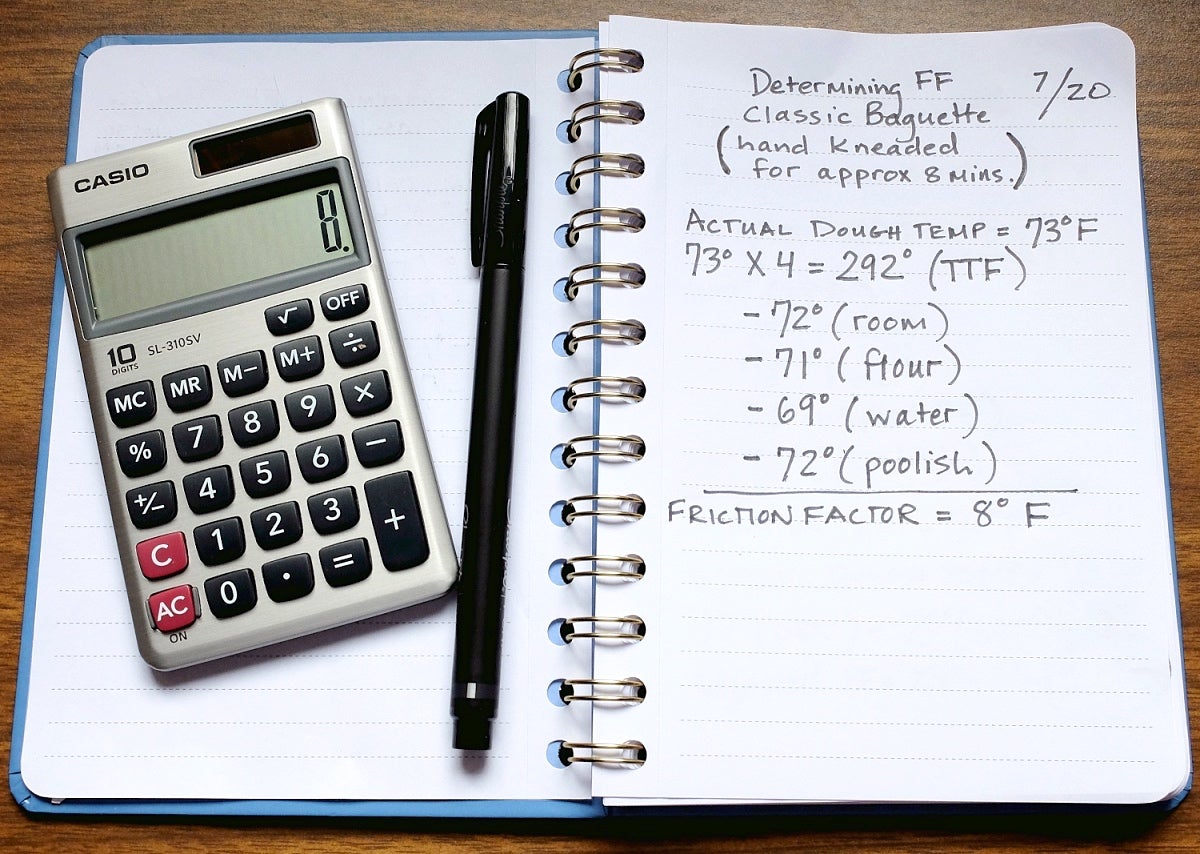
It’s a pleasant 70°F in my kitchen and I'm on a mission to make our Classic Baguettes recipe. I mixed the poolish the night before, and it’s now ripe and ready to go.
I decide to adopt a friction factor of 24°F, and use the DDT formula as usual. Both my poolish temperature and my flour temperature are 72°F.
I'm aiming for 77°F as my desired dough temperature.
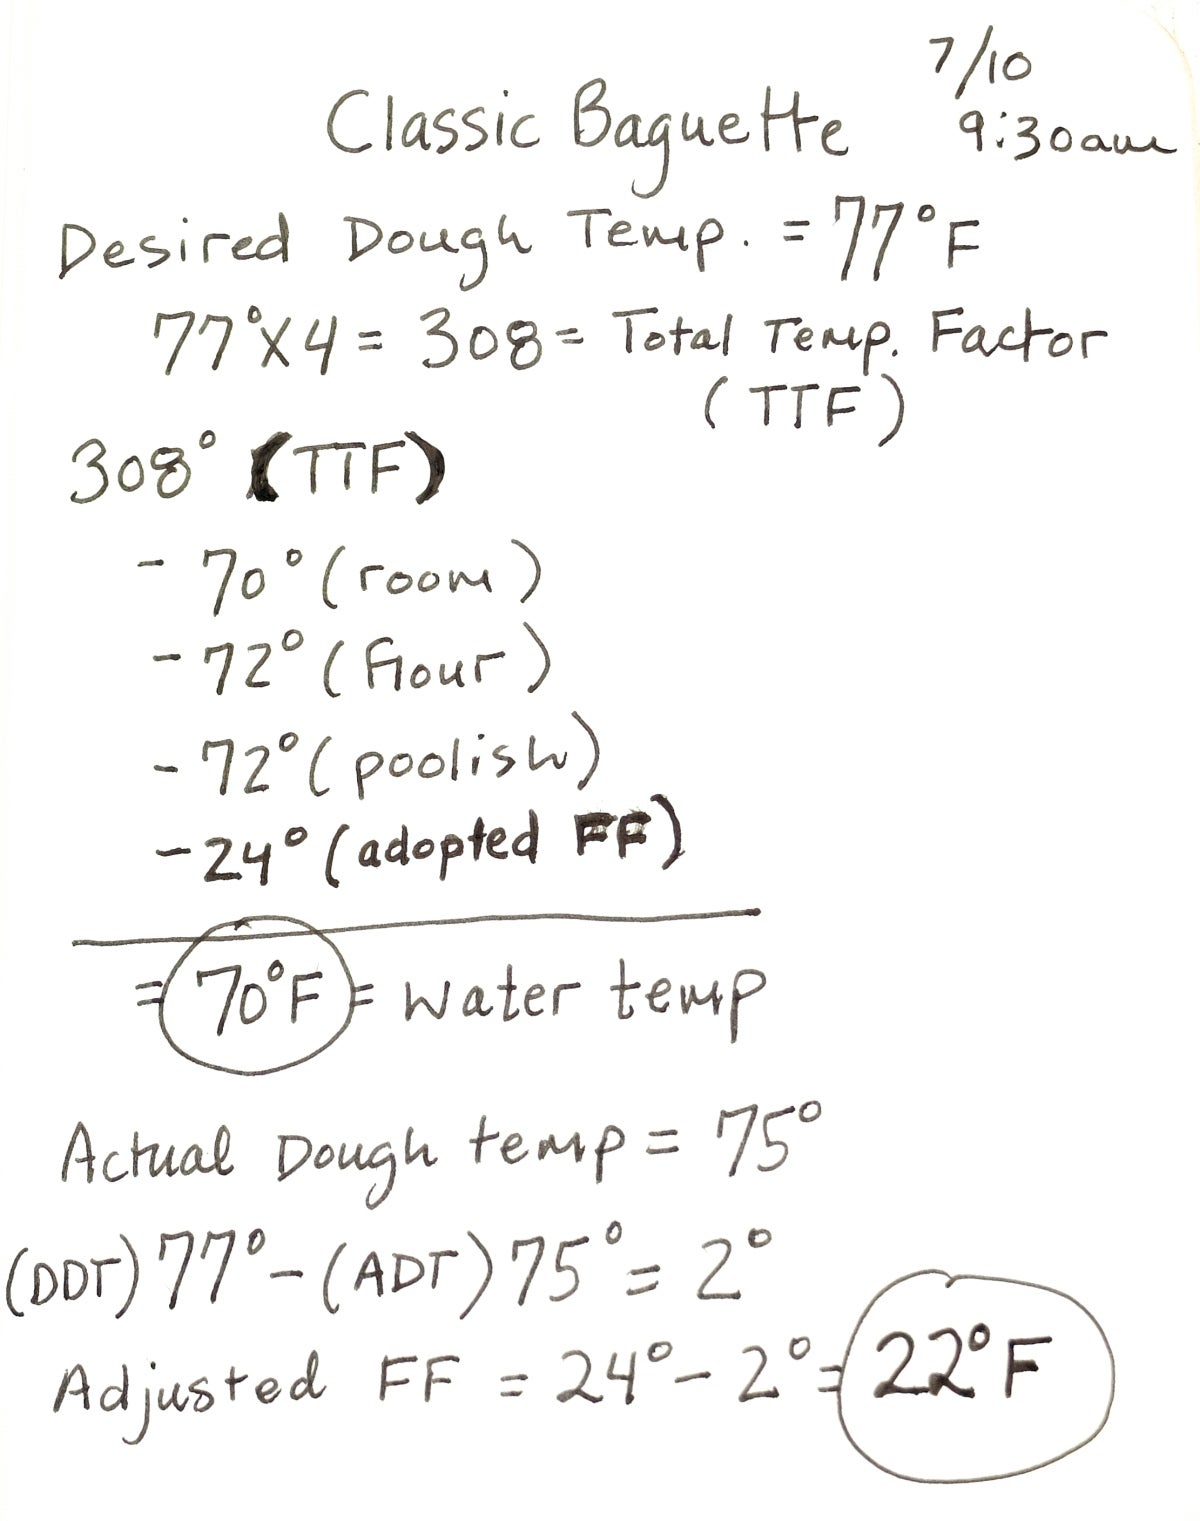
After mixing and kneading with 70°F water, my actual dough temperature turns out to be 75°F, instead of the 77°F I was aiming for.
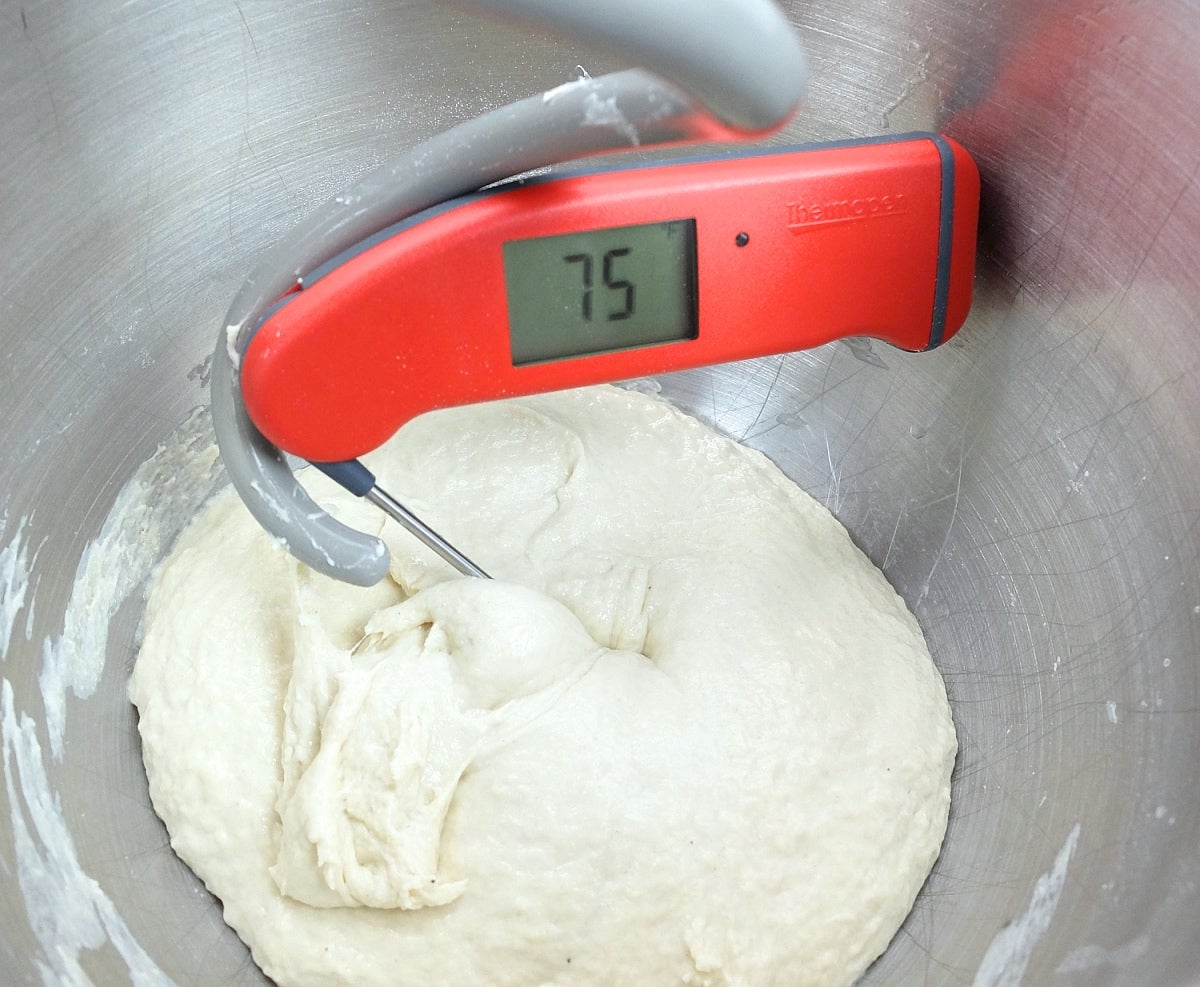
This indicates that my chosen FF of 24°F was a bit high, since the increase in temperature is less than expected. To tweak the friction factor, I need to reduce it by the 2-degree difference.
Friction factor = 24° - 2° = 22°F
But what if the dough temperature was 78°F instead of my DDT of 77°F? That's a sign that the mixer generated more heat than expected. In this case, I'd need to increase my friction factor.
Friction Factor = 24°+ 1° = 25°F
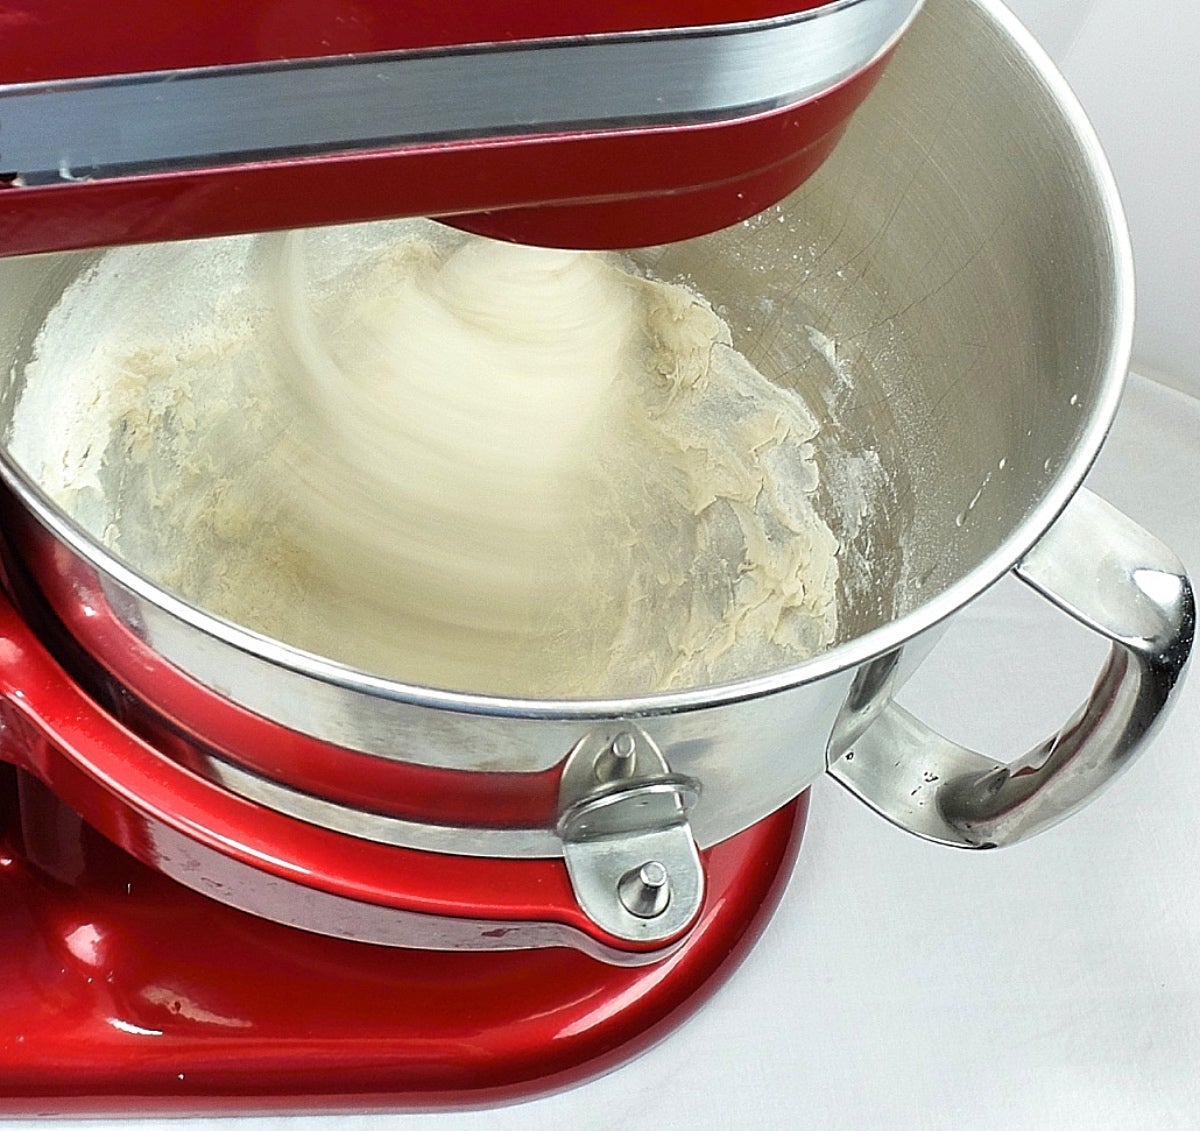
A few weeks have passed and I'm ready to make baguettes again. This time, I want to calculate the friction factor from scratch.
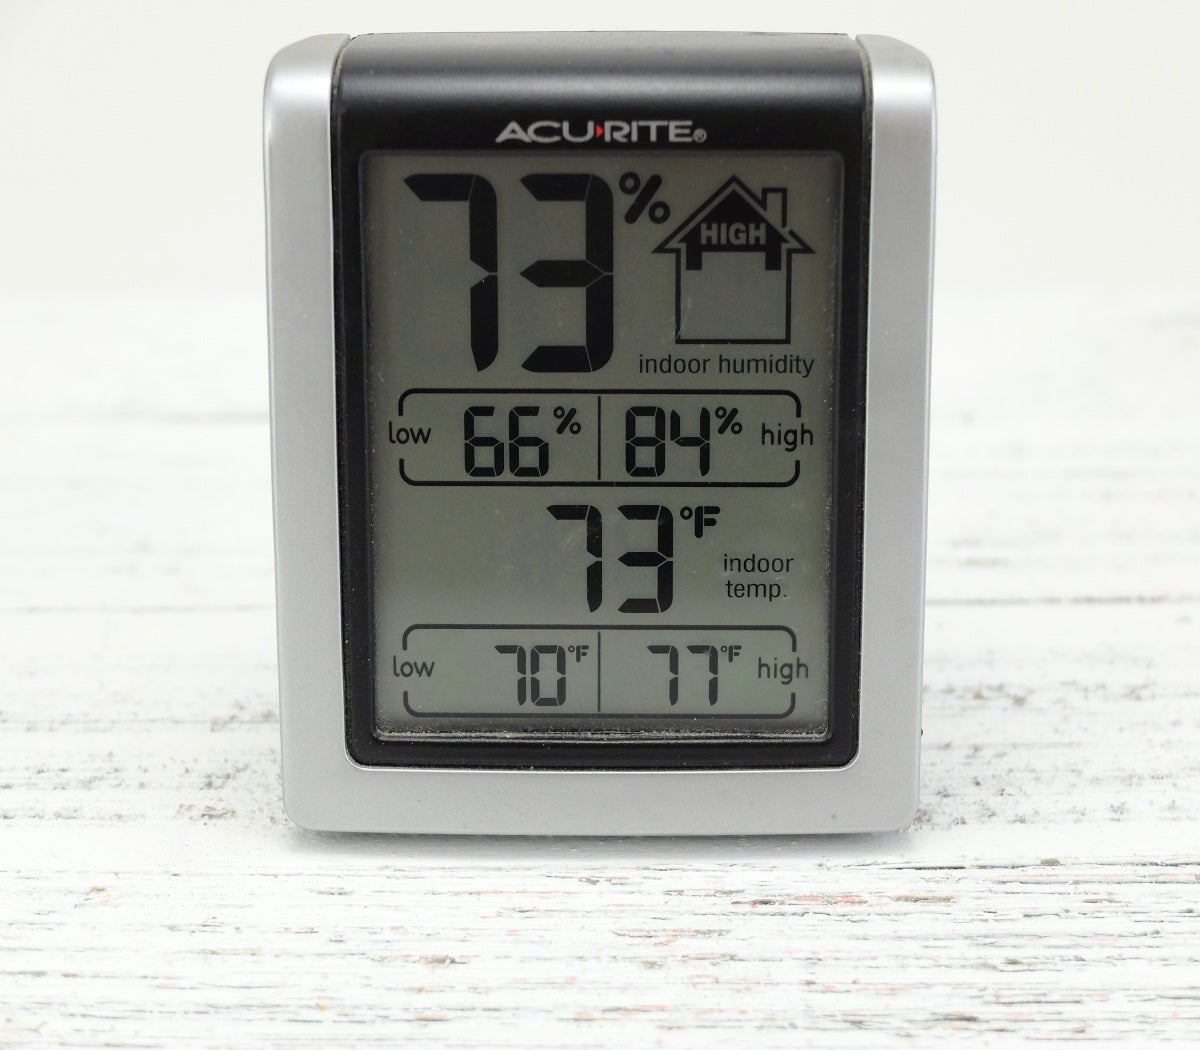
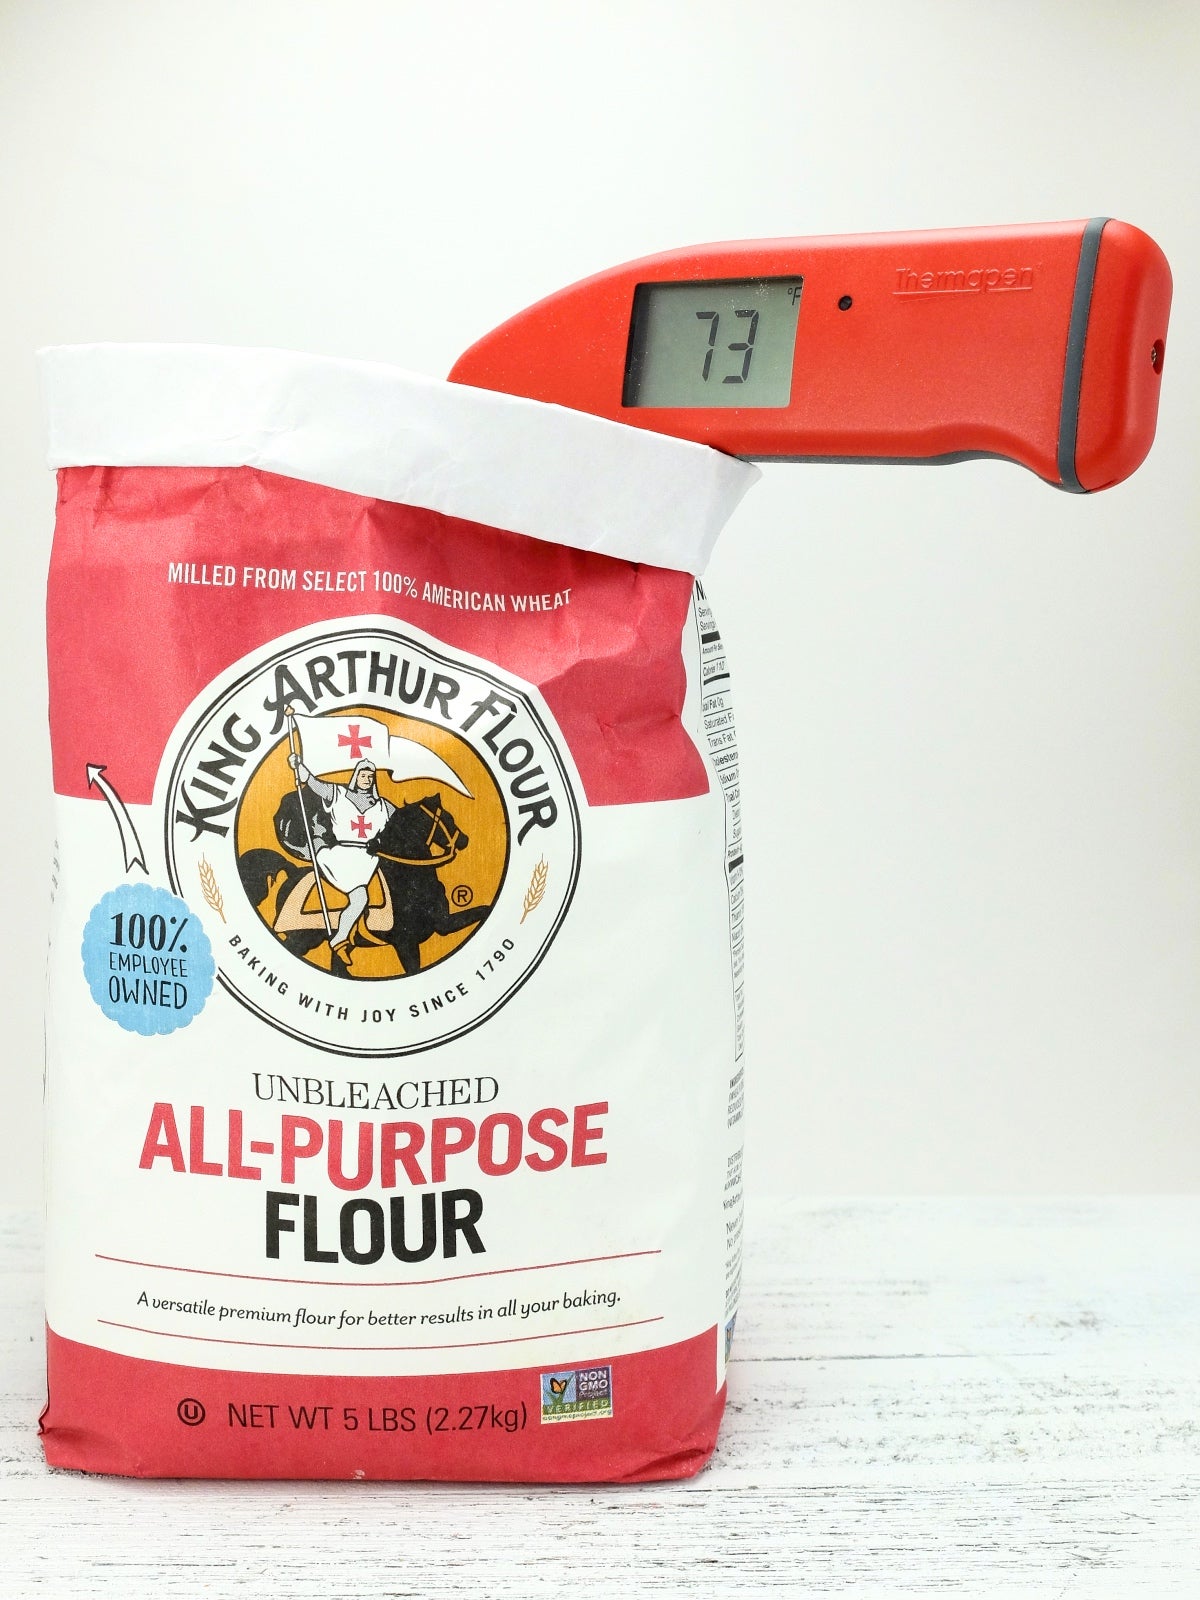
Summer has arrived in earnest, and my kitchen is a warm 73°F.
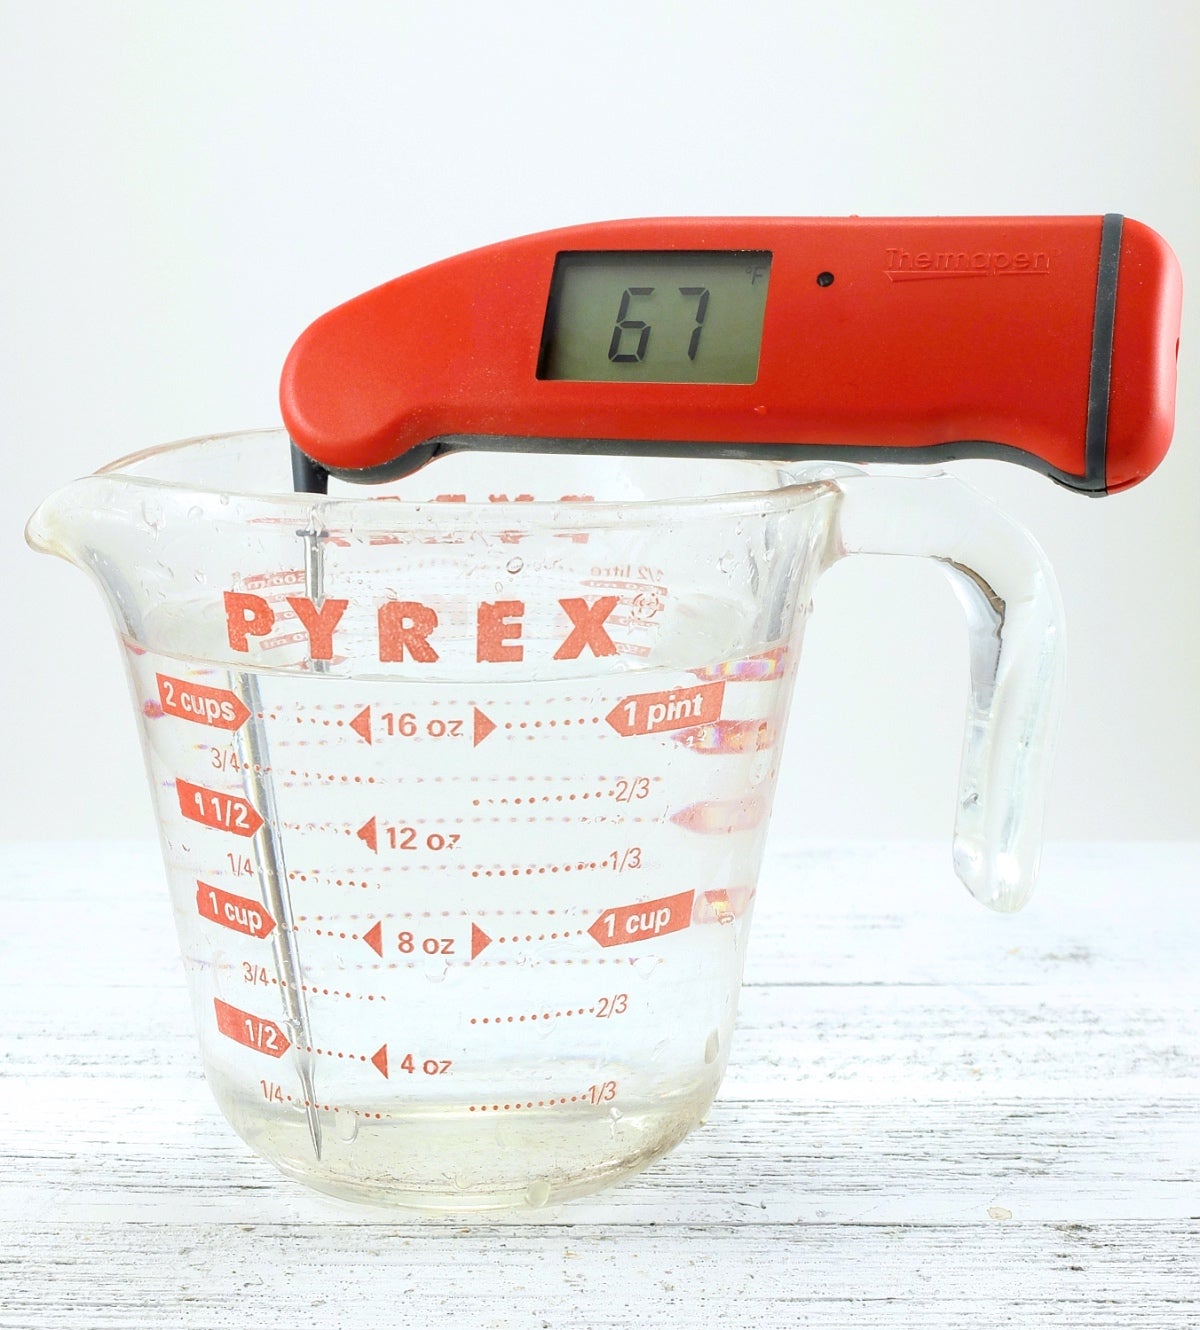
First, I have to decide on my water temperature. I use a thermometer to determine my tap water is 67°F, which seems like a reasonable water temperature — especially on a warm summer day.
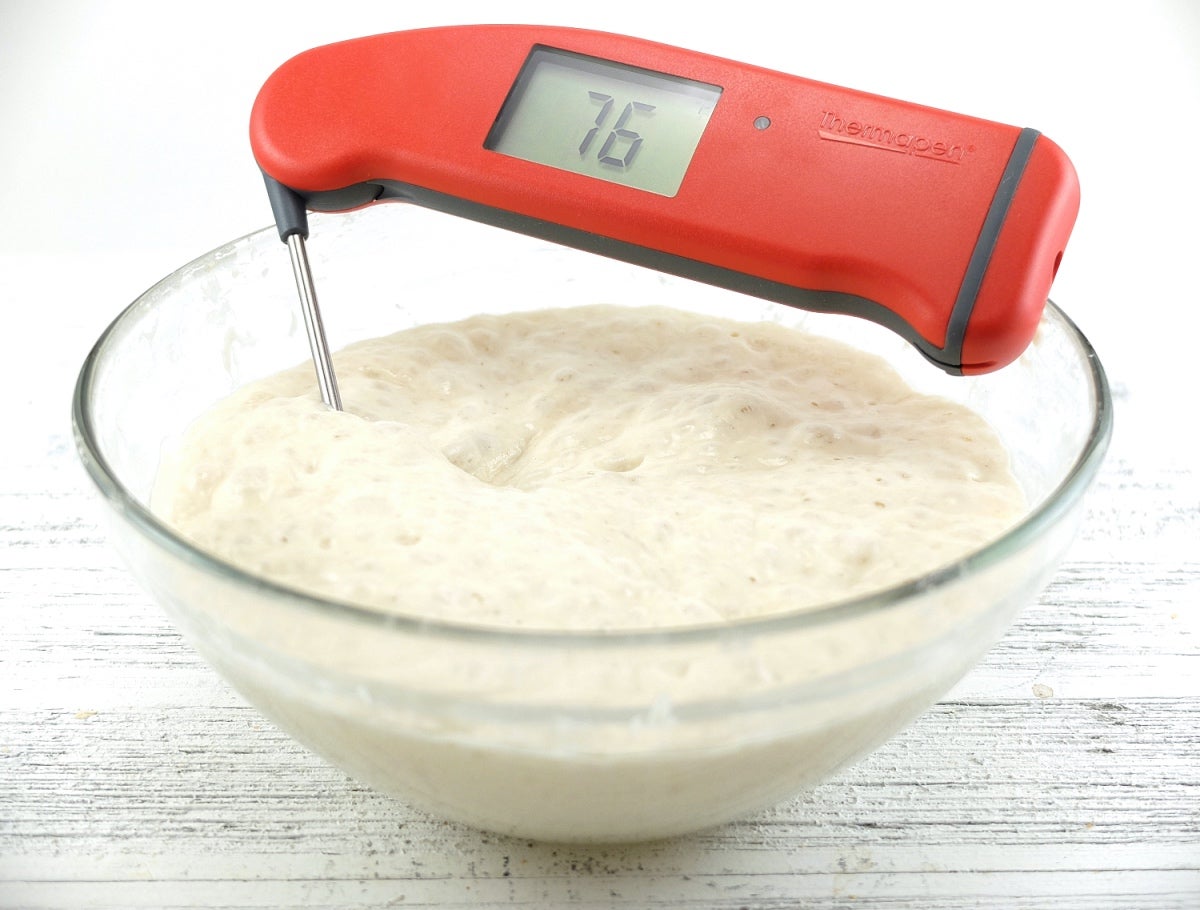
Next, a quick check reveals that my poolish temperature is 76°F, and the flour is 73°F.
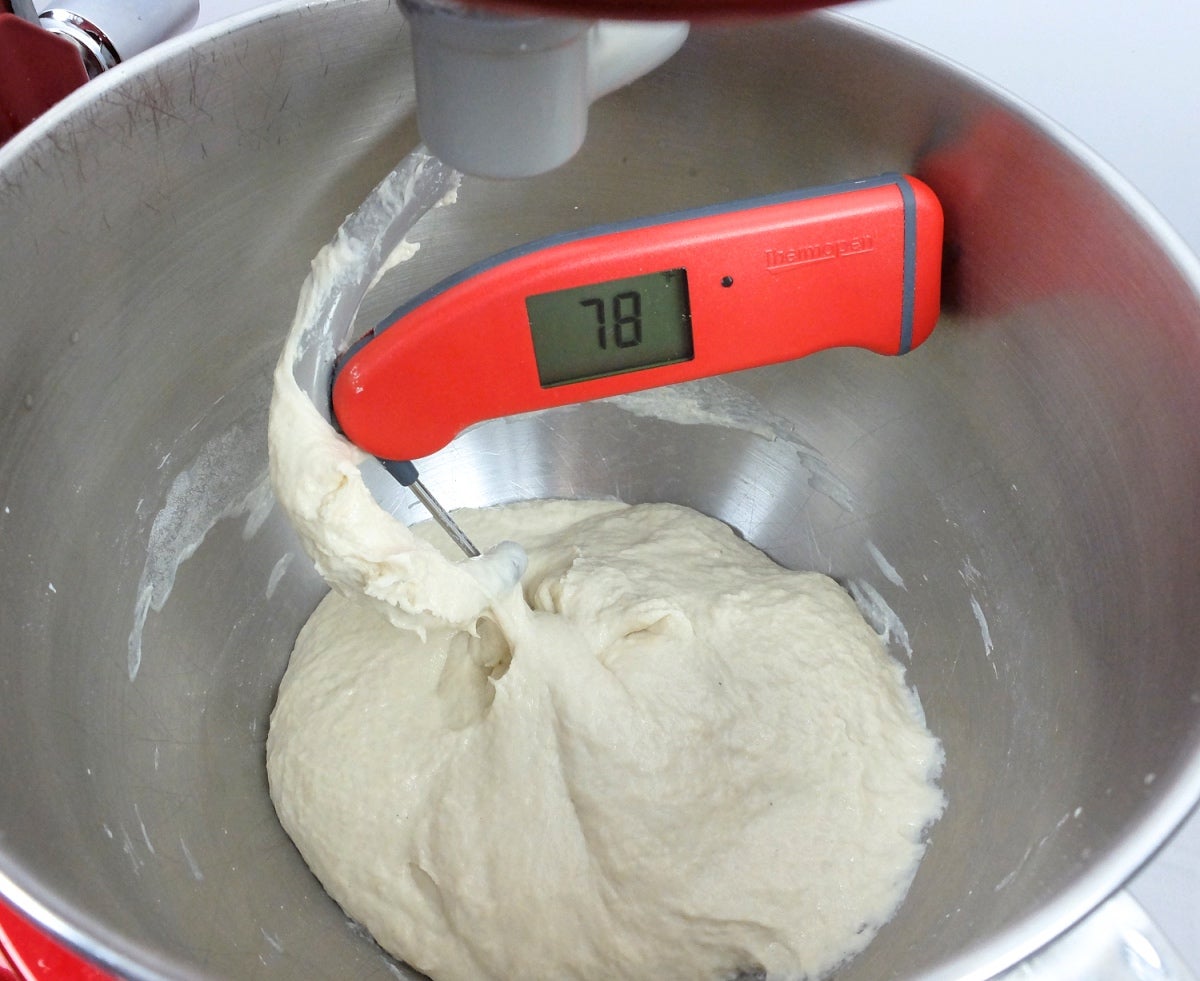
After mixing and kneading, I check my dough temperature: it's 78°F.
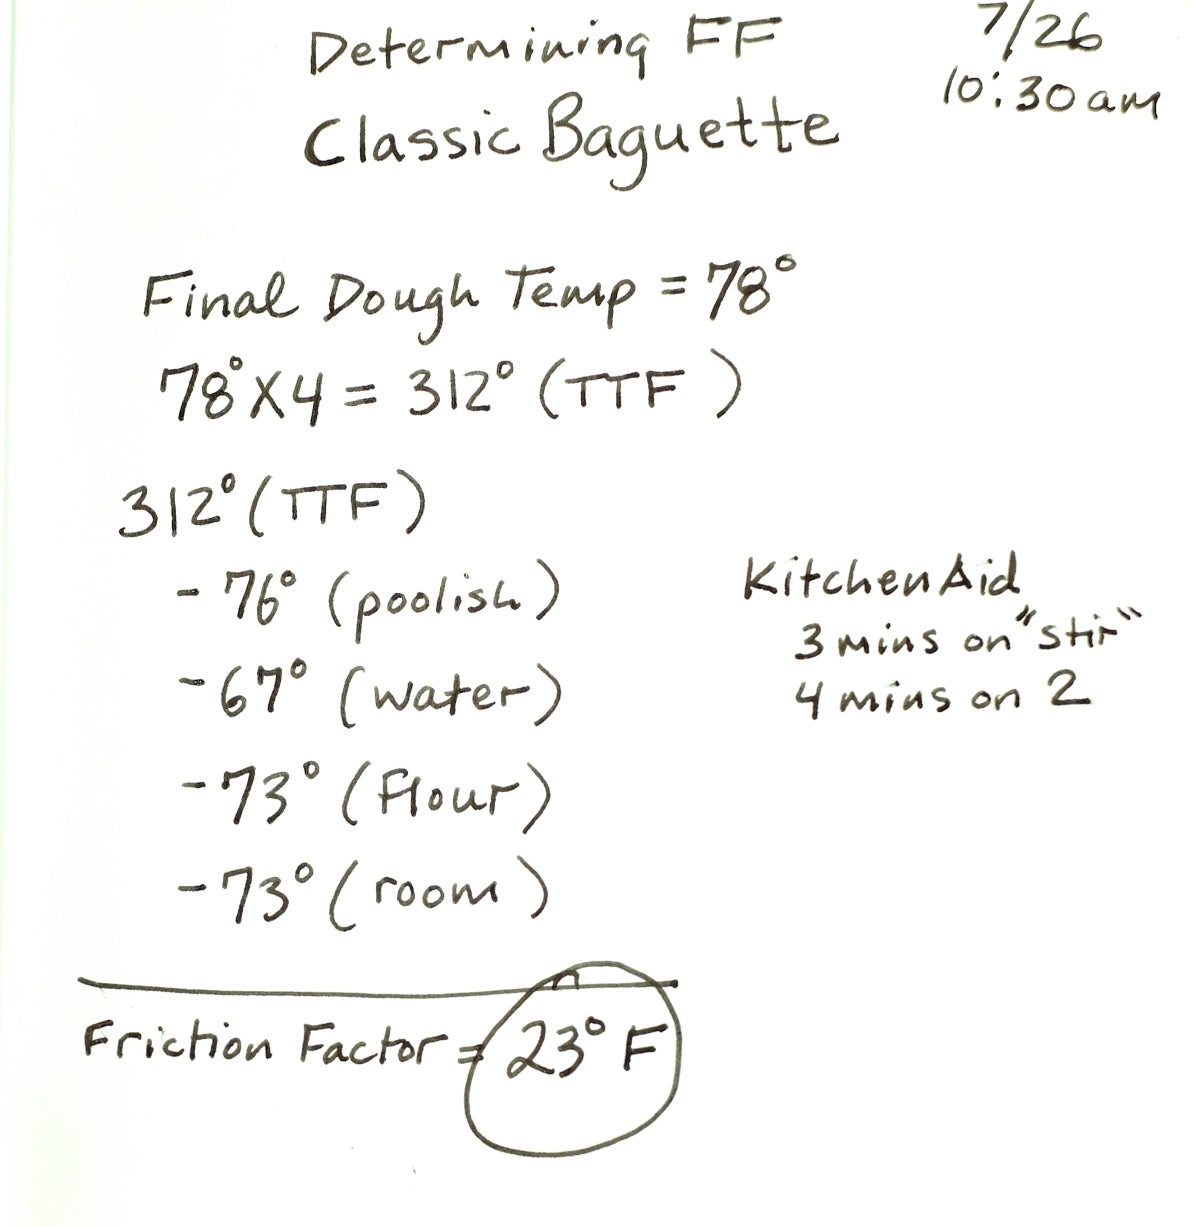 Ta-da! I now have my very own friction factor to use in future baking adventures. Remember, this number will apply best to recipes that are mixed and kneaded in a similar fashion.
In preparation for this blog post, I consulted my old friend Jaydl McCaffrey. She's one of the talented bread bakers in our King Arthur Flour bakery.
I asked her how she incorporates the DDT formula into her early-morning mixing routine at the bakery.
Jaydl says she does use the DDT formula and a predetermined friction factor (20-25°F) when she mixes a new dough for the first time. However, for her day-to-day mixing she relies on a mixing log.
"I much prefer to keep a log of all my data," she says. "I find this is far more accurate. Some doughs have a large preferment; some a large soaker. Some mix for a short time; some for a longer time on high speed. Using the log and comparing my current day's data to previous batches helps me narrow in on my choice of water temperature."
What a great idea for home bakers and professionals alike! Logging all the pertinent data each time you make bread will go a long way toward building consistency in your baking.
Not only will your data provide insight into future baking choices; recording and referring back to previous baking experiences will help develop your knowledge and intuitive baking sense.
Hey, bread geeks! I'd love to hear the friction factors you come up with. Consider the comments section one big baking journal; the more data we gather, the more we'll learn about the mercurial friction factor and how it affects our bread baking.
For some great background on why the friction factor can help make or break your bread, read our blog post on desired dough temperature.