Have you ever loaded your perfectly risen artisan bread into the oven, only to discover a dull, constricted loaf at the end of the bake? How do artisan bakeries achieve that lovely golden, crisp, shiny crust? Baking bread with steam is the key.
Steam is critical for achieving crusty loaves of bread, for reasons both functional and aesthetic. If you bake bread in a dry oven, the crust quickly sets and dries, impeding the ability of the dough to expand to its full potential, leading to loaves with a denser crumb. But if you were to bake an identical loaf, introducing steam at the start of the bake, the crust remains moist, and the loaf is able to stretch and expand before the crust sets, resulting in a better crumb structure. Additionally, even if you score your bread properly, those cuts will not expand in a dry oven; you need steam for that.
Besides functionality, there are aesthetic reasons to add steam to the oven when baking. Steam helps gelatinize sugars on the exterior of the loaf, resulting in better browning, and a shinier (and also thinner and crispier) crust.
Bakeries have steam-injected ovens that handle this easily; in a home oven, it's not so simple, requiring a more DIY approach.
Today we're going to test different home methods of adding steam in bread baking. Our test bread is the Pain Au Levain recipe used in our Baking School. This lovely sourdough bread has a mild flavor and a wonderfully open crumb.
Pain Au Levain is the perfect guinea pig for our steam tests. We can first admire the loaves baked in class, utilizing a professional steam injection oven. Next, we'll use the same recipe at home to test various baking and steaming methods. Which home steaming method will bring us closest to professional oven results?
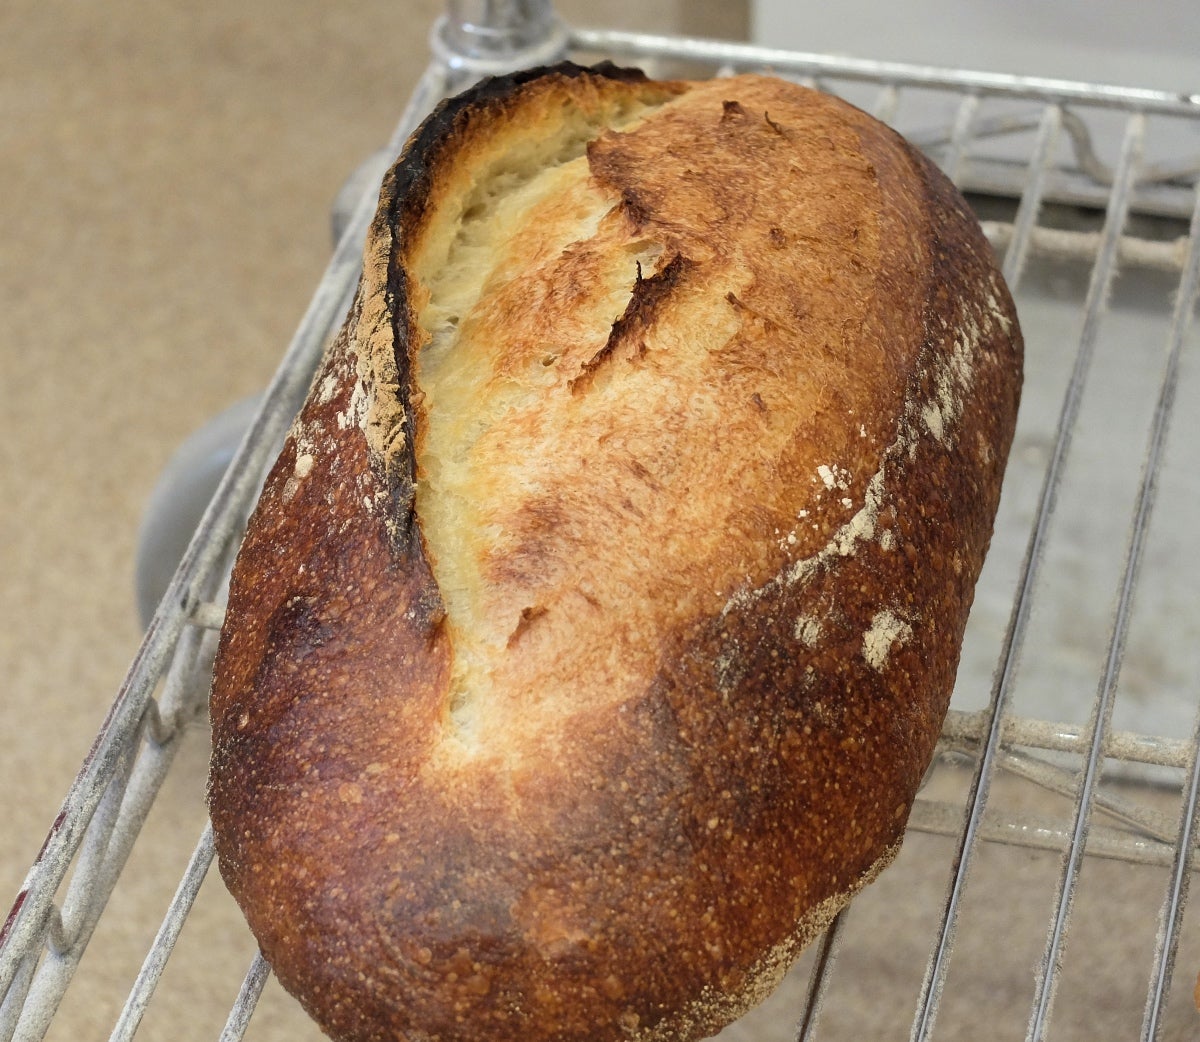
Here's a beautiful loaf straight from the school's steam-injected oven. See what we're aiming for here?
If you want to follow along with our tests and bake the Pain Au Levain bread, you can find the recipe and directions here. If not, these steaming methods will work with any artisan bread recipe.
We'll bake this bread at 450°F for 35 to 40 minutes. If you plan to use a baking stone and a cast iron frying pan (for steam), preheat both of these for 60 minutes before baking.
A brief note about scoring (aka "slashing")
Before we get too steamy, let's take a moment to consider the importance of scoring your bread before baking. Those cuts in your bread aren't just decorative! Scoring the loaf provides a strategic vent to release fermentation gases during baking. Good scoring, along with proper steaming, allows your loaf to open up fully. Without scoring your loaf is likely to burst open at weak spots and end up oddly shaped and constricted.
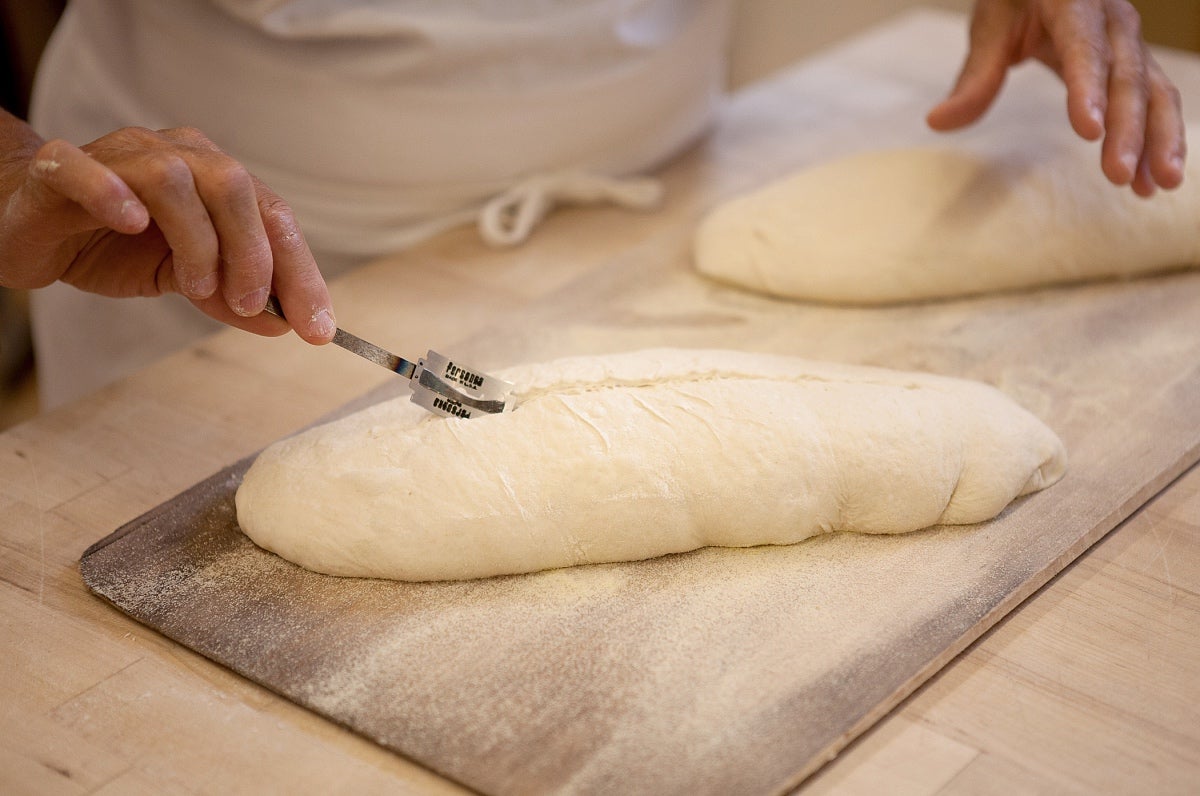
The Pain Au Levain bread requires one long "ear" or "lip" cut down the center of the loaf. Notice how the blade is angled, and only one corner of the blade touches the loaf.
For more tips on scoring, check out this blog post and helpful video.
Before we get started, please remember to suit yourself up with good oven mitts whenever you're working with steam!
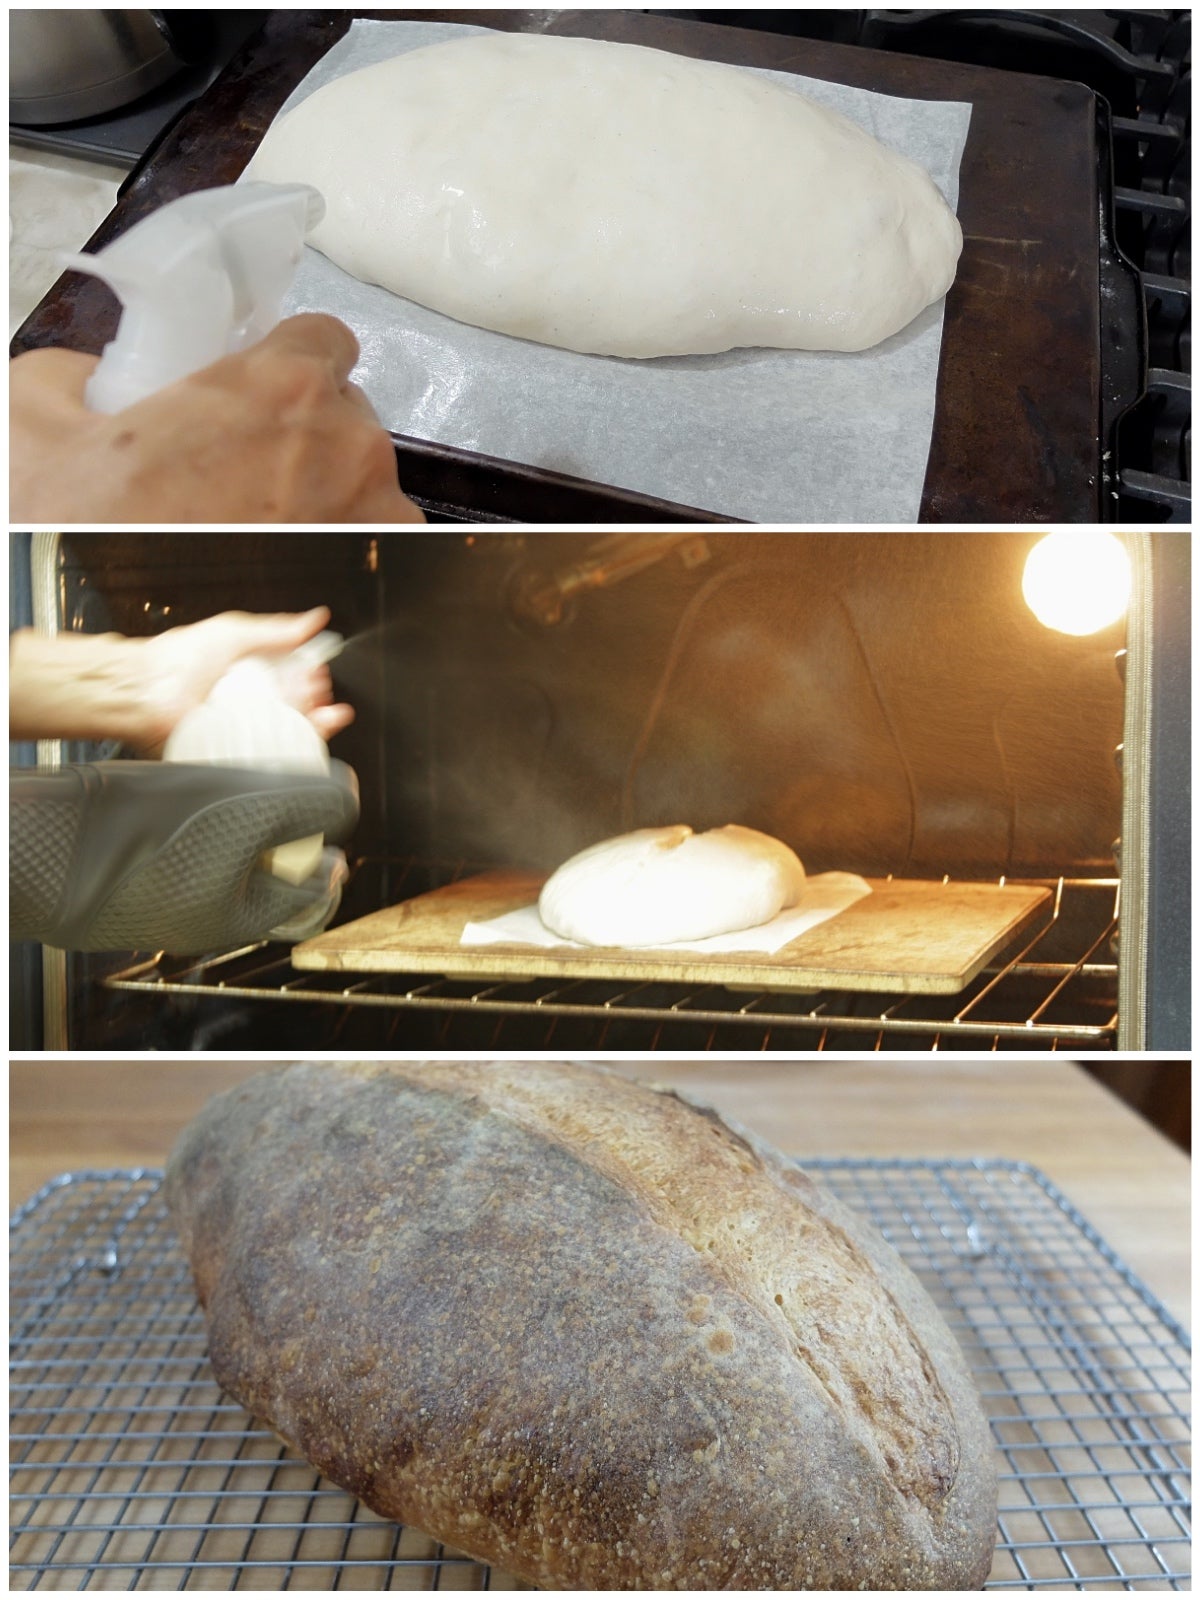
The simplest method of adding steam to your oven is to spray the loaf with warm water prior to putting it into the oven. Spray the oven once the bread is loaded, and then again about 5 minutes into the bake.
Unfortunately, this method doesn’t offer much moisture, and the effects on the bread are minimal.
In class, our instructor illustrated method #2. She loaded the loaf onto the preheated stone and then poured about 1 cup of boiling water into a preheated cast iron frying pan on the shelf below. This method works quite well, as you can see from the resulting loaf on the right, above.
(I tried the same method at home with the addition of preheated lava rocks in the frying pan, and my loaf looked great, too.)
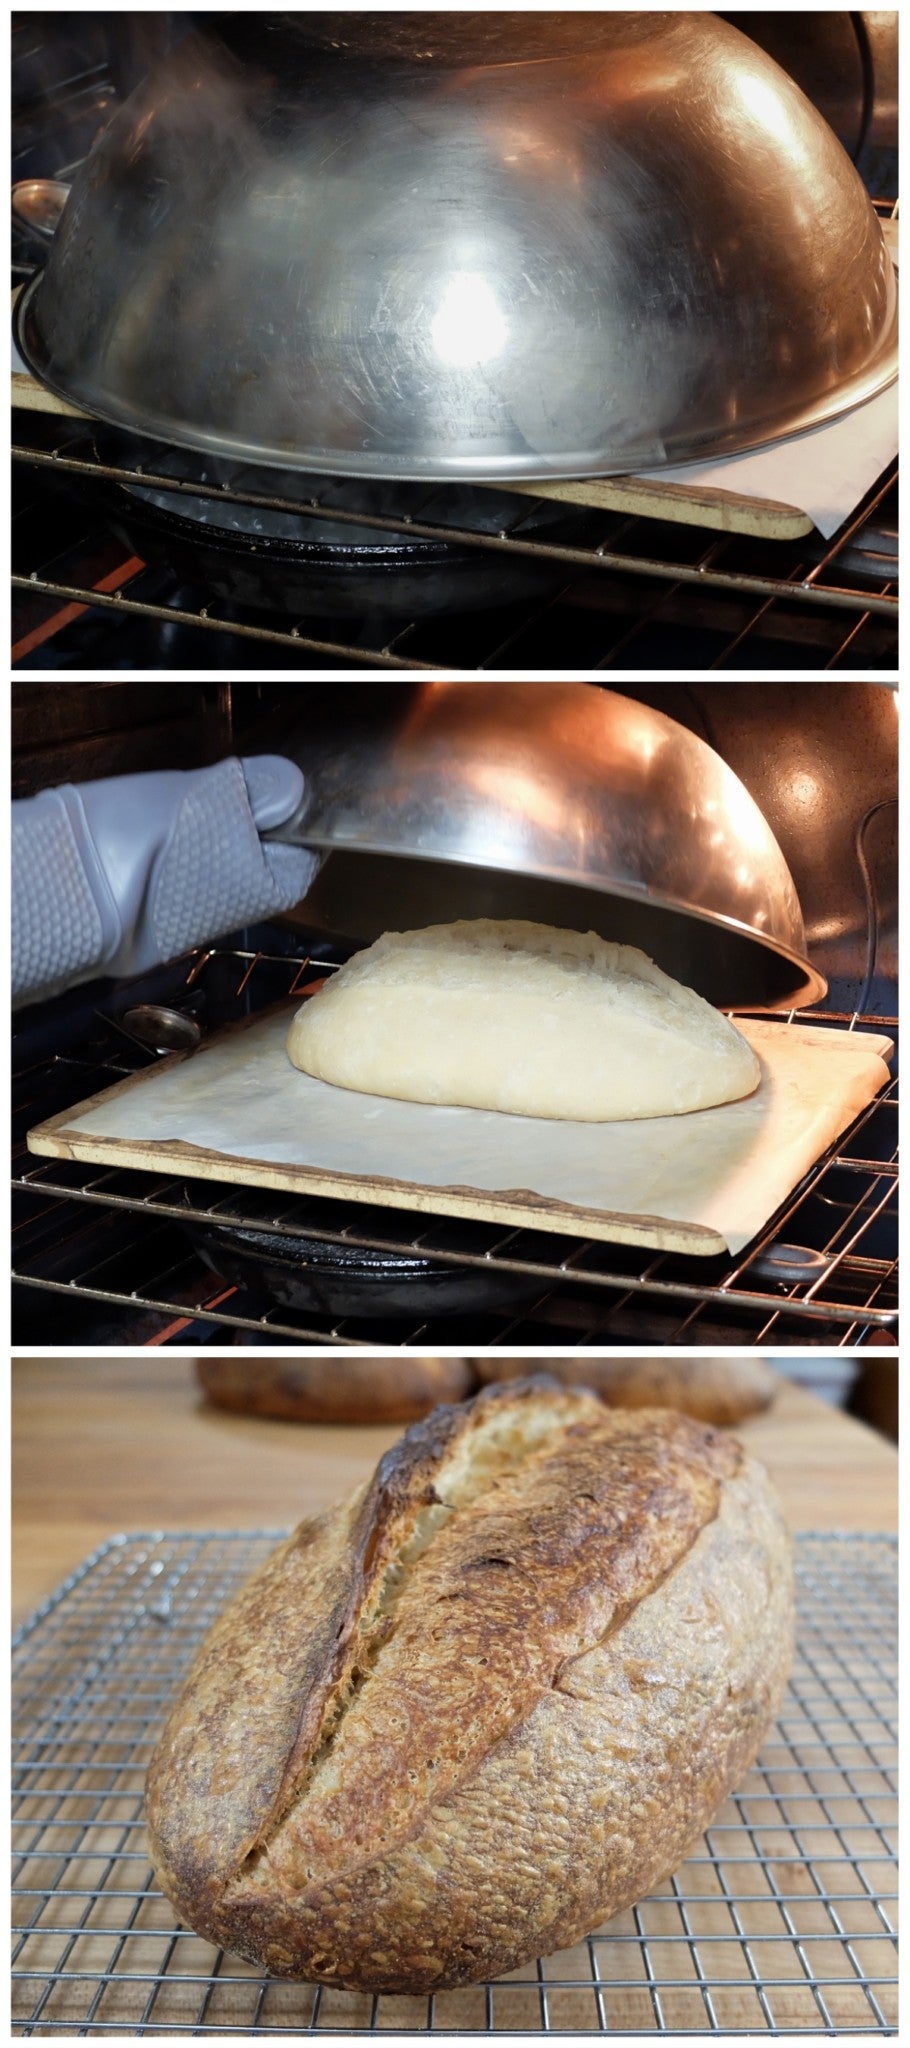
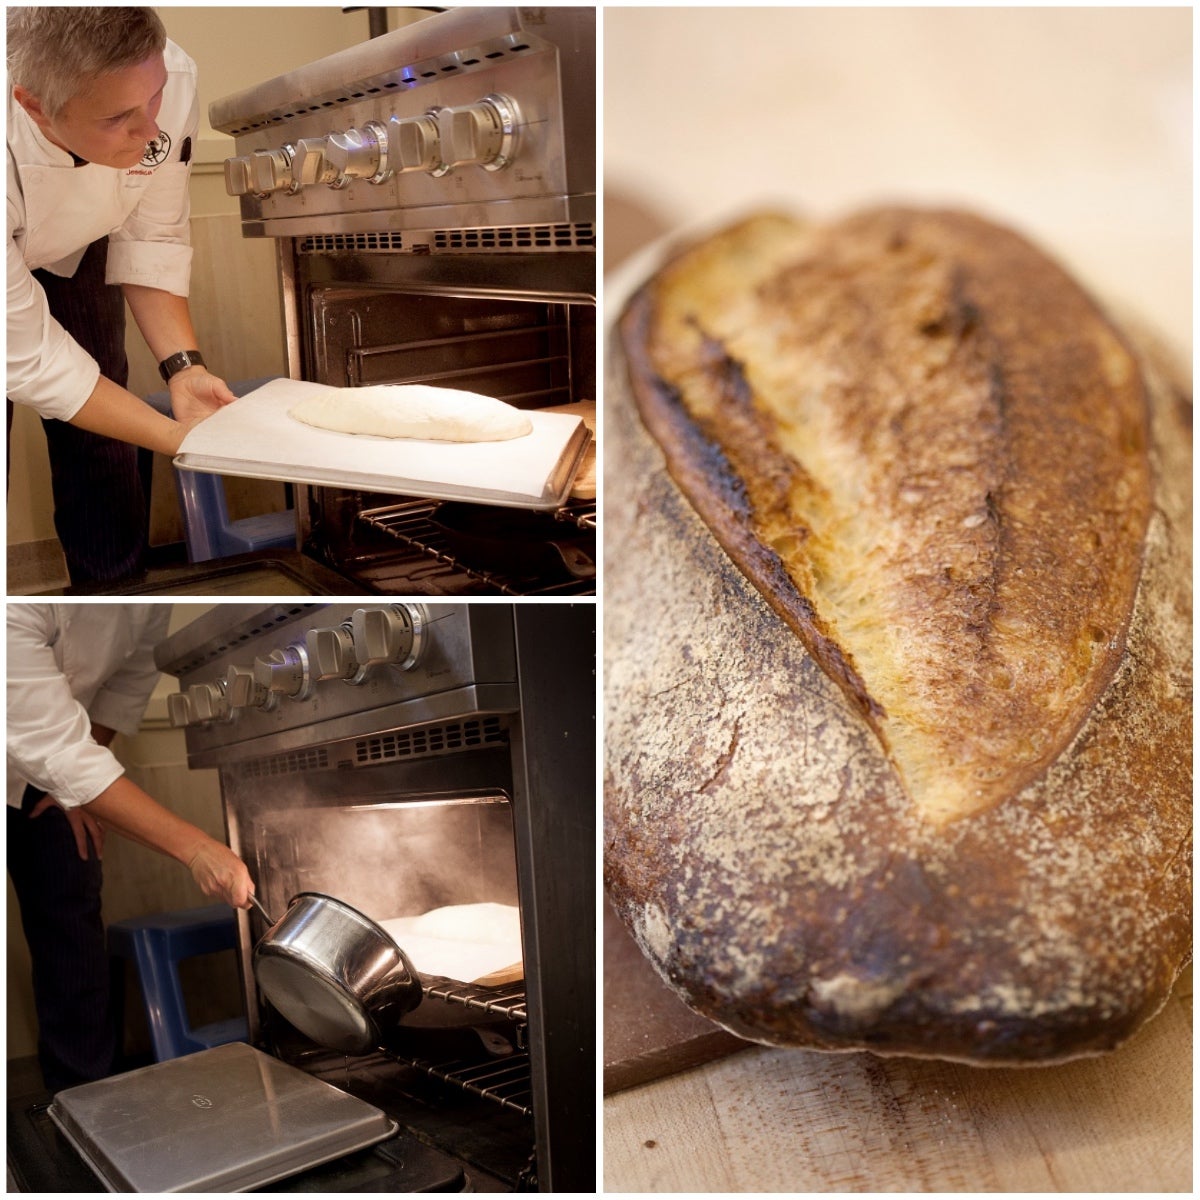
If you want to enhance the effect of method #2, a large metal bowl can be placed over the loaf to trap the steam and keep it close to the surface of the bread during the oven-spring period.
This is part of the reason steam injection ovens get such great results; the individual "decks" of the oven aren't very high, keeping the steam where it's needed — on the surface of the loaf.
Load your loaf onto the preheated stone and then place the bowl over the loaf, with the front of the bowl overhanging the stone and leaving a gap that lines up with the preheated cast iron frying pan below.
Pour about 1/2 cup boiling water into the frying pan and shut the door. Remove the bowl 15 minutes later and allow the bread to finish baking in a dry oven. A butter knife comes in handy to lift the hot bowl, which will be hard to grab with oven mitts.
Steam is vital during the oven-spring period so that the surface of the loaf remains moist and expands easily. However, once the yeast has died and the loaf is set, moisture is no longer a friend to your bread. Too much moisture throughout the bake can lead to a thick, rubbery crust.
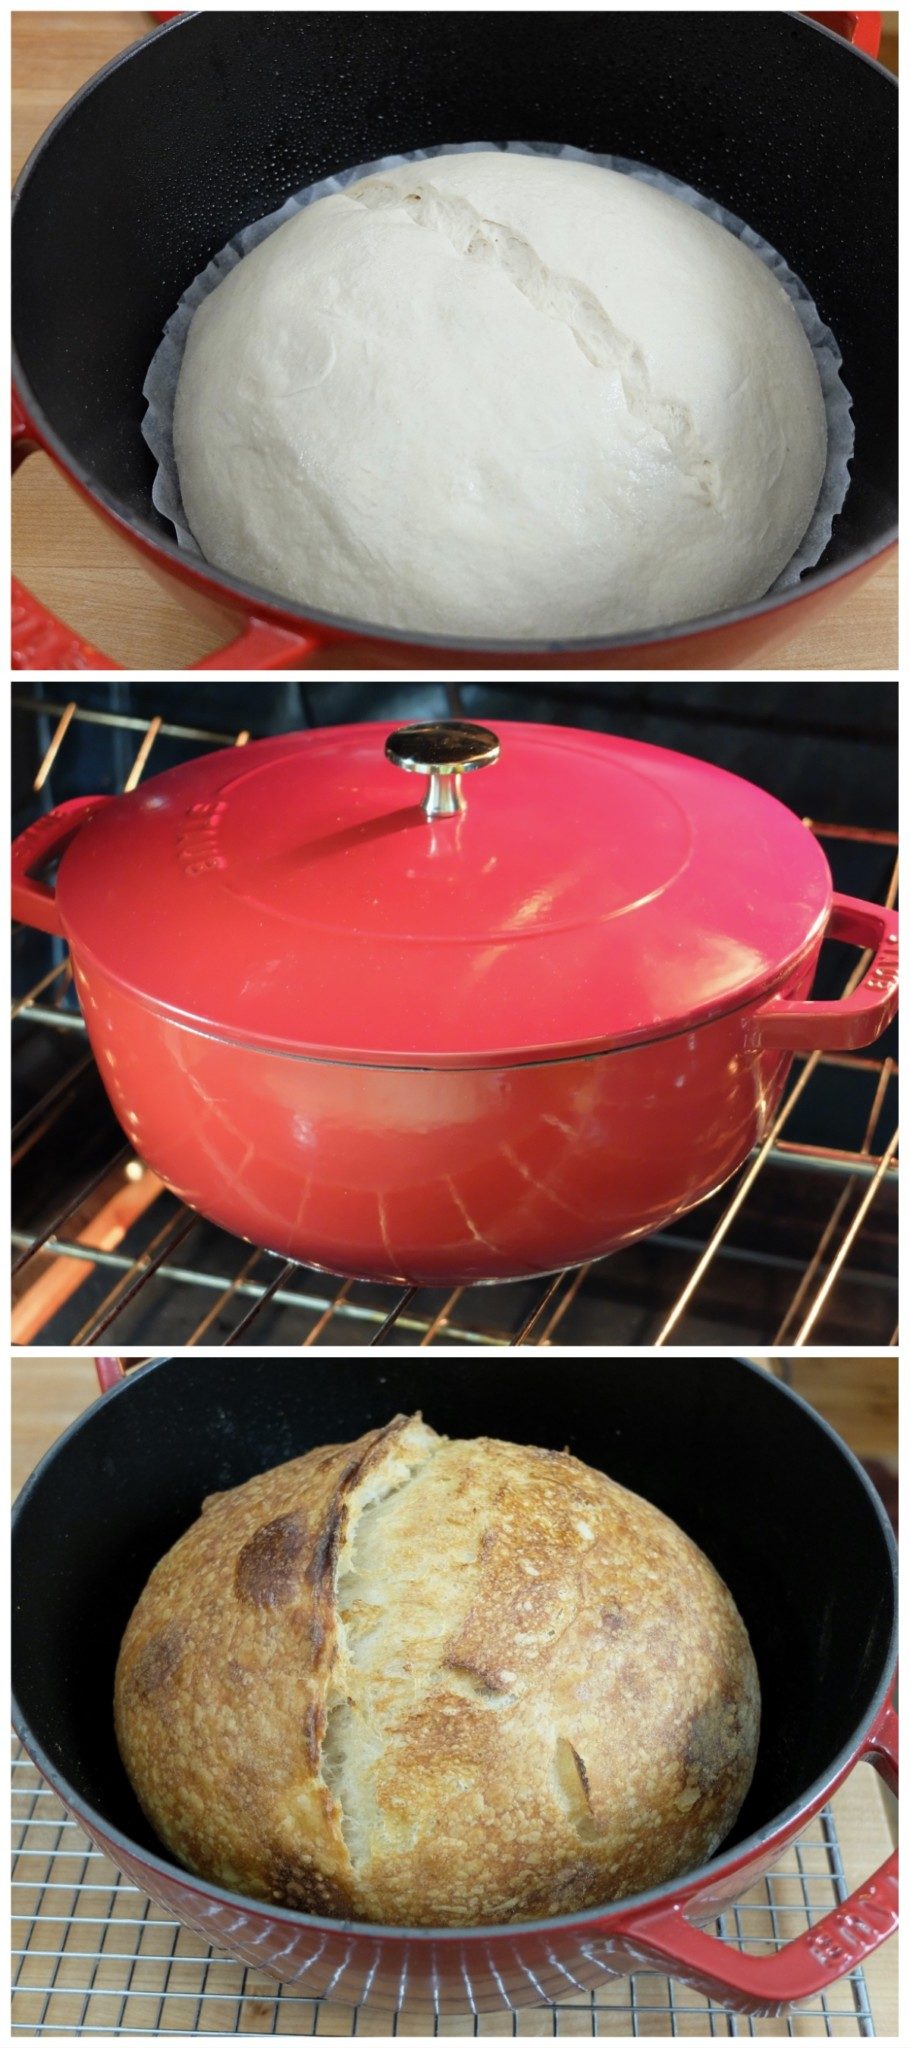
A Dutch oven or cloche also works to keep the moisture given off by the bread during baking close to the surface of the loaf, allowing for the same kind of expansion and shiny, golden crust.
Although we don't generally recommend preheating empty any of the baking pots we sell (a method popularized by Jim Lahey and Mark Bittman about a decade ago), Emile Henry's 4.2-quart Dutch oven can be preheated empty, as can their potato and bread pot. These pots heat up more quickly than cast iron, so 30 minutes of preheating should be sufficient. Remove the lid after 20 minutes of baking.
Never fear, though, if you don't have a pot suitable for preheating empty (or don't like messing with a very hot pot), you can still get great results baking in your Dutch oven. In the photos above, I put the Staub Dutch oven with its cargo of risen bread into a preheated oven; but if you prefer a cold start, that works great too. Again, it’s important to remove the lid and allow the bread to continue baking in a dry oven after the loaf is set (remove the lid after 25 minutes in a preheated oven, after 30 minutes when baking from a cold start). Overall baking time will be a little longer when baking from a cold start.
See more here: Bread baking in a Dutch oven
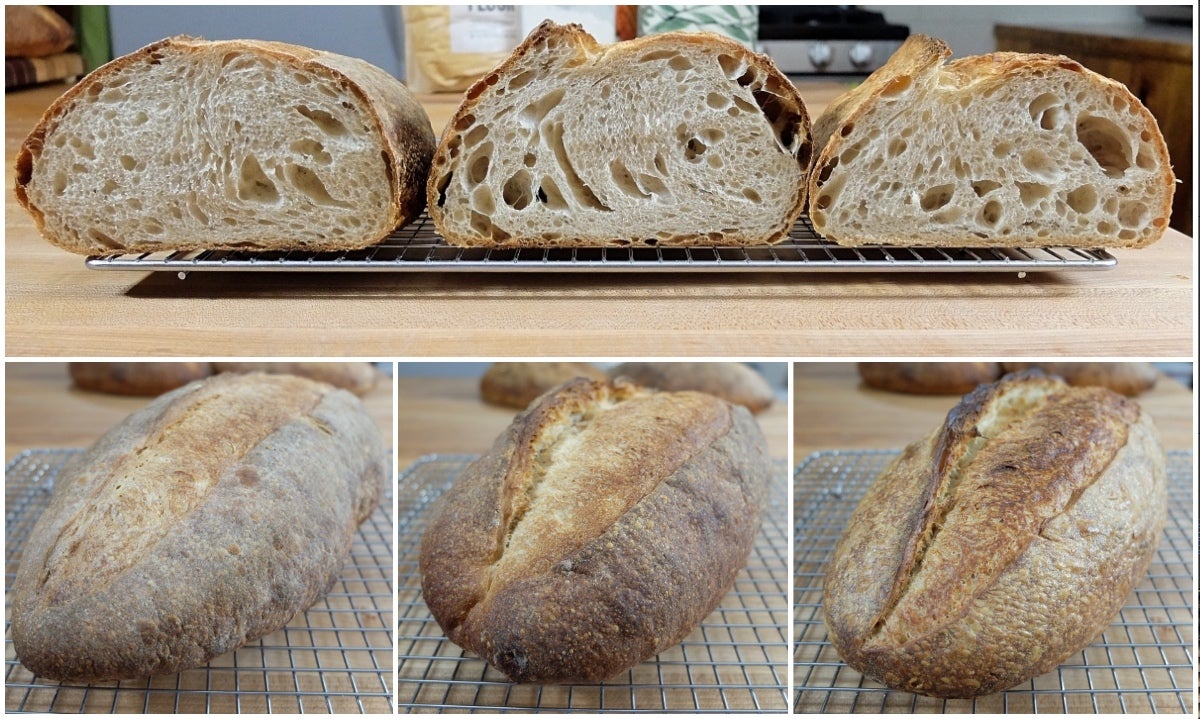
The loaf on the left was steamed with method #1 (spray bottle). This loaf failed to open properly where I scored it, and the crust is dull in color. Notice how the crumb structure is relatively dense, in comparison with the other loaves? It will still be a delicious loaf of bread, but more steam would have made it even better.
The loaf in the center was steamed with method #2 (cast iron pan). It opened up beautifully and has a lovely brown crust, although not quite as shiny as loaf #3.
The last loaf was baked with method #3 (cast iron pan + metal bowl). See how shiny and blistery the crust is, and how open the crumb?
Both this loaf and the loaf baked in the Dutch oven were refrigerated overnight in their shaped form before being baked the next day. This added step contributes to a more blistery crust, as well as more sour flavor.
Have you ever wondered what effect allowing your dough to rise too long in the shaped form has on the final outcome of your bread?

Notice there are lots of large gas bubbles right under the surface of the loaf above. This is a sign that the loaf has been allowed to rise too long before going into the oven. I deliberately over-proofed this loaf as an added experiment, and baked it using the bowl method of steaming (#3).
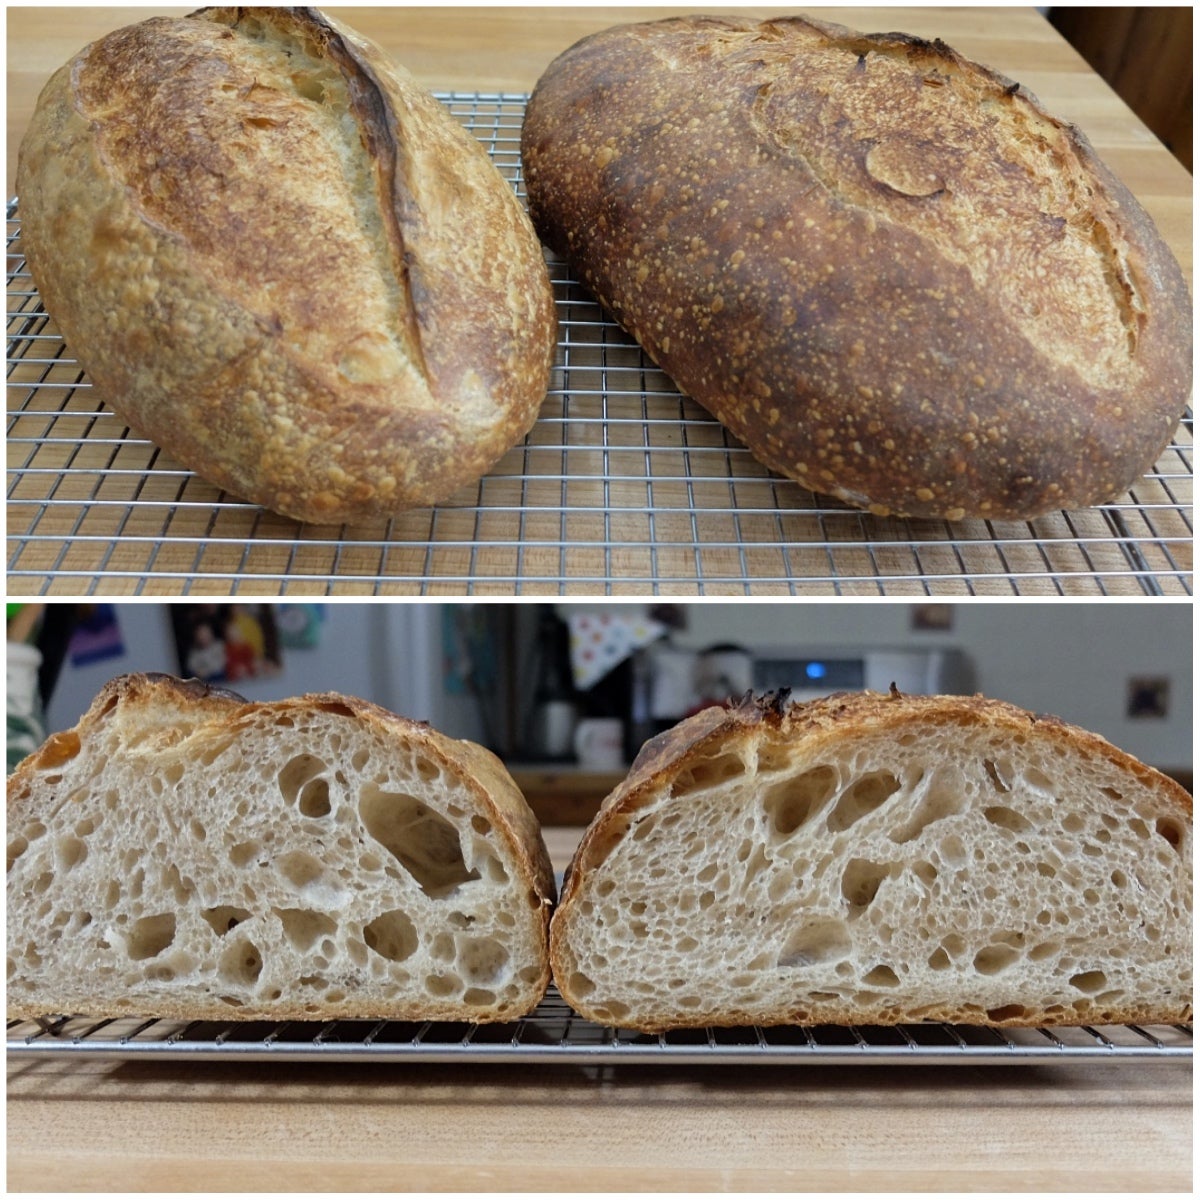
The loaf on the right is my over-proofed loaf, and the loaf on the left is loaf #3. While my over-proofed loaf didn't open up quite as much as loaf #3 and has a slightly denser crumb structure, it still rose well and colored up nicely.
If we compare the crumb of my over-proofed loaf (right) to the relatively closed crumb of loaf #1 (left), we can see how even an over-proofed loaf will fare better with steam than a loaf that doesn't get enough steam.
Keep in mind that not all breads will endure as well as this one did when allowed to rise too long. Have you ever scored your loaf, only to see it deflate like a poked balloon? Or has your lofty loaf collapsed in the oven? These are sure signs that you've let your bread rise too much before baking.
I hope you'll give our Pain Au Levain recipe a try and test out some of these steaming methods as well. Steam really does make the difference!
You can view the Pain Au Levain recipe here.
Big thanks go out to Lee Clark for taking these beautiful photos during class, so I could get down and dirty with the dough.
And if you ever get a chance to take a class at one of our baking schools, I guarantee you'll have a great time, and go home with a wealth of baking knowledge and techniques.