Maybe you’ve never baked homemade sandwich bread. Maybe you’ve baked it, but constantly run into trouble. Or, maybe, you make it all the time, but you’re looking to take your sandwich bread recipe from good to great.
Perhaps your bread falls — or shrinks. Or it just sits there looking dull ... and becoming duller by the moment, as it loses its oven-hot "sheen."
What's a sandwich bread lover to do?
The following tips guide you through those crucial moments between hot-from-the-oven and cool-on-the-counter to help you make your best sandwich bread yet.
In days gone by, seasoned bread bakers tapped the bottom of their sandwich loaf to listen for a particular sound — best described as a hollow ring — that meant the bread was done.
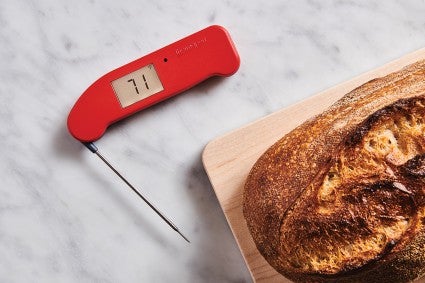
If you can reliably judge baked bread that way, more power to you. But we find it easier simply to take the sandwich bread's temperature at its center. For one thing, there’s no need to tip the sandwich loaf out of its hot pan to tap the bottom, risking damage to a loaf that's not yet fully baked (to say nothing of a painful burn to the baker). And second, a thermometer is much more accurate than hearing.
Breads made with all-purpose flour (a.k.a. white bread) are generally considered fully baked once they reach a minimum temperature of 190°F. We sometimes like to let loaves go a tiny bit longer, up to 194°F or so, just to make sure they’re fully set, structurally speaking.
Breads that are particularly dense/heavy — think hearty whole-grain loaves, or sweet breads packed with fruit and/or nuts — should reach 200°F to 205°F.
We use a Thermapen digital thermometer, which at $98.95 an investment (tempered somewhat by its free shipping), but we love its accuracy, durability, and reliability. Our bakers use it regularly for all kinds of cooking and baking, from homemade candy to hamburgers to roast chicken to bread. It's super-accurate and very fast, which means if bread isn't done, it can quickly be returned to the oven, before it starts to cool and potentially suffers damage to its texture.

If you turn a loaf of sandwich bread out of its pan immediately upon removing from the oven, it may collapse. But even if the bread doesn't collapse, handling it while it's super-hot and its structure is still pliable means that you can leave dents. Or your cooling rack can make dents, leaving deep impressions in the bottom of a hot loaf.
So — hands off! At least until your sandwich bread cools just a bit. We recommend at least 1 minute in the pan (perhaps using that minute to brush it with melted butter — see next tip).
And if the sandwich bread seems particularly soft, allow it to rest in the pan for up to 5 minutes. Longer than that and the side and bottom crust starts to steam, which will make it leathery rather than tender.
The easiest way to do this is simply to run a stick of butter over the top surface of the hot loaf. If the bread has cooled enough that butter won't melt on contact, then melt your butter and apply it with a pastry brush.

It's so tough not to simply slice off that golden, tender end piece, spread it with butter, and devour. But doing so allows much of the moisture in your sandwich loaf to evaporate. Think about it: There's liquid in the form of steam inside your sandwich bread, and it likes nothing better than to escape through that enormous gaping hole you've just made by cutting off its end.
In addition, as you're slicing sandwich bread, you're naturally compressing it just a bit, both with your hand, and with the knife you're running through it. It'll set in this compressed/compromised state, never regaining its full height.
Trust us: It's far better to wait until the bread is cool, and then slice off its end. Pop it into the toaster very briefly, just to warm; you'll enjoy that same just-baked experience.
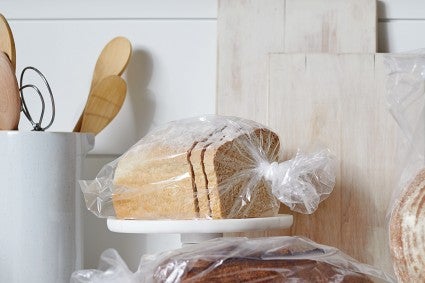
Once the bread is completely cool, slice it up and freeze anything you won't be using within a couple of days.
Your homemade sandwich bread doesn't include any preservatives or stabilizers, so from the moment it reaches its optimum quality (as soon as it's cooled to room temperature), it starts to go downhill.
When you need a slice of sandwich bread, remove one packet and thaw, still wrapped, at room temperature. It'll be nearly as good as the day it was baked. And if you toast it, you'll never know it had been frozen.
Of course, the bread will gradually deteriorate in the freezer over time, principally by becoming dry. But guess what? That process happens much more quickly in the fridge. Put your bread in the refrigerator, and it'll become stale overnight.
We love hearing from you — do you have any post-baking tips for preserving your homemade sandwich bread’s quality? Please share them in "comments," below.
Then apply these tips to your favorite sandwich bread recipe: We’re big fans of this Vermont Whole Wheat Oatmeal Honey Bread!
Editor's note, August 2023: We've slightly updated this post, including photography, to provide even more guidance for readers. Time to get baking!
Cover photo (Sourdough Sandwich Bread) by Rick Holbrook; food styling by Kaitlin Wayne.